6 Helpful AI Tools for Freelance Photographers

The most useful AI tool for a freelance photographer is not necessarily the one that produces the most dramatic before-and-after image. It is the one that removes a recurring bottleneck without creating more review work, compromising your style, or making promises you cannot deliver to a client.
These six tools address different jobs: choosing photographs, applying consistent edits, producing cutouts, enlarging files, searching an archive, and clarifying client briefs. Treat them as a shortlist, not a shopping list. A wedding photographer and a commercial product photographer probably should not build identical workflows.
Before committing to any tool, test it on a completed assignment. Compare its output with your approved deliverables, and count setup, uploads, checking, and corrections—not just the time the AI spends processing.
1. Narrative: Find the keepers in high-volume shoots
Most useful for: wedding, event, family, and portrait photographers who spend too much time comparing similar frames.
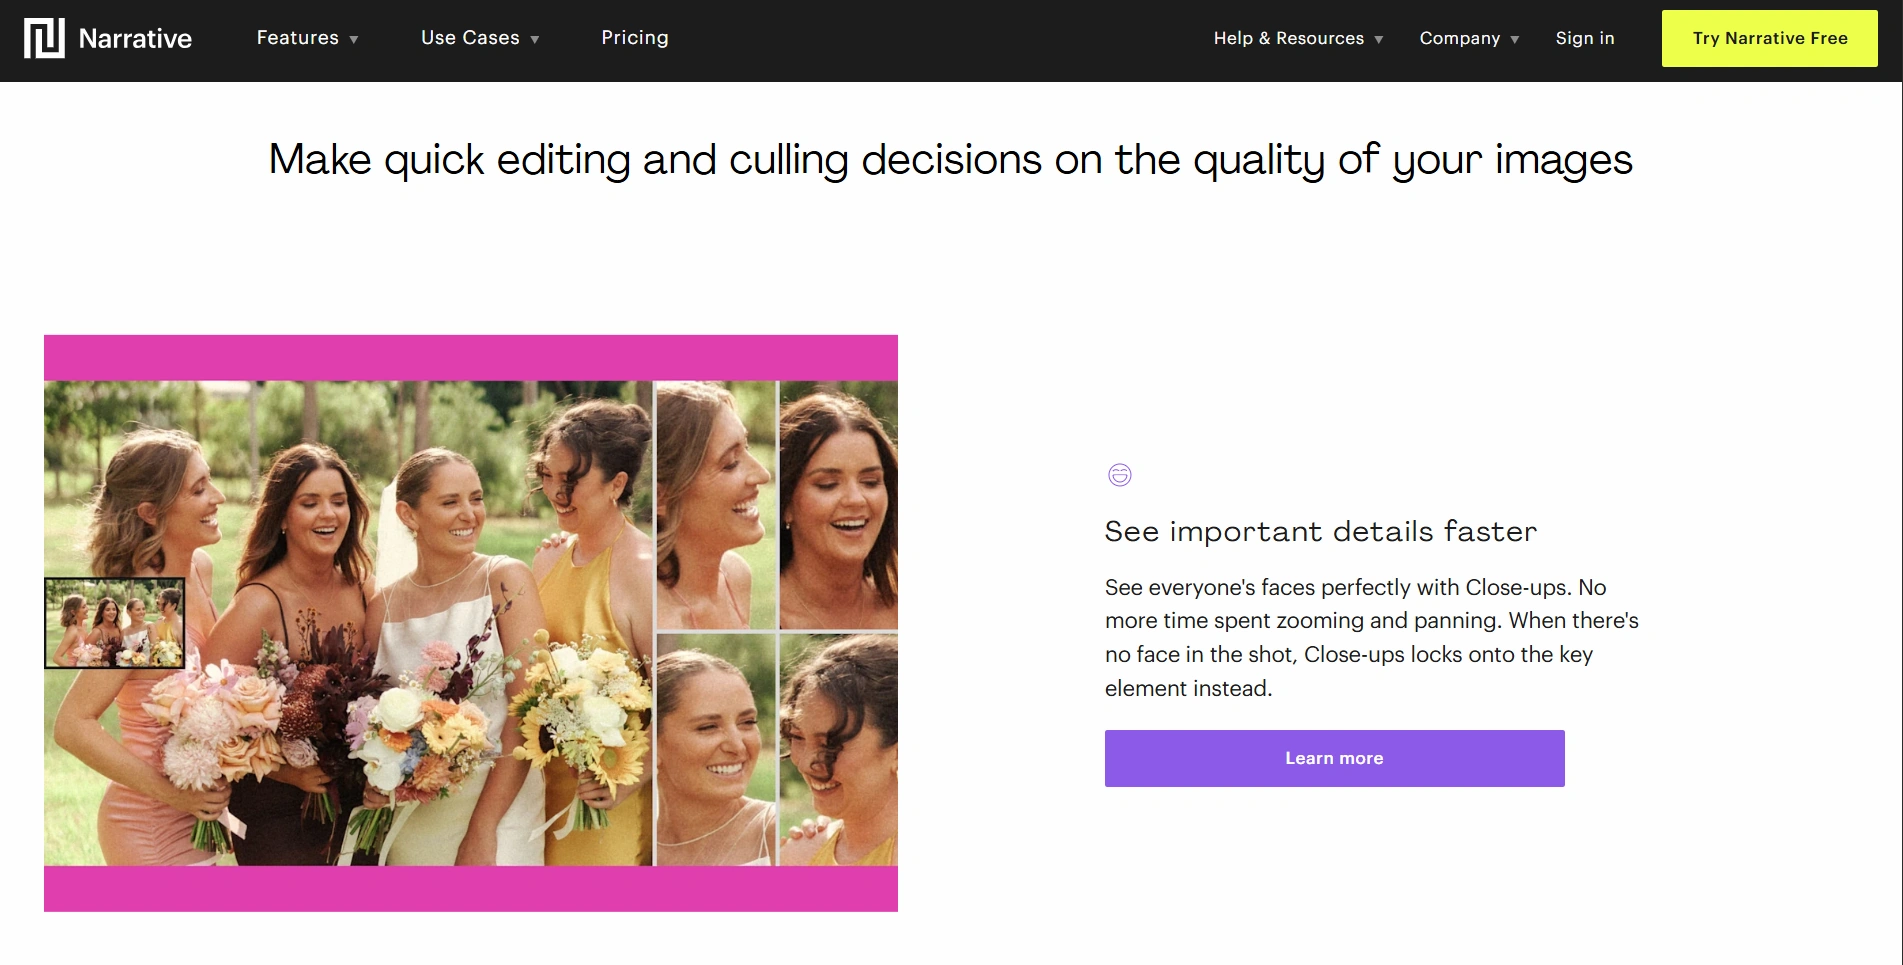
Narrative uses AI-assisted culling to help you assess photographs rather than simply handing you an unexplained final selection. Its eye and focus assessments flag potential problems, the Close-ups Panel makes faces easier to inspect, and Scenes View groups similar photographs with rankings. It runs on Windows and macOS and supports a handoff to Lightroom Classic.
The practical advantage is reducing repeated inspection. In a group portrait sequence, you need to evaluate several faces across several frames. Bringing those details into view is more useful than a generic “good photo” score.
Use technical assessments without losing the story
A sensible culling process separates three decisions:
- Check technical problems. Inspect important faces for missed focus, blinking, or expressions that do not suit the assignment.
- Choose the strongest moment. Review the whole frame for gesture, composition, interaction, and intentional movement.
- Check coverage. Make sure your final selection includes the people, products, locations, and moments the client requested.
Do not let an assessment become an automatic rejection rule. Closed eyes can belong in an intimate portrait; motion blur can communicate energy. The photographer’s job is to understand whether the image works in context.
During a trial, pay particular attention to photographs you would have wrongly discarded—not just how quickly you reach a shortlist. Keep your originals while testing, and compare the AI-assisted selection with a gallery you already delivered.
Narrative’s plan comparison is worth checking before subscribing because culling features vary by tier. Confirm that the plan you intend to buy includes the functions that made your trial worthwhile.
2. Imagen: Apply a consistent first-pass edit in your own style
Most useful for: photographers delivering substantial galleries who already have a recognizable approach to color and tone.
Imagen applies AI editing through profiles, including a Personal AI Profile trained on your previous work. For a Lightroom Classic workflow, it can provide a first pass on settings such as white balance, exposure, contrast, and color, with the adjustments available for your review afterward. Its value is not merely applying the same preset everywhere; it learns patterns in how you edit.
The training-data detail that matters
Imagen’s Personal AI Profile requirements specify at least 2,000 edited photographs in a consistent style using the same camera profile. You need the original photographs or supported previews with their editing information—not a folder of finished, exported JPEGs whose adjustments have been baked into the image.
The profile learns global editing decisions. It does not learn your local retouching work simply because that work appears in the finished photograph. That distinction prevents a common disappointment: expecting an editing-style profile to reproduce every finishing step.
If you do not have a suitable training collection, Imagen also offers ready-made profiles and a Lite Personal AI Profile built from a Lightroom Classic preset and a style questionnaire. You can test the workflow without first assembling thousands of examples.
For a meaningful test, include several lighting situations: daylight, indoor mixed light, flash, and backlighting. Compare skin tones and image-to-image consistency, then record how much correction remains. A profile that performs well on one outdoor portrait sequence may still need attention elsewhere.
Cull before uploading your editing batch. There is little benefit in processing frames you will never deliver. Imagen offers pay-as-you-go and subscription options, so compare costs against your monthly editing volume rather than the total number of photographs you shoot.
Processing involves uploads, so check whether that fits the assignment’s confidentiality requirements. Imagen’s getting-started guide explains the upload-and-review workflow, including the estimated editing cost shown before submission.
3. Bulk Background Remover: Turn product shoots into repeatable cutout workflows
Most useful for: product, e-commerce, and commercial photographers delivering transparent assets or standardized catalog images.
Bulk Background Remover: Automated Cutouts is a Photoshop plugin that automates two native Photoshop pathways: Select Subject & Remove Inverse and Remove Background Using AI. It does not introduce a proprietary segmentation model. Its usefulness comes from batching the surrounding production work as well: mask refinement, transparent trimming, canvas normalization, positioning, naming, and export.
The default Select Subject method validates the subject selection and creates a Reveal Selection layer mask. That matters when you want to refine a cutout rather than destructively delete its background.
For a RAW-based shoot, first export your selected edits to supported files such as TIFF or JPEG. Place the intended inputs directly inside the source folder; the plugin does not recursively process nested folders.
Example: A consistent product-image delivery
Suppose a client needs transparent product images on 2000 × 2000-pixel canvases, with each product resting on the same bottom baseline. A practical operation would be:
- Select Select Subject & Remove Inverse.
- Test the resulting masks. If residual edging is a recurring problem, try a small Contract Selection adjustment and check that it does not remove useful product detail.
- Enable Normalize Output Size, enter 2000 × 2000 in pixel mode, and choose Center / Bottom alignment.
- Export PNG files with the source name and final dimensions in the filename, then save the operation for future assignments.
Normalization first trims the transparent outer canvas. Oversized cutouts are proportionally reduced to fit; smaller cutouts are not enlarged. The result has consistent canvas dimensions and alignment, but not necessarily identical visual product size. An 800-pixel-tall cutout will remain smaller than a 1600-pixel-tall one on that canvas.
If the client wants tightly bounded assets instead, choose Crop To Remaining Pixels. It removes transparent margins rather than forcing a standard canvas. Crop and Normalize are mutually exclusive controls because normalization performs its own preliminary trim.
There are two important batch limitations. Remove Background Using AI can trigger a Photoshop-controlled blocking popup when detection fails, so Select Subject is the better starting point when unattended processing matters. Also, Skip Images Containing Transparency is a complete skip: those images are not refined, normalized, or exported.
Test difficult edges before running the full folder, and inspect results against both light and dark backgrounds. Original source files are closed without saving, but visible source layers are merged during preparation; PSD or PSB output should not be mistaken for preservation of the original layer stack.
4. Bulk Image Upscaler: Enlarge delivery files with useful batch safeguards
Most useful for: photographers who repeatedly receive requests for larger versions of existing images, cropped photographs, or older files.
Bulk Image Upscaler: Batch-Enhance Resolution automates folder-based enlargement and export inside Photoshop. Its AI options use Photoshop’s Generative Upscale functionality: Firefly Upscaler, Topaz Gigapixel, and Topaz Bloom, each in 2× and 4× variants. It also includes eight conventional Photoshop resampling methods for situations where generative processing is unnecessary or unsuitable.
Calculate the delivery requirement before choosing 4×
Ask for the required pixel dimensions, or the print dimensions and requested pixels per inch. A 12 × 8-inch print specified at 300 ppi requires 3600 × 2400 pixels. An 1800 × 1200-pixel source therefore needs a 2× enlargement in each dimension—not automatically 4×.
Changing only a resolution value does not add pixels. Adobe’s explanation of image size, resolution, and resampling is useful when a client’s request says “300 DPI” but leaves the actual delivery size unclear.
The plugin’s AI methods use fixed 2× or 4× factors and keep DPI set to AUTO. Conventional methods support custom factors from 1.1× to 25.0×, allow a user-entered DPI value, and do not require Generative Credits.
A particularly useful safeguard is automatic AI output-limit handling. If a requested 4× result exceeds the selected model’s limit, the plugin can switch that image to the corresponding 2× method. If 2× still exceeds the limit, it proportionally reduces the source only as much as necessary before processing.
Consequently, a 4× batch request does not guarantee that every output will be four times its original dimensions. Include actual width and height in the filename pattern, and verify the exported dimensions before delivery. The filename tokens reflect the resolved operation rather than blindly repeating the original request.
AI batches require a Generative Credits acknowledgement and a Photoshop version that supports the necessary functionality. Review Adobe’s Generative Credits guidance before budgeting for a large folder.
Finally, compare enlarged faces, lettering, fabric, and fine product details with the source. More pixels are not proof that missing detail has been recovered faithfully. If factual fidelity is central to the assignment, test conventional interpolation alongside the AI result and discuss acceptable changes with the client.
5. Excire Foto: Make an existing archive easier to search and reuse
Most useful for: freelancers with a growing archive who regularly need portfolio examples, previous client images, or photographs for a new presentation.
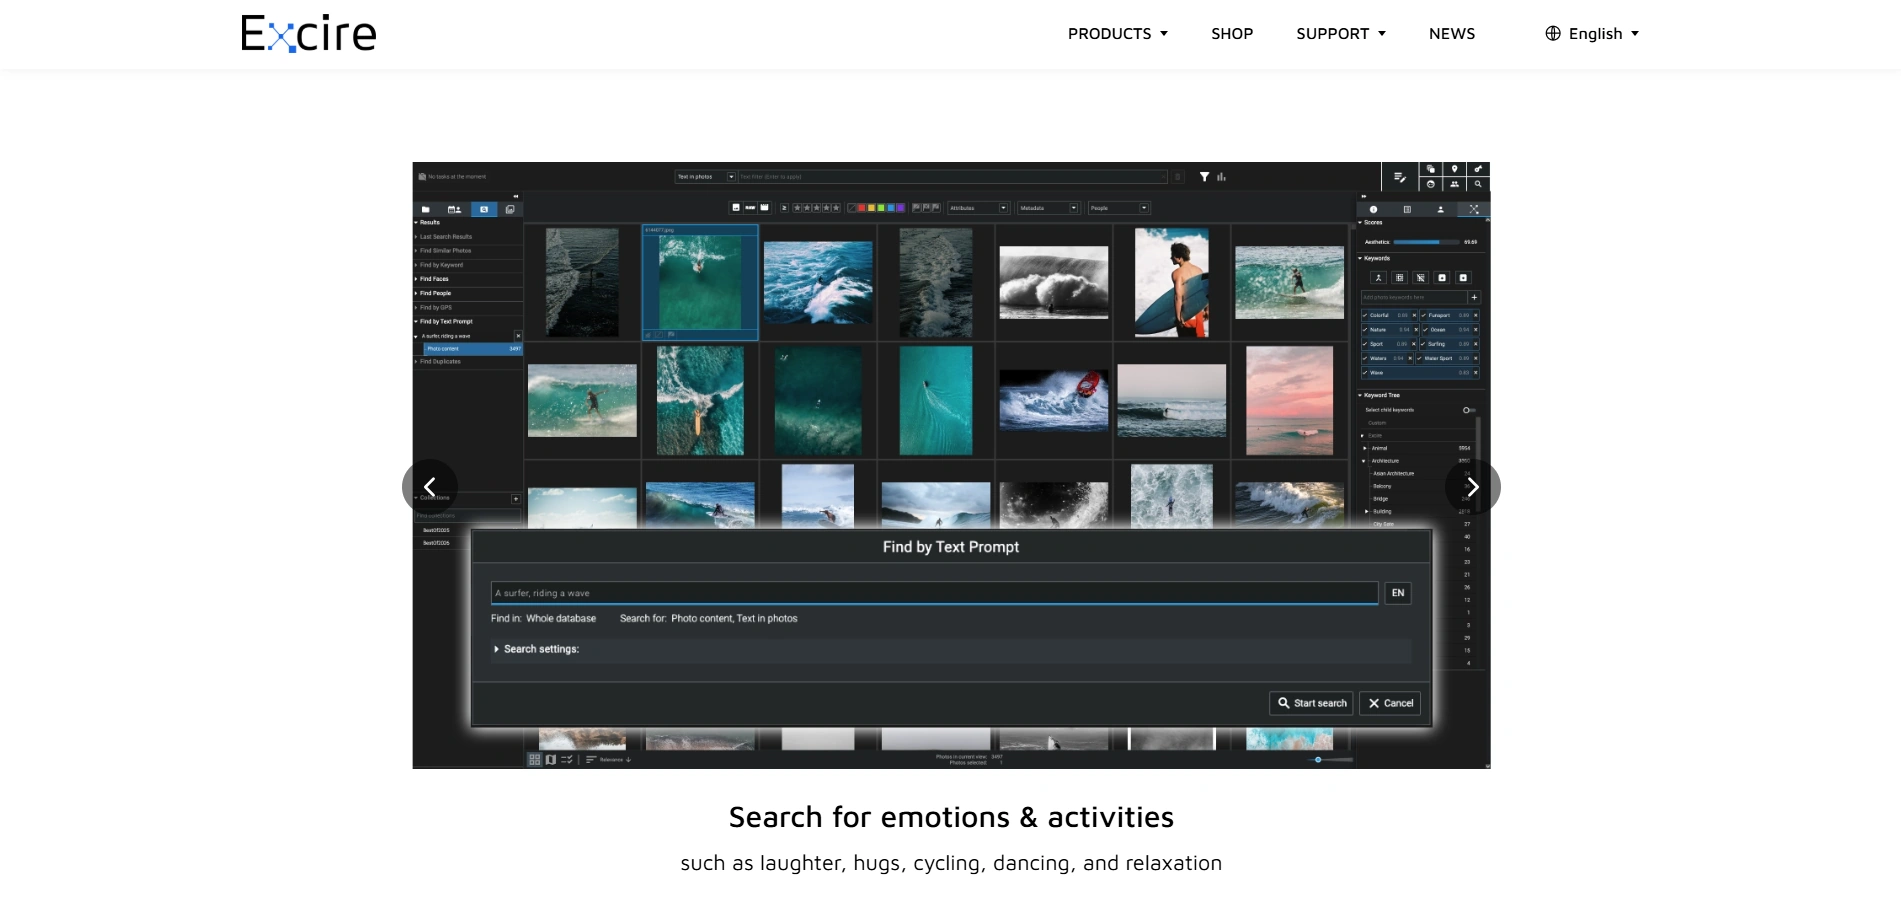
Excire Foto is a standalone photo-management application with AI-powered free-text search, automatic keywording, people search, and similarity search. Its processing runs locally on your computer. Unlike an editing tool, its main contribution here is helping you find photographs whose filenames and folder locations tell you very little about their contents.
That can be valuable before a shoot as well as afterward. If a prospective client asks whether you have photographed a particular type of environment or subject, you need relevant examples—not an afternoon spent opening old folders.
Build a retrieval test from real business questions
Before indexing your entire archive, try one substantial folder and a few searches you genuinely need:
- A portrait photographed beside a window.
- A particular person across different sessions.
- Images visually similar to a photograph the client liked.
- A scene or subject you remember but cannot locate by filename.
Use descriptions as starting points, not promises of exact results. Inspect the returned photographs for the composition, quality, and context you need.
Then add information AI cannot reliably supply from appearance alone: the correct client name, project identifier, approval status, and any restrictions you track on reuse. A photograph being visually suitable does not establish that you should put it in a public portfolio or send it to another client.
There is also an important interoperability detail. Excire’s keywords initially live in its database, not automatically in the image files. Its metadata-saving guide explains how Save Metadata writes information to photographs or XMP sidecars for other applications. Test that handoff on copies, and check append-versus-overwrite settings before writing across an existing archive.
Excire Foto is offered as a one-time purchase rather than a subscription. It is most compelling when retrieval is a recurring problem; a small, well-tagged archive may not justify another catalog. Keep both your photographs and catalog backed up regardless of how convenient searching becomes.
6. ChatGPT: Turn vague inquiries into usable production briefs
Most useful for: freelancers whose bottleneck is client communication, planning, or repeatedly writing the same business explanations.
ChatGPT earns a place here for work that happens around the photographs. Rather than asking it to “write a photography proposal,” use it to identify missing information, organize a shoot brief, and draft a concise response from facts you supply.
Consider an inquiry such as: “We need photographs of 12 skincare products, some lifestyle images, and content for our website and paid social. Ideally next month.” The danger is not poor wording. It is treating an incomplete request as a defined assignment.
A prompt that exposes gaps instead of inventing answers
Try this prompt with an anonymized inquiry:
“Using only the facts below, create a production checklist. Separate confirmed information from unanswered questions. Do not invent image counts, dates, fees, usage permissions, or delivery promises. Then draft an email under 150 words asking the five most important questions needed to define the assignment. Inquiry: [paste the anonymized request].”
Review whether the questions address the actual production uncertainties: how many final images are needed, which angles each product requires, who supplies styling and props, whether models or locations are involved, and what the shoot and delivery dates should be. Keep requested image usage explicit rather than allowing the draft to assume it.
Once the client answers, use the confirmed information to produce a shot-list draft and a preparation checklist. You still decide what is feasible, what to charge, and what commitments to make. Check every client-facing sentence before sending it.
For recurring work, ChatGPT Projects can keep related chats, files, and instructions together. Add sanitized service descriptions, approved delivery policies, and an example of your writing style. An instruction such as “Never invent a turnaround time; ask when it is missing” is more useful than a vague request to sound professional.
Check ChatGPT’s data controls before sharing business material. Turning off “Improve the model for everyone” prevents new conversations from being used for model training, but does not delete saved chats. Temporary chats are not used for model improvement while they remain temporary, although they may be retained for up to 30 days for safety. Neither option replaces permission to share confidential client information.
Start with whichever tool addresses your most expensive recurring task, and test it across more than one representative assignment. The useful measure is total time from source material to approved delivery—including corrections—alongside the software cost. Keep the tool if it improves that workflow without weakening the judgment your clients hired you to provide.