8 Repetitive Graphic Design Tasks You Can Automate

The concept is approved. The typography works. The client likes the composition. Now you need to update the same price in 40 templates, render 60 designs across six mockup scenes, and export everything in three sizes.
That is where graphic design automation becomes useful: not replacing your creative decisions, but repeatedly executing decisions you have already made.
The eight tasks below focus on image and template production in Photoshop. Each includes a practical way to define the job, an automation option, and the checks that should remain in your hands.
For fixed sequences of commands, Photoshop’s native Actions-based batch processing is a useful starting point. Record an action, then run it through File > Automate > Batch. Check the destination carefully: Save and Close can overwrite originals, while a separate destination folder supports a safer derivative-output workflow.
Before automating any of these tasks, assemble a small test folder containing representative exceptions—not just your easiest files. Include different orientations, resolutions, text lengths, or subject positions. Keep outputs separate from inputs. The folder-based plugins discussed below process supported files directly inside the selected folder, rather than searching nested subfolders.
1. Update recurring text across editable templates
Prices, dates, product names, promotional headlines, and URLs are excellent automation candidates when their replacements are already approved. The difficult part is often not changing the words; it is making the new words fit.
Start with a replacement map containing the original wording, the approved replacement, and its intended location. Give editable text layers meaningful names such as Headline, Price, and Product Name. A replacement restricted to Price is easier to control than a document-wide search for a number that might also appear in a description.
Decide which layout property can change
Different elements need different rules:
- A headline may need to keep its width and remain on one line, while font size changes.
- A description may need to keep its width and font size, while the number of lines changes.
- A label may need to keep its font size and line count, while its width expands or contracts.
Make that decision before running the batch. “Keep the design looking right” is too vague; “keep this headline on one line inside its original width” is an actionable requirement.
Bulk Text Replacer applies Original Text → Replacement Text pairs across editable Photoshop text layers, including layers inside nested groups. You can search all text layers or restrict a rule to an exact, case-sensitive layer name, then control whole-word matching, capitalization, and whether the complete layer must match.
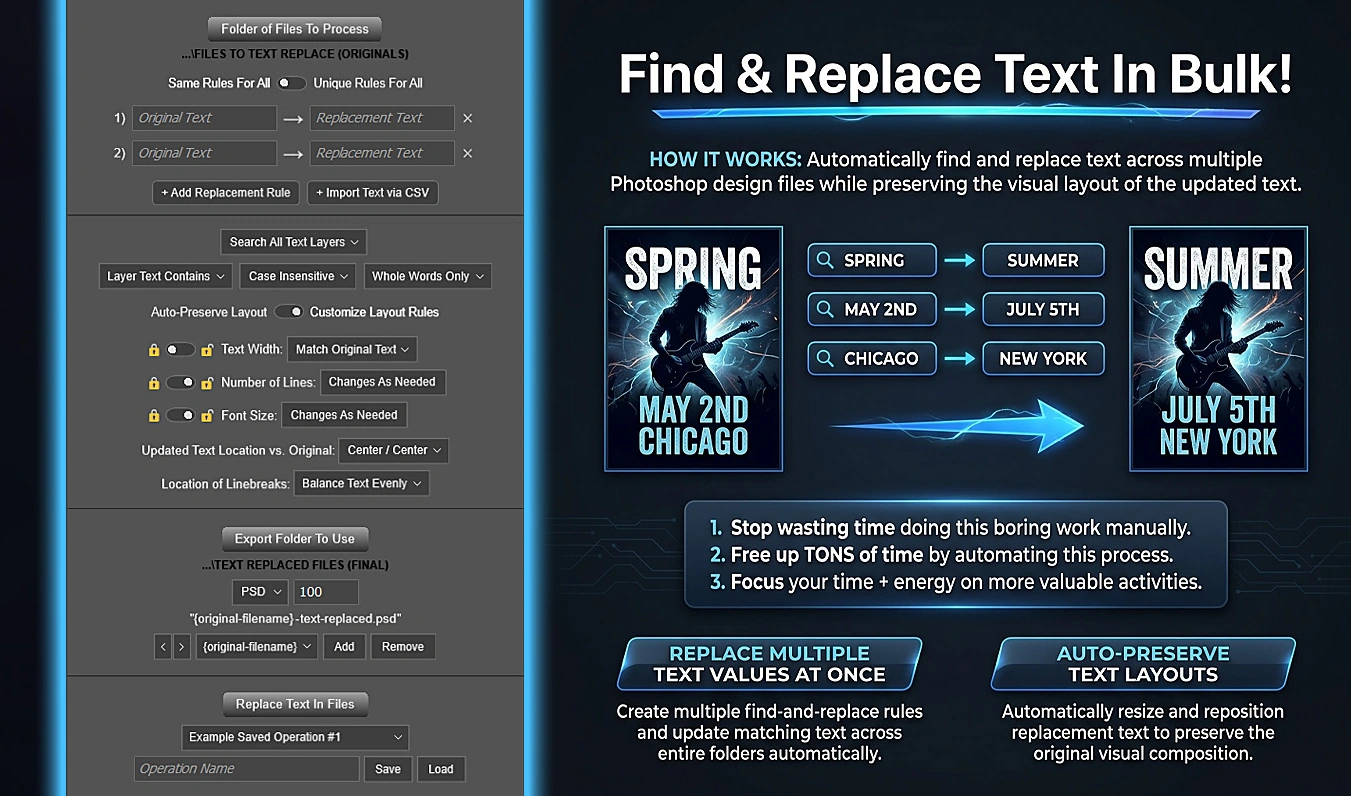
Its Auto-Preserve Layout mode keeps the original rendered text width, allows natural wrapping, adjusts font size toward the original rendered height, and restores the original center position. For stricter requirements, Customize Layout Rules lets you choose which properties remain fixed and which can change.
For a large replacement map, import a two-column CSV with the exact headings ORIGINAL TEXT and REPLACEMENT TEXT. Treat this as a mapping table, not a per-record graphics generator: every configured replacement pair is evaluated against each source document.
Avoid overlapping replacements on the same layer
The plugin evaluates rules against the captured original text, not text created by earlier rules. RED → BLUE followed by BLUE → GREEN therefore does not create a replacement chain. When several rules match the same original layer, a later rule can supersede an earlier modification.
For predictable results, target distinct layers or replace the complete intended phrase in one rule. Review the longest replacement, the shortest replacement, and every price or date before approving the full run.
This task requires editable text layers. Accepted batch inputs are PSD, PSB, TIFF/TIF, and PDF, but the extension alone does not guarantee editable text. Files without text layers are skipped; documents with text layers but no matching wording can still be exported.
2. Generate mockups for every design and scene
Mockup production multiplies quickly. Forty artworks across six scenes means 240 artwork-and-template combinations before you create any additional delivery sizes.
The useful automation boundary is clear: approve the scenes and placement behavior first, then automate the combinations. Choosing which scene best presents a product remains a design decision; repeatedly inserting approved artwork into that scene does not need to be.
Smart Objects make this possible. Adobe’s Replace Contents documentation explains: “The new file replaces the original, retaining all transformations intact.” A properly constructed template can therefore preserve its mockup perspective when you change the artwork.
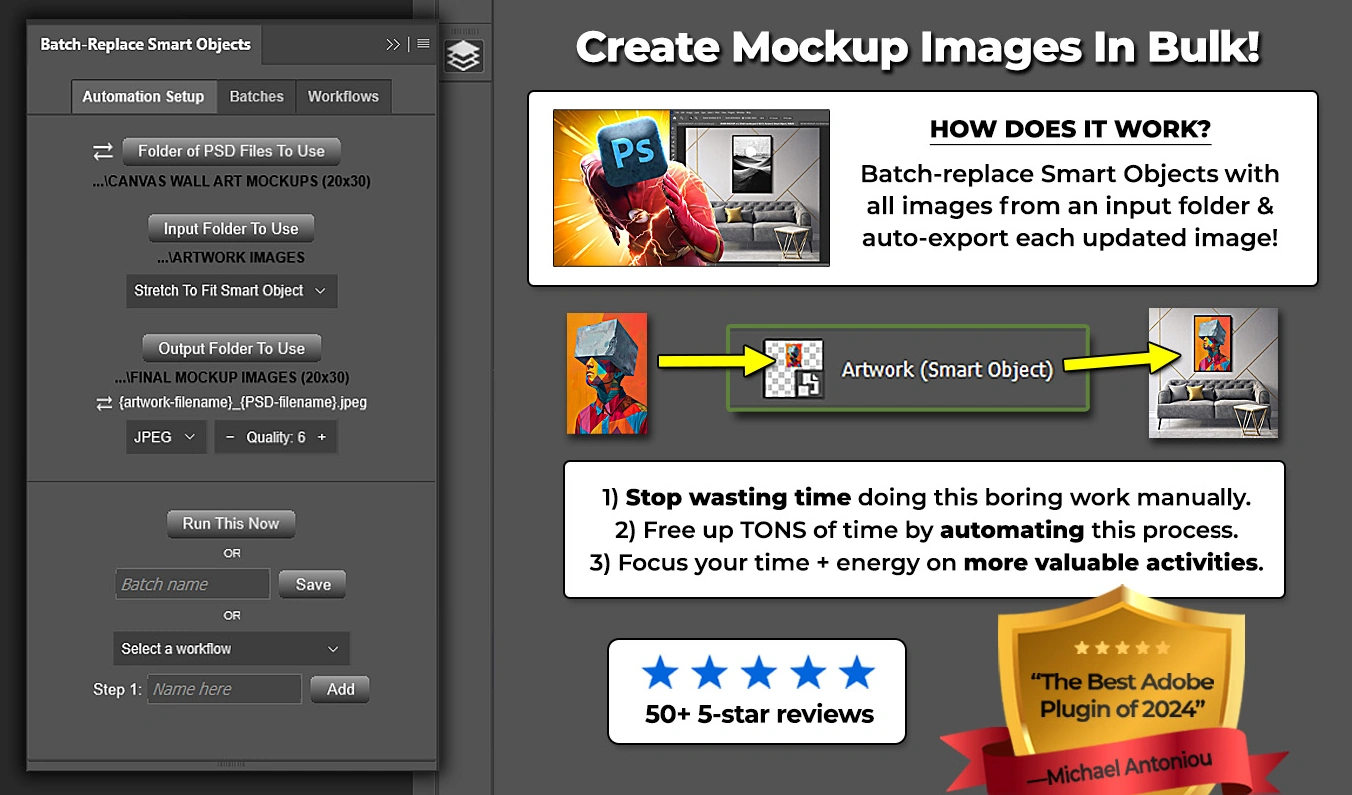
Batch-Replace Smart Objects processes an artwork folder against either one PSD/PSB template or a folder of templates. Outputs automatically include both the artwork name and the mockup-template name, making a large generated collection easier to trace.
Prepare the template before multiplying it
- Inspect the Smart Object’s internal canvas dimensions and resolution. These—not its apparent size in the outer mockup—provide the placement reference.
- Remove unnecessary transparent space that would make replacement artwork occupy an unexpectedly small portion of that canvas.
- Convert the design layer to a Smart Object before applying the outer perspective or distortion.
- For templates with several Smart Objects, select the intended targets and save the template in that state.
A template containing exactly one Smart Object is targeted automatically. If several targets are selected, the same current artwork goes into all of them before one completed mockup is exported. That is useful for repeated product instances, but it is not a way to assign different designs to different package faces during one iteration.
Choose placement according to the artwork, not convenience. Contain Inside Smart Object preserves the whole design and its proportions, potentially leaving space. Fill Smart Object & Crop preserves proportions and covers the area, potentially losing edge content. Stretch To Fit covers the area without cropping the source, but can distort it. Place Original Image is appropriate when assets are already prepared to the required dimensions and resolution.
Use folder-of-templates mode when all scenes share one operation configuration. Use the plugin’s multi-step Workflows when scenes need different placement or export settings—for example, contained artwork in a frame and full-area coverage on another product.
Test every template with at least one artwork whose proportions differ from the placeholder. A faulty template can otherwise reproduce the same placement error across an entire collection.
3. Remove backgrounds and standardize product cutouts
Background removal is rarely the whole production task. You may also need to trim empty canvas, clean up an edge, place the subject on a standard-sized canvas, and align every product consistently.
Define those requirements separately. A tightly bounded cutout, a square transparent canvas, and a product that occupies a consistent proportion of that canvas are three different outcomes.
Bulk Background Remover automates two Photoshop-native pathways: Select Subject & Remove Inverse, which creates a subject-revealing layer mask, and Remove Background Using AI, which invokes Photoshop’s own Remove Background functionality.
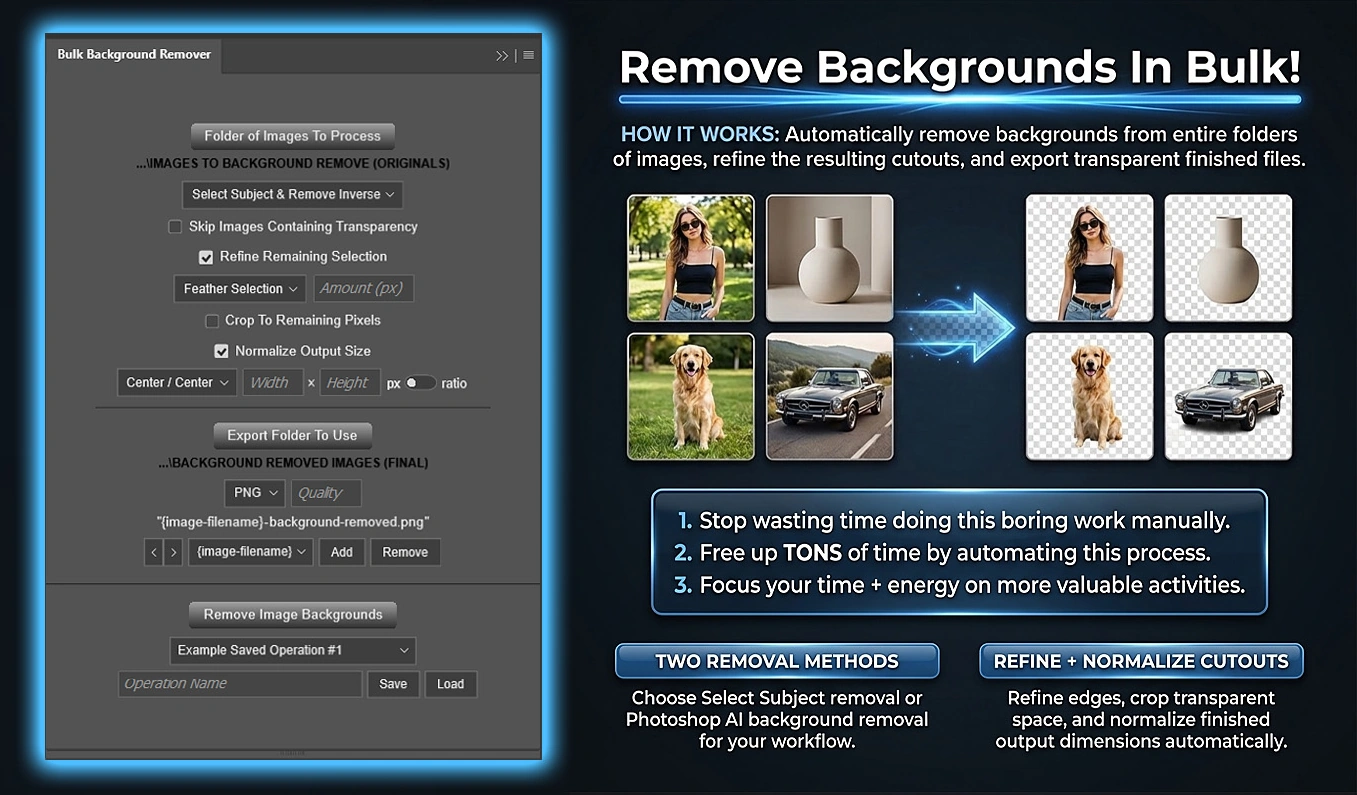
For unattended work, Select Subject & Remove Inverse is the more suitable starting point. The AI method can trigger a Photoshop-controlled popup when it cannot identify a background, requiring manual acknowledgment. The plugin warns about this before an AI batch begins, and it does not automatically switch between methods.
Specify the finished asset, not just the removal command
A catalog-cutout recipe might use Select Subject, optional edge refinement, Normalize Output Size at 2000 × 2000 pixels, Center / Bottom alignment, and PNG export. That establishes a consistent canvas and baseline for the products.
However, pixel normalization only scales oversized cutouts down to fit. It does not enlarge smaller ones. An 800 × 600 cutout on a 2000 × 2000 canvas remains 800 × 600. If consistent apparent product size is essential, inspect that separately rather than assuming identical canvas dimensions guarantee it.
If you only need compact transparent assets, use Crop To Remaining Pixels. If you need a particular canvas shape without cropping the subject, ratio normalization expands transparent canvas to the requested proportion.
Keep a manual exception path for difficult edges. Test cutouts against both light and dark backgrounds, and include hair, fine details, translucent regions, and enclosed gaps in your pilot set. Adobe’s Refine Hair instructions provide a useful follow-up for selections requiring more attention than a uniform Feather, Contract, or Expand adjustment.
Two operational details matter: Skip Images Containing Transparency is a true skip, so those files are not exported; and visible source layers are consolidated before removal, so PSD/PSB output should not be treated as preserving the original multilayer composition. Keep the layered originals separately.
4. Create aspect-ratio crops and consistent transparent margins
Turning one asset into square, portrait, and landscape versions is repetitive—but cropping is still a composition decision. Automate it when you can express the retained region as a reliable rule.
Separate the shape requirement from the final pixel dimensions. Cropping a 4000 × 3000 image to 4:5 produces a 2400 × 3000 crop when the full height is retained. It does not automatically produce 1080 × 1350 pixels. That final sizing is a subsequent resizing task.
Bulk Image Cropper can generate several independent crop variants in one run. Each rule starts from the original source state, so a 16:9 version is not created from an already-cropped square version.
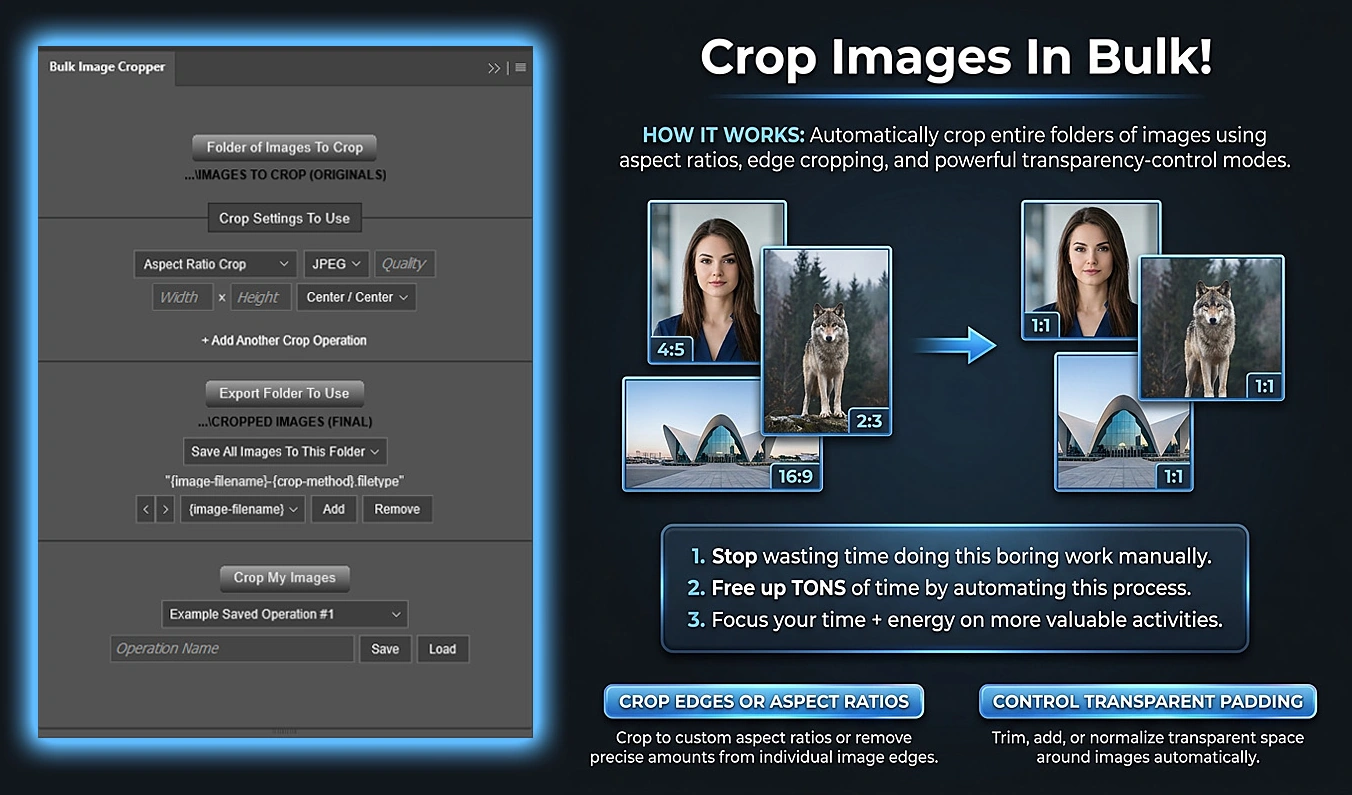
For photographs, its Aspect Ratio Crop uses nine alignment positions to determine which region survives. Choose Left / Center for a collection whose subjects consistently sit toward the left, rather than accepting a center crop that repeatedly removes important content.
When subject positions vary, divide the collection into composition groups or handle exceptions manually. A fixed alignment is not an instruction to find and protect whichever subject happens to matter.
For transparent assets, define what the margins should do:
- Trim Excess Transparency sets maximum padding. With a 20-pixel maximum, an existing 10-pixel margin stays at 10.
- Add Transparent Padding sets minimum padding. With a 20-pixel minimum, an existing 40-pixel margin stays at 40.
- Normalize Transparency establishes target padding after tightly trimming the visible content.
That distinction prevents an easy mistake: choosing a maximum or minimum operation when you actually want consistent spacing. For proportionally normalized margins, percentage padding is measured from the tightly trimmed visible-content dimensions.
Review variants together rather than opening them randomly. Adobe Bridge’s PDF contact-sheet workflow can arrange outputs in a grid and include filenames. Use it to spot clipped subjects and inconsistent framing across the collection, then inspect questionable files at full size.
5. Export multiple image sizes without repeating Image Size
Once the composition is approved, resizing is one of the clearest automation opportunities. The same master may need a thumbnail, a content image, and a larger detail view.
Write a delivery specification before opening the resize dialog. Record the required dimensions, whether proportions must be preserved, the output format, any print-resolution requirement, and how variants should be named and grouped.
The dimensional rule should match the actual requirement:
- Use an exact width with automatic height when a content column controls the width.
- Use an exact height with automatic width when vertical size is the constraint.
- Use a longest-edge target for mixed portrait and landscape images.
- Use exact width and height only when both are mandatory and the source proportions are already suitable—or distortion is acceptable.
Bulk Image Resizer lets you stack independent resize rules with their own dimensions, DPI, resampling method, format, and applicable quality settings.
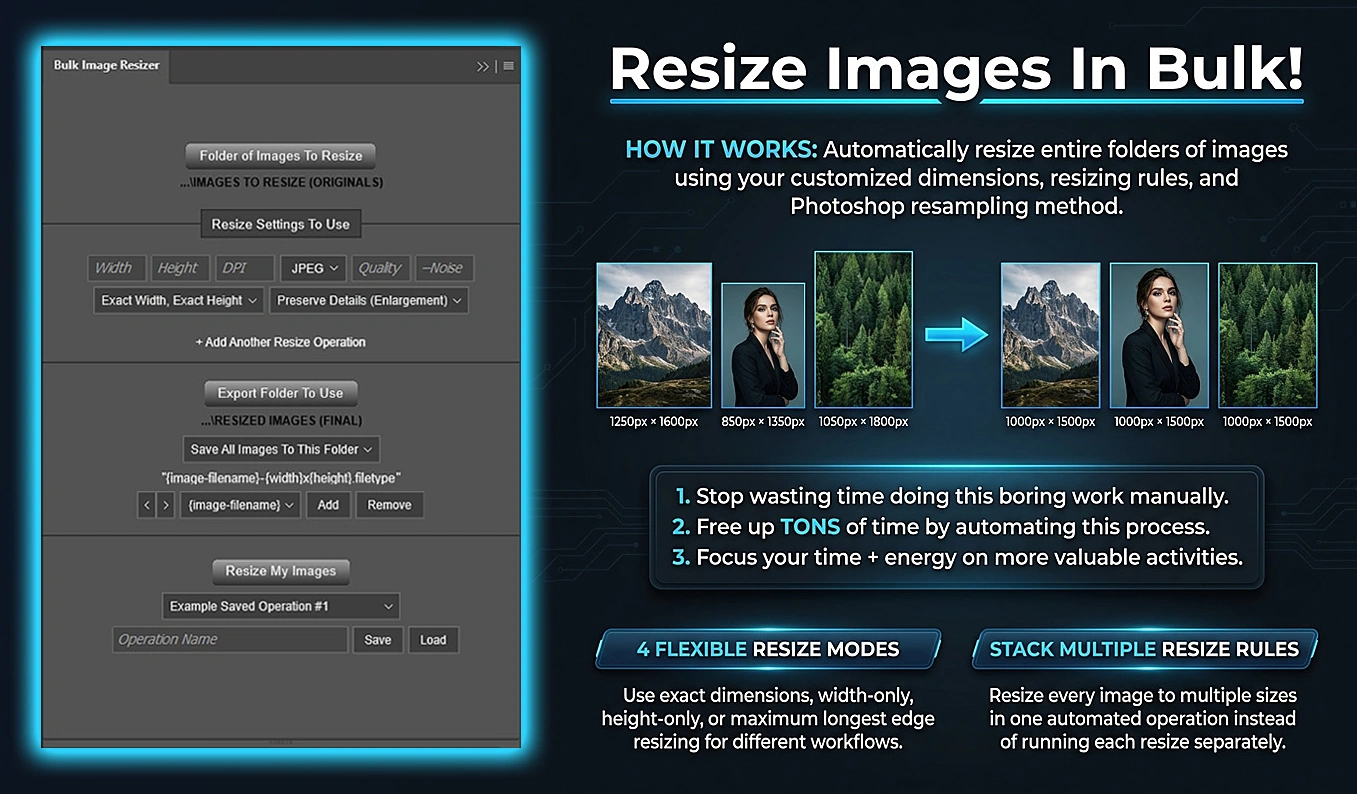
For example, 80 approved images could each receive 640-, 1280-, and 2400-pixel-wide variants with automatic height, producing 240 outputs. Each variant is derived from the original source state rather than repeatedly resizing the previous output.
Group outputs by resize rule when handing standardized sets to a developer, or by source image when handing a complete variant package to a client. Include actual output dimensions in filenames so a file’s purpose remains apparent outside its original folder.
Choose resampling deliberately. Adobe’s resampling reference distinguishes Bicubic Sharper for reduction from Nearest Neighbor for hard-edged or pixel-art graphics. Those are different needs; a photographic resize recipe should not automatically become your pixel-art recipe.
Watch one subtle limitation: Maximum Longest Edge sets the longest edge to the target, even if that enlarges a smaller source. It is not a downscale-only ceiling. If enlargement is prohibited, stage appropriately sized inputs separately.
For website delivery, coordinate the variants with the developer. The web.dev responsive-images guide explains how different image sizes can be supplied through srcset and sizes so browsers can select an appropriate resource. Producing smaller variants is only useful if the site actually serves them; the resizing plugin does not implement that website markup.
6. Apply output sharpening to the right regions
Sharpening is repeatable once you have approved its settings for a particular image class and delivery size. It becomes risky when one aggressive recipe is applied indiscriminately to portraits, product photographs, textured artwork, and already-sharpened assets.
For an output workflow, test sharpening on final-sized copies. Inspect edge transitions, fine texture, smooth regions, and small lettering—not just the image’s overall impression when zoomed out.
Adobe’s Smart Sharpen guidance gives a useful inspection rule: “Zoom in to 100% to accurately see the sharpening effect.” Compare the result at its intended viewing size as well.
Bulk Image Sharpener automates Unsharp Mask and Smart Sharpen, with targets for the entire image, the Photoshop-detected subject or background, an exactly named layer, or a top-level layer-stack position.
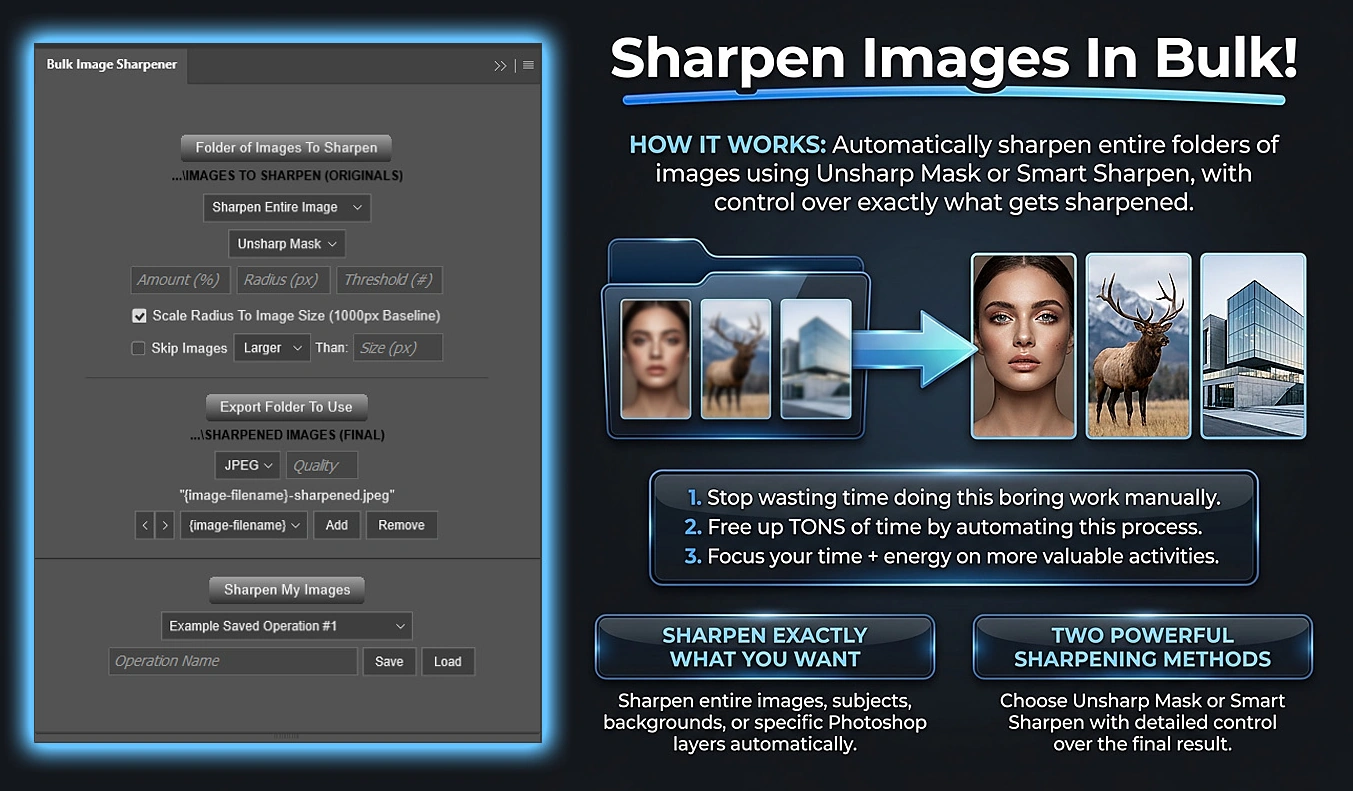
That targeting can be valuable in structured PSD production. A consistently named Product layer can receive sharpening without deliberately applying the same filter to every other element. Named-layer matching is exact and case-sensitive, and the search includes nested groups.
Make radius size-aware, but keep the test content-aware
The optional 1000-pixel-baseline scaling multiplies the configured radius by the document’s longest edge divided by 1000. A 1.5-pixel baseline radius becomes 3 pixels on a 2000-pixel-long image and 0.75 pixels on a 500-pixel-long image.
For Smart Sharpen, the main, shadow, and highlight radii all scale. Amount and the other non-radius controls remain fixed. The reference is the full document size, not the selected layer’s bounds.
This adapts sharpening geometry; it does not determine whether skin, fabric, noise, or fine print needs the same treatment. Build separate approved recipes when the content differs substantially, and check for halos or excessive texture before saving a reusable operation.
Also account for fallback behavior. If subject detection fails or a requested layer cannot be found, the plugin sharpens the entire visible image instead. If your requirement is “never sharpen the background,” that fallback needs explicit review. Whole-image preparation also merges visible layers, so retain the original layered master rather than assuming every layered export preserves the input structure.
7. Add consistent branding and proof watermarks
Watermarking becomes repetitive when every exported image needs the same logo, copyright line, or proof overlay. The first decision is editorial: are you creating branded publication assets, client proofs, or both?
Keep clean masters separate from watermarked derivatives. A corner logo may suit a publication asset; a repeating proof mark may suit an approval gallery. They should not accidentally become the same deliverable.
Bulk Image Watermarker supports both text and image sources, with layouts ranging from a single aligned mark to repeated patterns and crosshatch overlays.
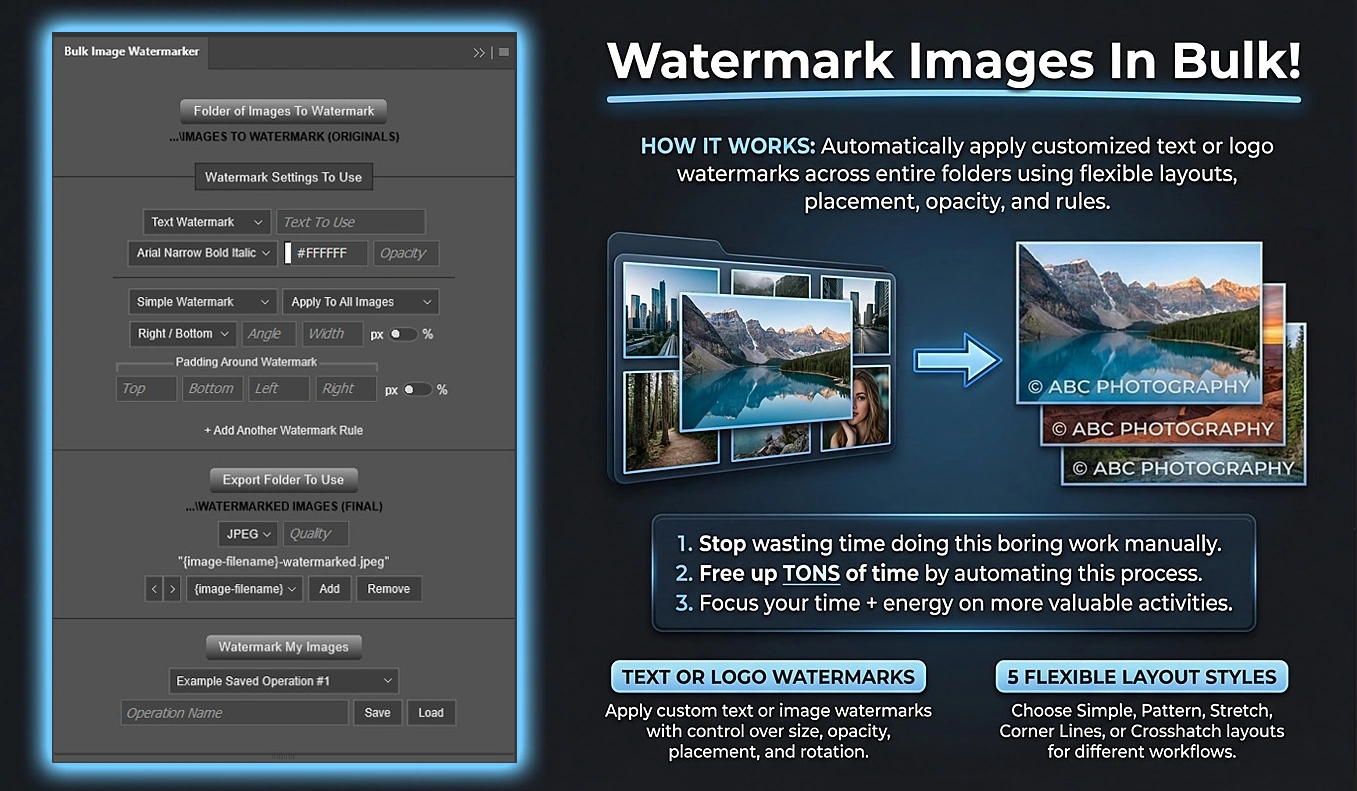
For a mixed-resolution collection, a Simple Watermark using percentage width is a useful starting point. A logo at 12% of image width becomes 240 pixels wide on a 2000-pixel image and 120 pixels wide on a 1000-pixel image. Percentage padding can maintain proportional distance from the edges. Approve opacity and placement against representative backgrounds before running the folder.
Conditional rules can make the operation more selective. A logo could apply to every image while additional PREVIEW text applies only when the filename contains preview. Rules can also use orientation and histogram-based average brightness.
Average brightness needs careful interpretation: it describes the image as a whole, not the particular patch beneath the logo. A mostly dark photograph can still have a bright bottom-right corner. Light/dark watermark rules are useful starting points, but local visibility still deserves inspection.
Unlike independent crop and resize variants, qualifying watermark rules are cumulative. A logo rule and a proof-pattern rule can both modify the same working image, which is exported once. Conversely, if no rule applies, that source produces no export. Check rule coverage before expecting one output for every input.
Keep attribution information separate from the visible overlay. The IPTC Photo Metadata User Guide explains fields such as Creator, Credit Line, and Copyright Notice. Maintain that information in your asset workflow and verify it in delivery files rather than assuming a visible watermark carries it. The discussed plugins’ WebP save configurations omit XMP and EXIF metadata.
8. Compress deliverables to a filesize budget
Compression is a good final-stage automation task when the delivery requirement is explicit. “Make the images smaller” could mean smaller pixel dimensions, fewer bytes, or both. Decide which variable is allowed to change.
Prepare the appropriate dimensions first, then establish a filesize or quality goal. If exact dimensions are mandatory, do not quietly allow a compression process to reduce resolution just to meet a byte budget.
Bulk Image Compressor provides three distinct strategies for JPEG or WebP output:
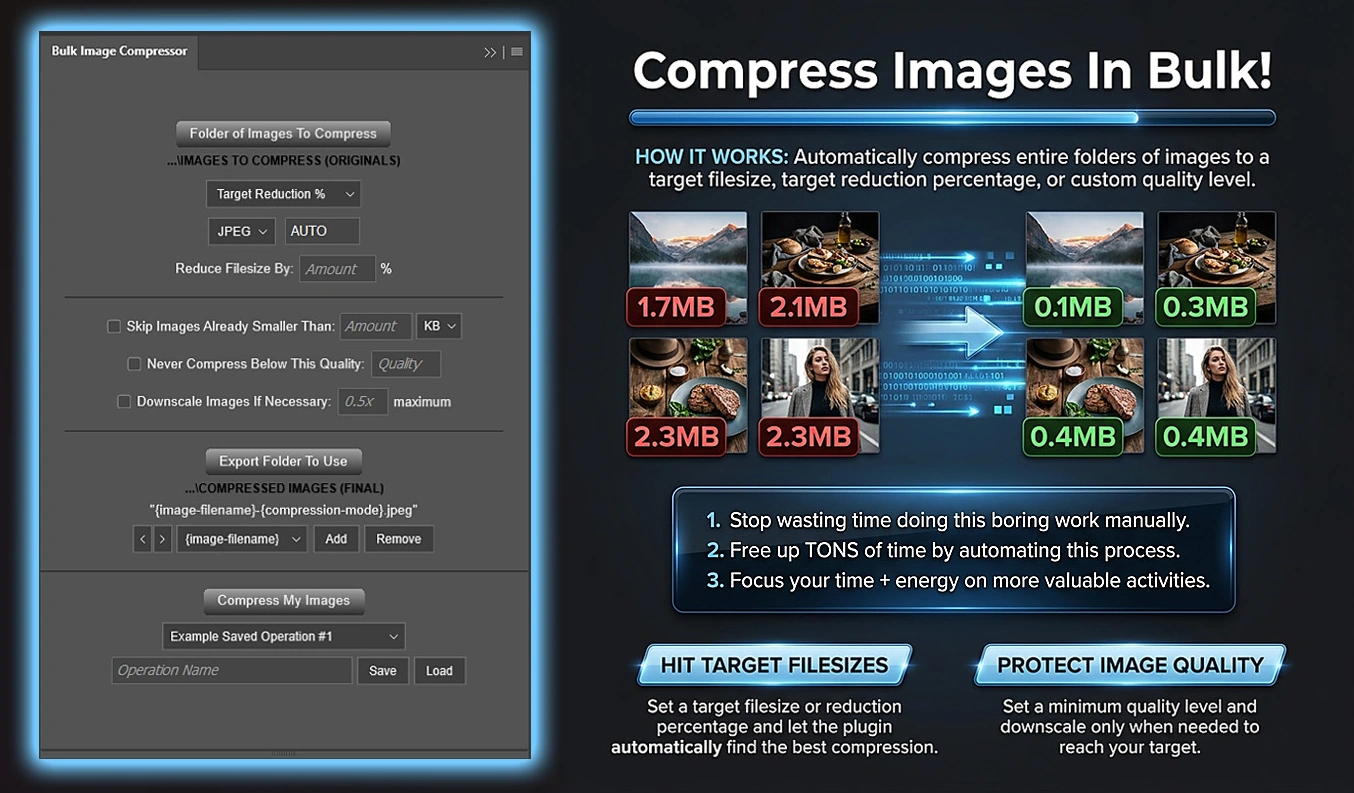
- Standard Compression applies a chosen quality, with optional fixed proportional downscaling.
- Target Reduction % calculates a separate goal from each source’s original filesize. A 75% reduction aims to leave approximately 25% of the original size.
- Target Filesize applies one KB/MB goal across the batch.
The two target modes encode temporary candidates, measure their actual saved filesizes, and search for a suitable quality. You can establish a minimum quality and optionally allow bounded downscaling if quality adjustment alone cannot reach the target.
Distinguish a target from a hard upload limit
Target-based compression treats results within ±10% as successful. A 500 KB target therefore is not a guarantee that every file will be below a strict 500 KB upload cap.
For that kind of limit, leave headroom. A 450 KB target has an accepted band of 405–495 KB, but verify the final files anyway: if the configured quality and downscaling guardrails prevent a match, the closest permitted result can still fall outside the target band. The plugin calculates KB as 1024 bytes, so compare actual byte counts when the destination defines its limit differently.
Set the resolution guardrail intentionally. Allowing downscaling as far as 0.75x means the adaptive system may search between full size and 75% of the original width and height; it does not automatically shrink every image to that value. Leave adaptive downscaling disabled when the pixel dimensions must remain unchanged.
The skip-small-files feature has a different consequence: files below the threshold are copied unchanged, retaining their source formats and filenames. If the delivery folder must contain only JPEG or WebP, those bypassed files need a separate check.
For website work, test the published page with Google PageSpeed Insights, not just the exported assets in isolation. Chrome’s Improve image delivery guidance helps interpret unnecessarily large image downloads. There is no single filesize target that proves a page is delivering images efficiently.
Turn one successful batch into a reusable production process
You do not need to automate all eight tasks at once. Start with the recurring job whose rules are easiest to specify and whose outputs are easiest to verify. Resizing approved assets is often simpler to validate than conditional masking or text recomposition.
For a typical image-delivery job, a sensible sequence is approved master → crop if needed → resize → sharpen if needed → watermark proof copies if required → final compression. Keep lossless or layered intermediates where practical instead of repeatedly re-saving lossy delivery files between stages.
These are separate processing operations, not a promised suite-wide automatic pipeline. Use clearly separated stage folders when passing outputs into the next task. Save configurations only after the pilot succeeds, and record expected outputs, actual outputs, and deliberate exclusions. Missing files caused by skip rules or unmatched watermark conditions should not be confused with failed exports.
The goal is not to remove every click from graphic design. It is to make approved production rules repeatable—so your attention goes to exceptions, composition, and decisions that still need a designer.