9 Useful Tools for Print-on-Demand Sellers


A print-on-demand catalog can involve surprisingly little printing and a remarkable amount of repetitive production work: researching keywords, preparing artwork, making size variants, exporting mockups, creating products, and keeping everything matched to the correct listing.
The useful tools are the ones that remove a specific bottleneck without creating a new one. This list covers nine distinct jobs, from choosing a commercially sensible collection to turning approved designs into a well-organized product catalog. Some recommendations are especially relevant to Etsy and Printify sellers; others work across different storefronts and fulfillment setups.
You do not need all nine immediately. Start with the task that consumes the most time or causes the most expensive mistakes. The four Photoshop plugins below require Photoshop; the research, pricing, product-creation, and catalog-management tools serve separate roles.
1. eRank — Research Buyer Keywords and Seasonal Demand
eRank is useful before you make another hundred designs. Its keyword research, competition data, and trend tools help Etsy sellers investigate what shoppers are searching for and how that interest changes over time.
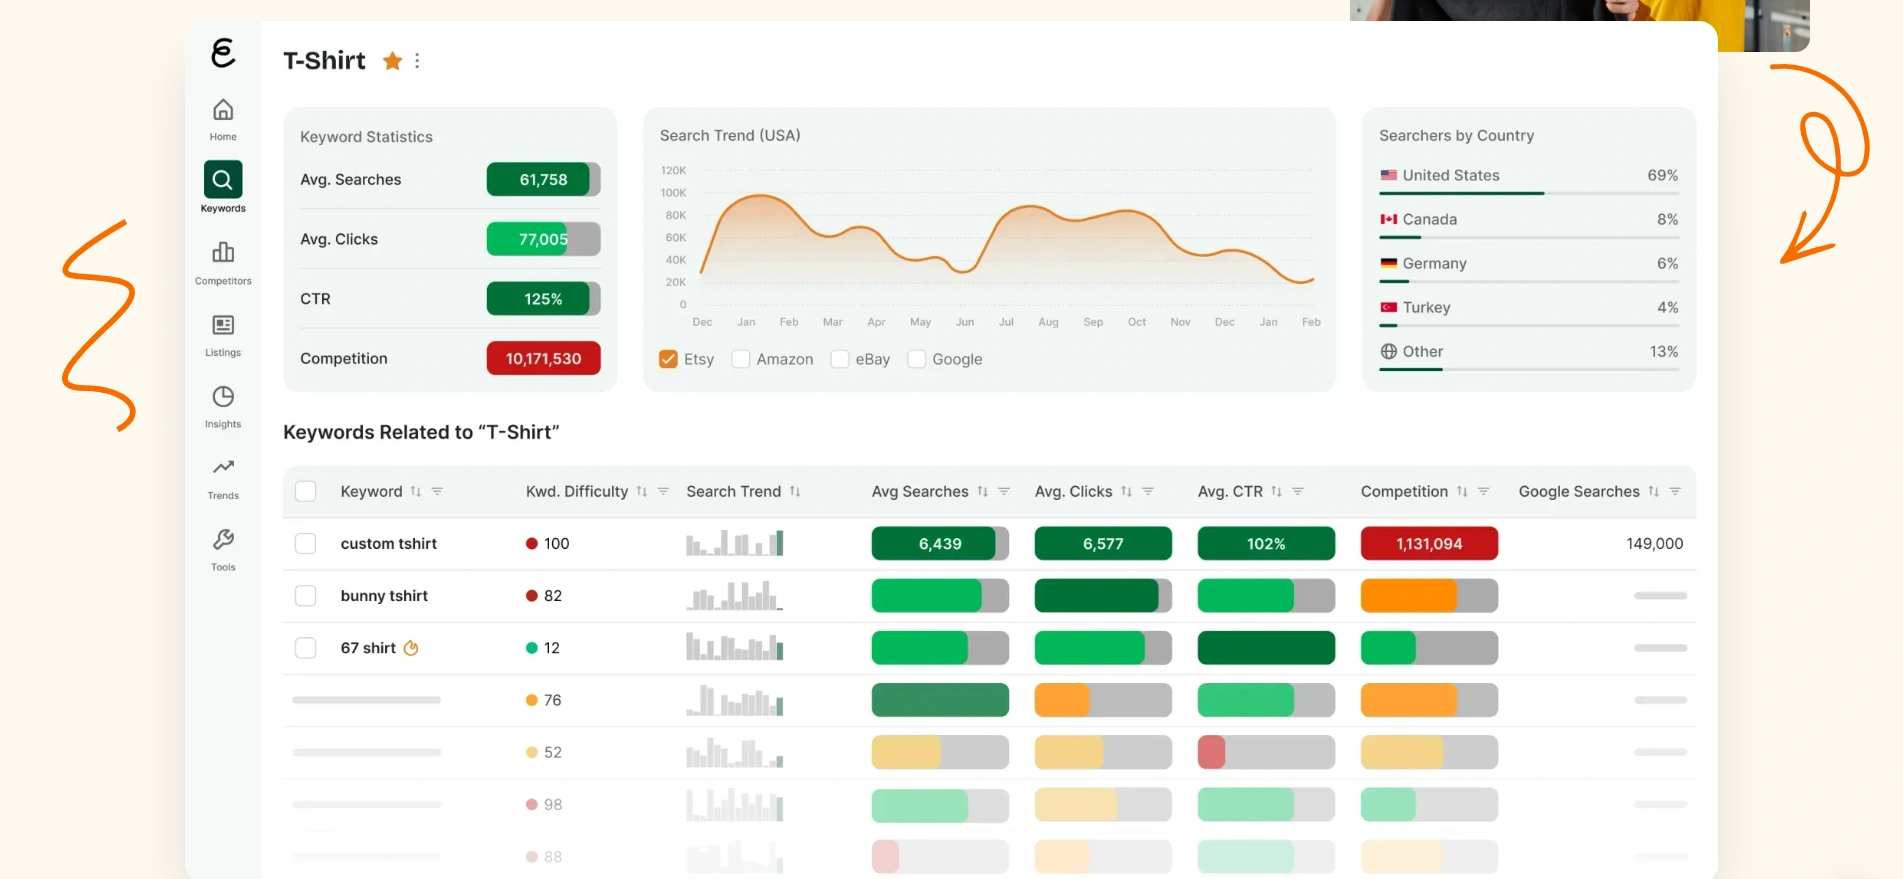
The productive question is not simply “What is trending?” It is “Which searches describe products I can make distinctively and sell profitably?” A botanical artwork seller might investigate “botanical wall art,” “vintage flower poster,” and “cottagecore print.” Those are research candidates, not interchangeable labels to paste onto every listing.
Use a short research sequence:
- Choose the country relevant to your target buyers.
- Compare several phrases describing the product, subject, style, or intended recipient.
- Look at historical search patterns, not just the latest spike.
- Inspect marketplace results to understand the products and visual styles shoppers encounter.
- Save relevant terms in a keyword list for the collection.
eRank’s Monthly Trends guidance is particularly useful for distinguishing sustained interest from short-lived excitement. Treat estimated search activity as directional evidence, not a forecast of how many sales your artwork will make.
Turn the findings into a collection brief: target buyer, product type, visual direction, primary search phrases, and seasonal deadline. That brief should guide both the artwork and the listing copy. Research becomes much more valuable when it changes what you produce, rather than merely decorating titles after production is finished.
2. USPTO Trademark Search — Screen Names, Slogans, and Branding
The free USPTO Trademark Search belongs near the beginning of a US-focused POD workflow, especially for slogan apparel, branded collections, and designs containing distinctive wording or logos. It lets you investigate federally registered and pending trademarks before investing in a collection.
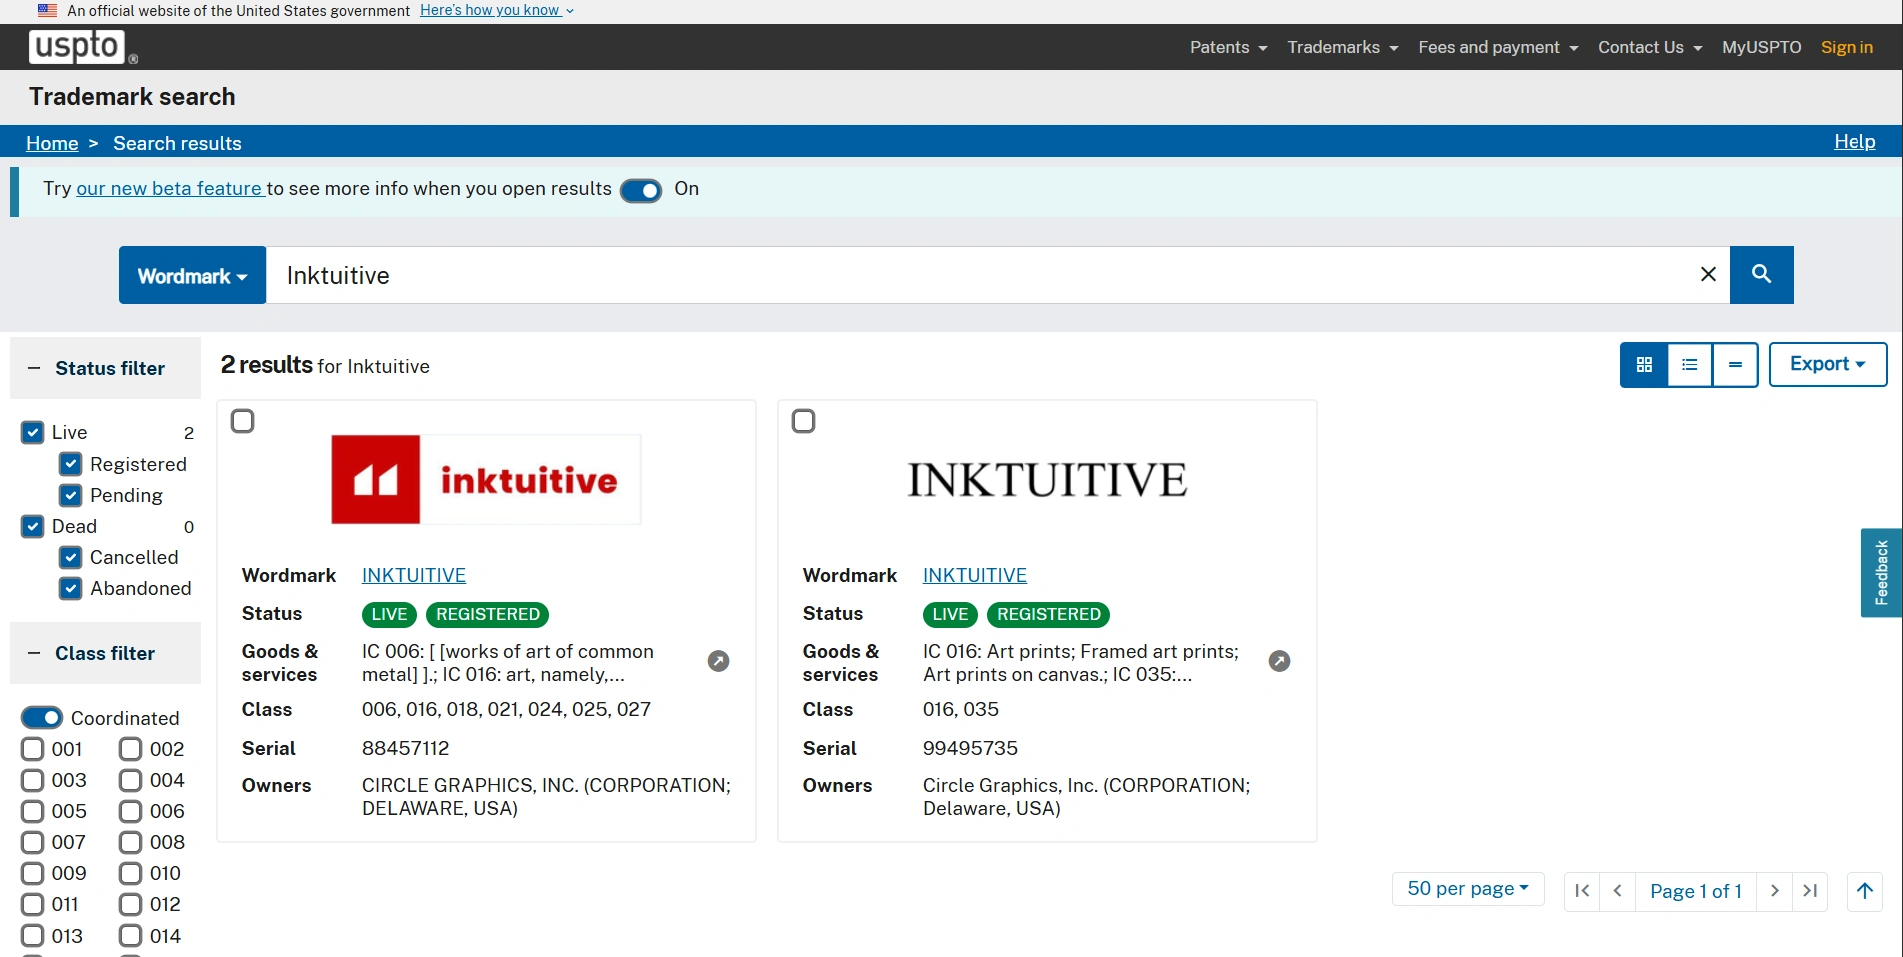
Do not limit your search to an exact phrase. The USPTO explains that potentially conflicting marks can be similar in sound, appearance, meaning, or commercial impression, particularly when used for related goods or services.
A practical preliminary screening routine is:
- Search the complete proposed wording and its distinctive words.
- Try plausible alternate spellings and similar-sounding wording.
- Read relevant records, including the goods or services involved, rather than judging by the name alone.
- Record what you searched and flag unresolved concerns before production proceeds.
The important distinction is between screening and clearance. An empty search result is not permission to use a design, and a matching word does not, by itself, settle the legal question. The USPTO’s clearance-search guidance also recommends investigating common-law use outside the federal database. An experienced trademark attorney can interpret uncertain results.
Trademark research is also separate from copyright and asset licensing. Keep evidence of the rights you have to artwork, photographs, fonts, and other incorporated assets. The value of doing this early is straightforward: resolving one questionable idea is easier than revising an entire collection built around it.
3. Printify Profit Calculator — Check Margins Before Scaling a Product
For Printify sellers using Etsy, the in-dashboard Printify Profit Calculator provides a more useful pricing check than subtracting the blank product cost from the selling price. It breaks down costs, incorporates standard sales-channel fees, and lets you examine individual size or color variants.
Open a product’s Pricing section and select Profit Calculator. You can enter a sale price or desired profit, select the relevant variant, and account for shipping through the free-shipping toggle when you plan to include that cost in the retail price.
Check the expensive variants, not just the cheapest one. A pricing structure that works for a small print or standard shirt size may leave much less room on another variant.
For an illustrative calculation—not actual Printify pricing—suppose a product sells for $32:
- Production costs $13.
- Seller-paid shipping costs $5.
- Marketplace and payment fees total $3.
- The remaining contribution is $11 before advertising, overhead, and other unbudgeted costs.
If acquiring that order costs another $6 in advertising, only $5 remains before those other expenses. That is a very different business decision from seeing “$19 profit” after subtracting production alone.
Test your planned discount as well as the full price. Include applicable advertising charges and make your own allowance for refunds, replacements, and business expenses that are not covered by the displayed calculation.
The calculator guides pricing; it does not automatically change the product’s pricing table. Transfer your approved prices into the product before using it as the template for a bulk catalog expansion. Otherwise, automation can reproduce an unprofitable price just as efficiently as a profitable one.
4. Bulk AI Image Creator — Generate Artwork from a CSV Prompt List
Bulk AI Image Creator: Batch Generative Fill automates Photoshop image generation across a CSV of prompts. For sellers developing artwork collections, it removes the repeated cycle of entering a prompt, waiting for generation, exporting variations, and starting again.
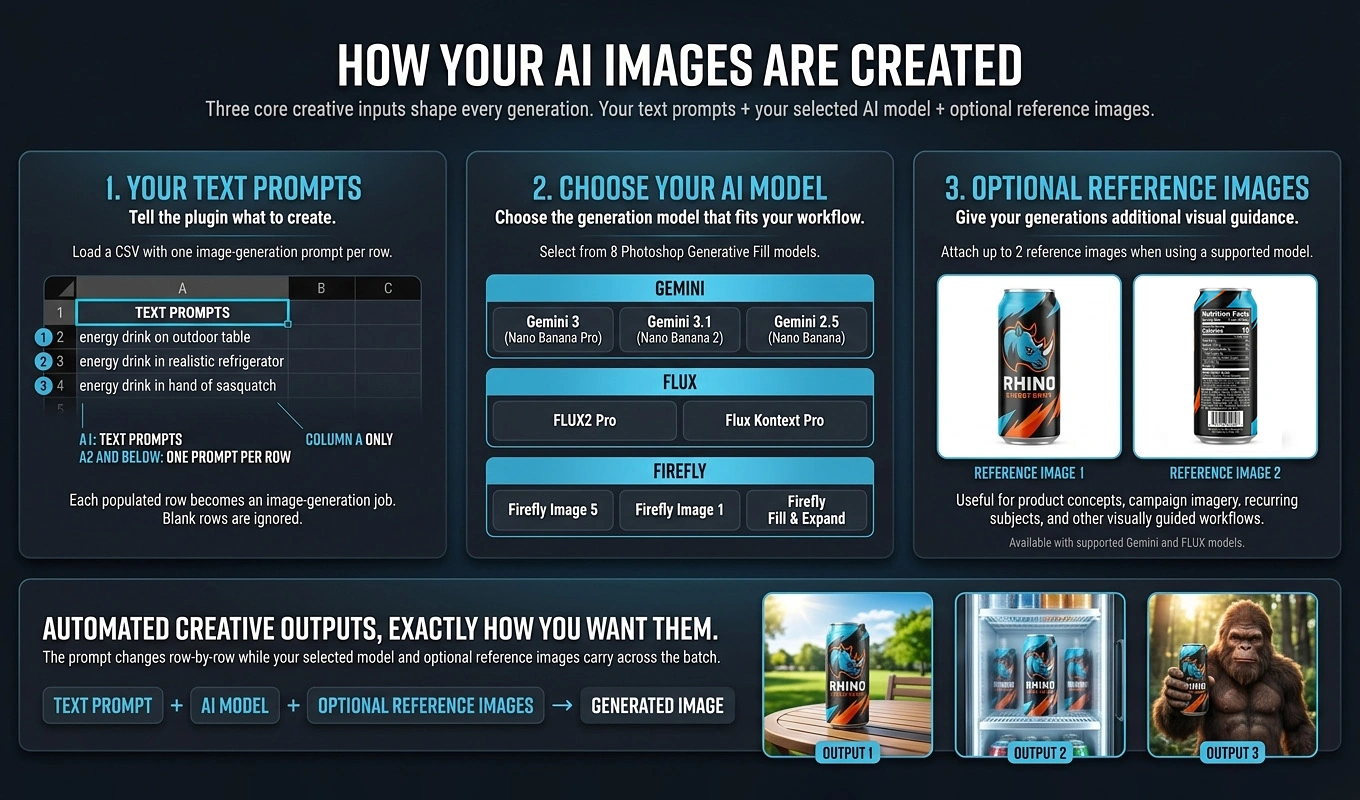
Prepare a one-column CSV with TEXT PROMPTS in cell A1 and your prompts beginning in A2. Choose the image width, height, DPI, and one supported model for the operation. The plugin then processes the valid prompts sequentially through Photoshop’s Generative Fill functionality.
A useful approach is to write collection-specific prompts rather than a miscellaneous queue. For example, a botanical series might share a restrained palette, consistent negative space, and a portrait composition while changing the plant subject. Generate separate batches when you need substantially different dimensions or visual directions.
For compatible Gemini and FLUX model options, you can attach one or two reference images across the batch. This provides common visual guidance without repeatedly reattaching the same files. References guide the model; they do not guarantee identical styling.
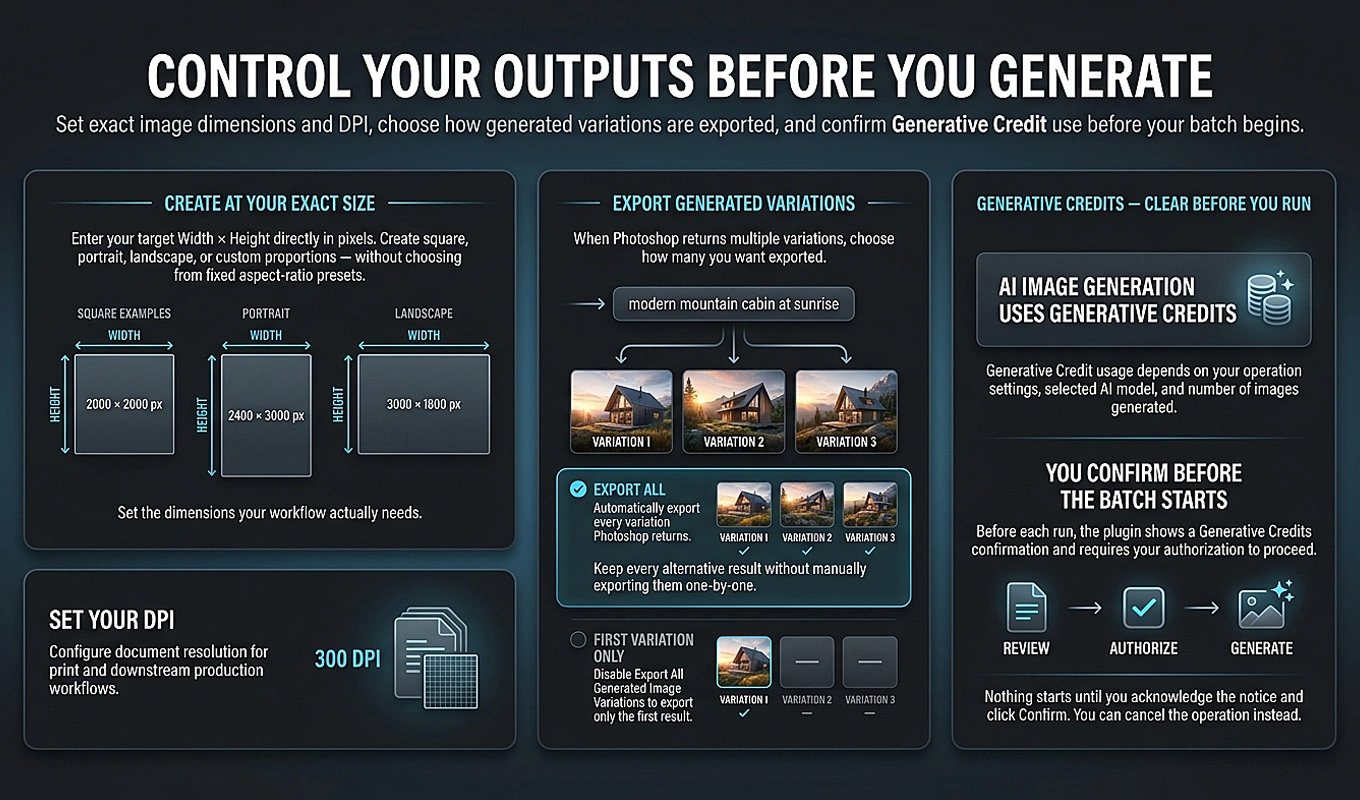
The plugin can export every variation Photoshop returns or only the first variation. Exporting all available alternatives is useful during development: review the results afterward and move only the strongest work into an approved-artwork folder. The number of returned variations is determined dynamically, not fixed.
Generation uses the applicable Adobe Generative Credits and requires explicit acknowledgement before the batch begins. Build a small test collection before committing to a long queue.
For Etsy sellers, Etsy’s Creativity Standards require disclosure in the listing description when an item is created using AI. They also require production-partner disclosure for applicable seller-designed products. Check commercial-use conditions for your selected model and any reference assets, then curate the output for originality, visual defects, and suitability for the actual product.
5. Bulk Image Upscaler — Enlarge Artwork for Larger Print Products
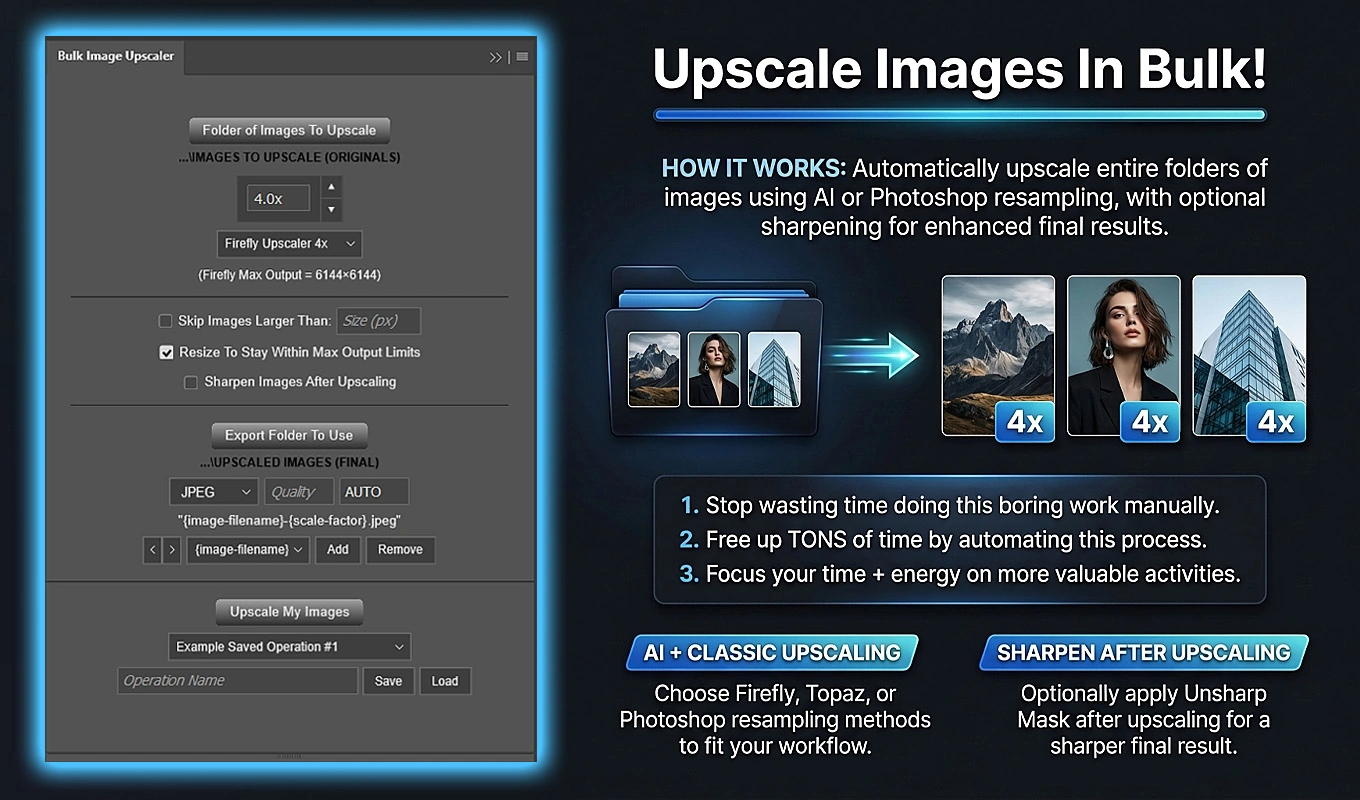
A design that looks convincing in a listing thumbnail may not contain enough pixels for a large canvas. Bulk Image Upscaler: Batch-Enhance Resolution automates enlargement across a folder, using either Photoshop’s AI upscaling workflows or its traditional resampling methods.
Calculate the Pixel Requirement First
Work backward from the intended print dimensions and the provider’s requested resolution. At 300 pixels per inch, before any required bleed:
- A 12 × 18-inch image needs 3600 × 5400 pixels.
- A 24 × 36-inch image needs 7200 × 10800 pixels.
Simply changing a file’s resolution label to 300 DPI does not create those pixels. Adobe’s explanation of pixel dimensions and print resolution clarifies the difference between changing the intended print size and actually resampling an image.
The plugin offers Firefly, Topaz Gigapixel, and Topaz Bloom in fixed 2× and 4× configurations. Traditional Photoshop methods support custom enlargement factors from 1.1× to 25.0×. This makes it possible to choose a workflow based on the artwork and required enlargement rather than using the same approach indiscriminately.
For a recognizable illustration, typography, or a design where faithful shapes matter, test a conventional method alongside any AI treatment you are considering. For image-based artwork, inspect fine textures and edges after enlargement. The goal is a better printable file, not merely a larger pixel count.
Large print requirements can exceed AI model output limits. The plugin automatically handles oversized requests, including switching a requested 4× operation to 2× when appropriate. Check the actual exported dimensions before assigning the file to your largest product.
Optional post-upscale sharpening can be included in the same batch. Start with a few representative images, review them at full size, and order a physical sample before approving the workflow for a collection. Upscaling is useful production assistance, not a guarantee that every low-quality source will become a premium print.
6. Bulk Image Resizer — Prepare Multiple Print-Size Variants Without Cropping
Bulk Image Resizer: Automated Batch Resizing is especially useful when the same artwork needs several production files. You can stack independent resize rules and apply every rule to every image in a folder during one run.
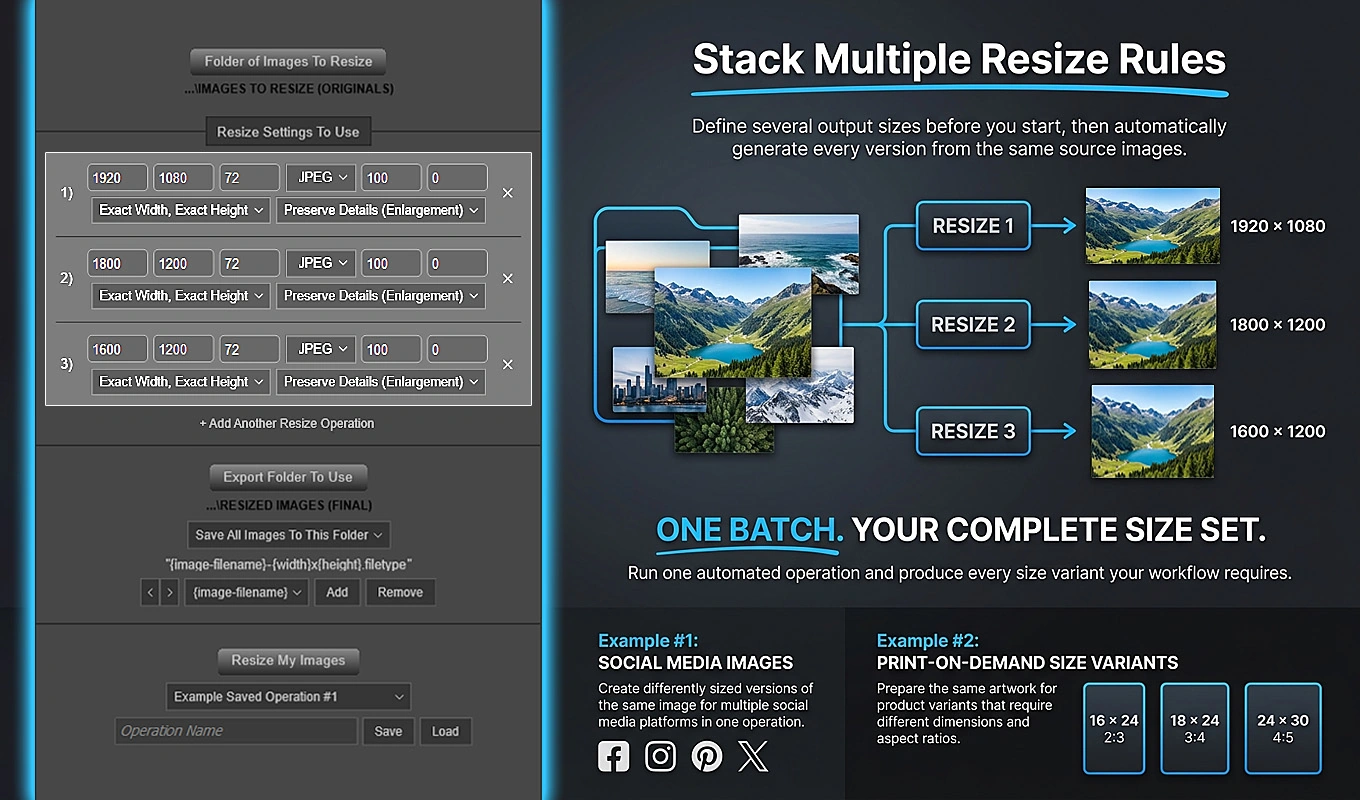
For an illustrative 2:3 poster collection at 300 pixels per inch, you could configure:
- 12 × 18 inches: 3600 × 5400 pixels.
- 16 × 24 inches: 4800 × 7200 pixels.
- 20 × 30 inches: 6000 × 9000 pixels.
Those dimensions share the same aspect ratio. A sufficiently large approved master can supply all three outputs without changing the composition. Each resize rule starts from the original source-document state rather than repeatedly resizing the previous output.
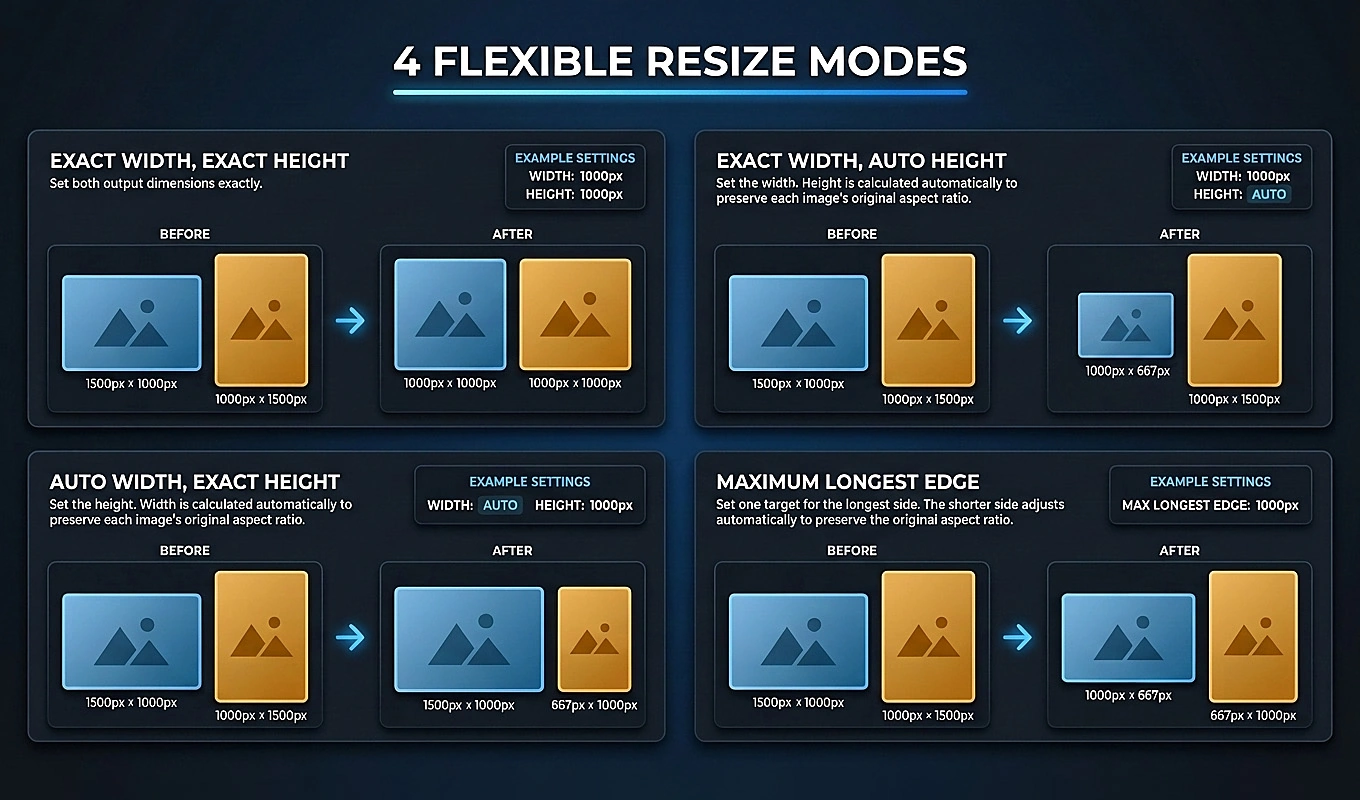
The more interesting use case is a collection that includes slightly different proportions. An 11 × 17-inch print is not the same ratio as a 12 × 18-inch print. If you want to preserve the complete artwork rather than remove content, the Exact Width, Exact Height mode can resize it directly to the required dimensions.
That operation does not crop. It can change proportions when the target ratio differs. A slight adjustment may be acceptable for an abstract composition or texture after visual review; it can be much more noticeable in faces, circles, lettering, and geometric designs. Decide whether the particular artwork tolerates the change before applying that rule to the whole collection.
When proportions must remain unchanged, use Exact Width, Auto Height or Auto Width, Exact Height. Do not force a substantially different format simply because it is available in the catalog.
Each rule can have its own DPI, export format, quality, and resampling method. Outputs can also be grouped into resize-rule subfolders and named with their actual dimensions, making it easier to identify the correct production file.
Use your supplier’s exact specifications rather than assuming the advertised product size is the upload requirement. Printify’s design-dimension guidance directs sellers to each product’s print-file requirements. Save the approved resize configuration for the next collection.
7. Batch-Replace Smart Objects — Create Mockup Images Across an Entire Collection
Mockup production becomes a serious bottleneck when every design needs several listing images. Batch-Replace Smart Objects: Mockups In Bulk combines a folder of artwork with one Photoshop PSD/PSB mockup or a folder of templates, then replaces the intended Smart Objects and exports the finished results.
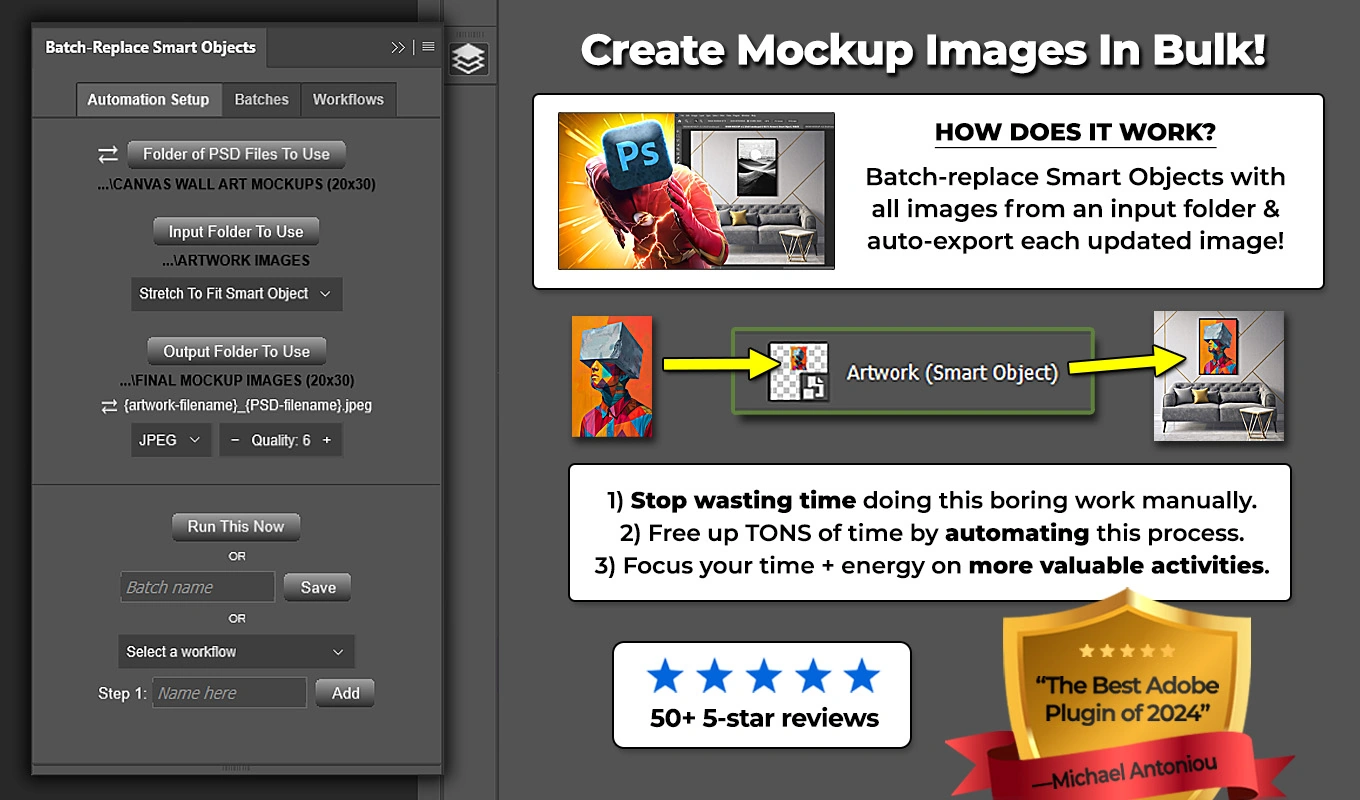
For example, 100 artworks processed through four templates produce 400 finished mockup images. You are defining the presentation system once rather than opening, replacing, exporting, and naming each combination manually.
Choose templates that perform different useful jobs in the listing:
- A clear primary product view.
- A close-up showing the artwork and relevant product detail.
- A lifestyle scene that helps the buyer imagine the product in use.
- A context view that communicates scale accurately.
Four genuinely informative images are more useful than four nearly identical room scenes. Keep frames, finishes, product proportions, and artwork placement representative of what the customer can actually purchase.
The placement settings matter. Contain Inside Smart Object preserves the entire artwork and its proportions, while Fill Smart Object & Crop fills the target area but can remove overflow. Use a cropped presentation only when it matches the printed product’s composition. Stretch To Fit can change proportions, so it should be an approved choice rather than an accidental default.
A template containing one Smart Object is automatically targeted. When a template contains several, select the intended artwork layer or layers. If multiple targets are selected, the same current artwork goes into all of them before one completed mockup is exported—useful for a scene showing several instances of the same design.
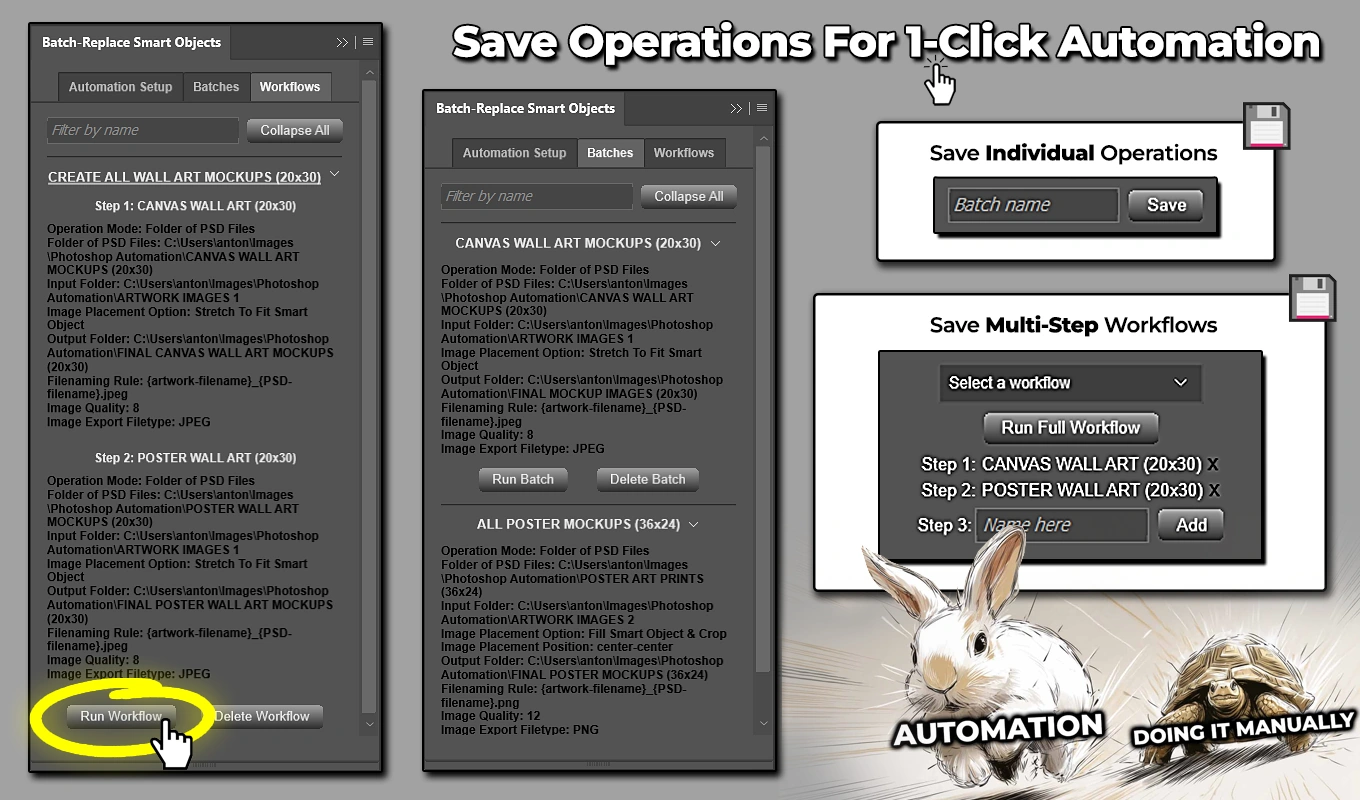
Saved Batches make a recurring presentation setup reusable. Workflows can chain different configurations, such as separate poster, canvas, and apparel scenes. Automatic filenames combine the artwork and template names, helping you match the resulting images back to the correct product.
Before the full run, test a light design, a dark design, and a composition with important content near the edges. That small review checks whether the template family works across the collection, not just with the image used to build it.
8. Bulk POD Product Creator — Turn Approved Artwork into Products in Bulk
After the artwork is ready, there is still product setup: uploading files, choosing variants, placing designs, setting prices, and writing listing information. Bulk POD Product Creator automates product creation using selected artwork images and an example product as the blueprint.
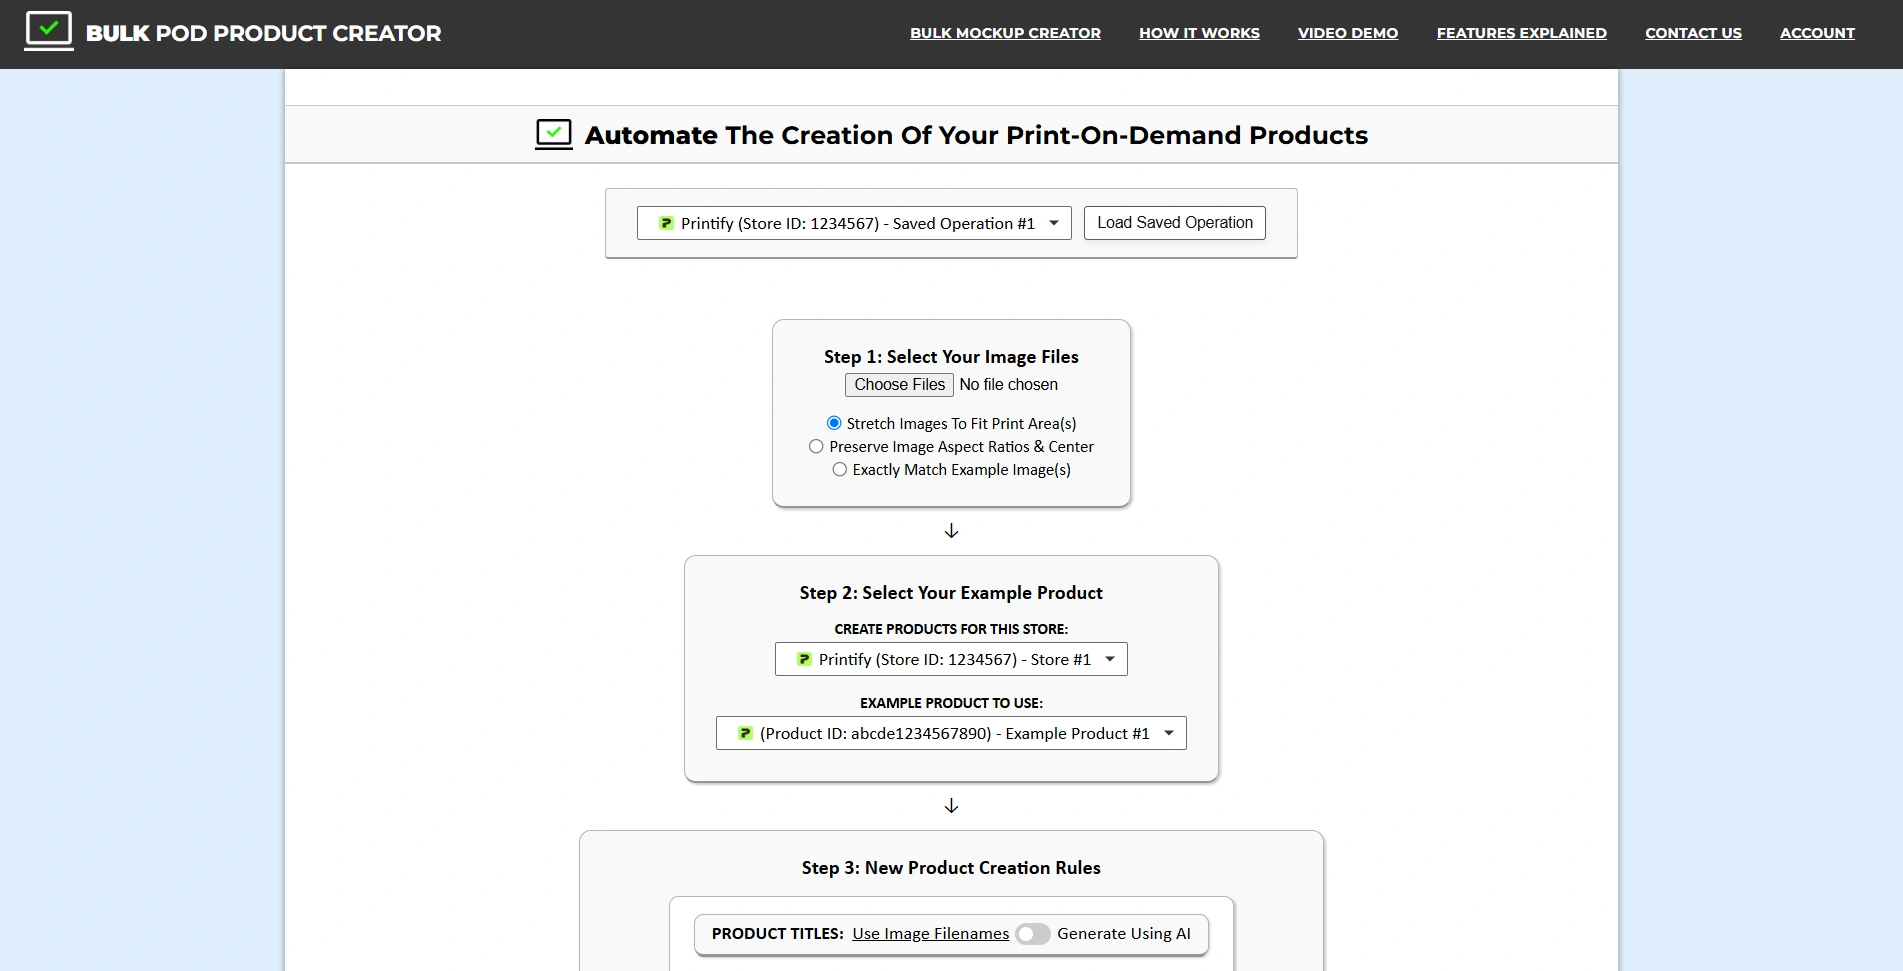
The tool supports Printify and Gelato connections. In a Printify workflow, start with a fully prepared example product whose variants, print areas, and prices are correct. The tool uses that example to create additional products for the selected images.
This makes the example product an important business asset. Before expanding it into a collection, verify:
- The product and provider are the ones you intend to sell.
- The selected sizes and other variants belong in the range.
- Artwork placement works across those variants.
- Prices have passed your margin check.
- The product information accurately describes what buyers receive.
Titles can use image filenames or AI-generated text. Descriptions and tags can be copied from the example product or generated using AI, with additional controls for the content. That removes repeated data entry while allowing design-specific listing information.
Use clean filenames if they will become titles. “Muted Wildflower Botanical Print” is a much more useful starting point than “final-art-27-v6.” If you use AI-generated text, review it for irrelevant keywords and invented material, printing, or delivery claims.
Keyword automation is not the same as search strategy. Apply your research when reviewing the drafts, and keep the wording readable. Etsy’s explanation of search makes clear that matching and ranking involve more than titles and tags alone.
Run separate product-creation batches for distinct product families. A poster blueprint should not be treated as a universal template for canvases and shirts. Once each family is approved, this tool can remove a substantial amount of repetitive catalog-building work.
9. Airtable — Keep Artwork, Product Files, and Listings Connected
Scaling a POD store creates a relationship problem: one design can have several print files, multiple mockups, and listings across different product types. Airtable’s digital asset management template offers a starting point for organizing assets, attachments, statuses, and related information.
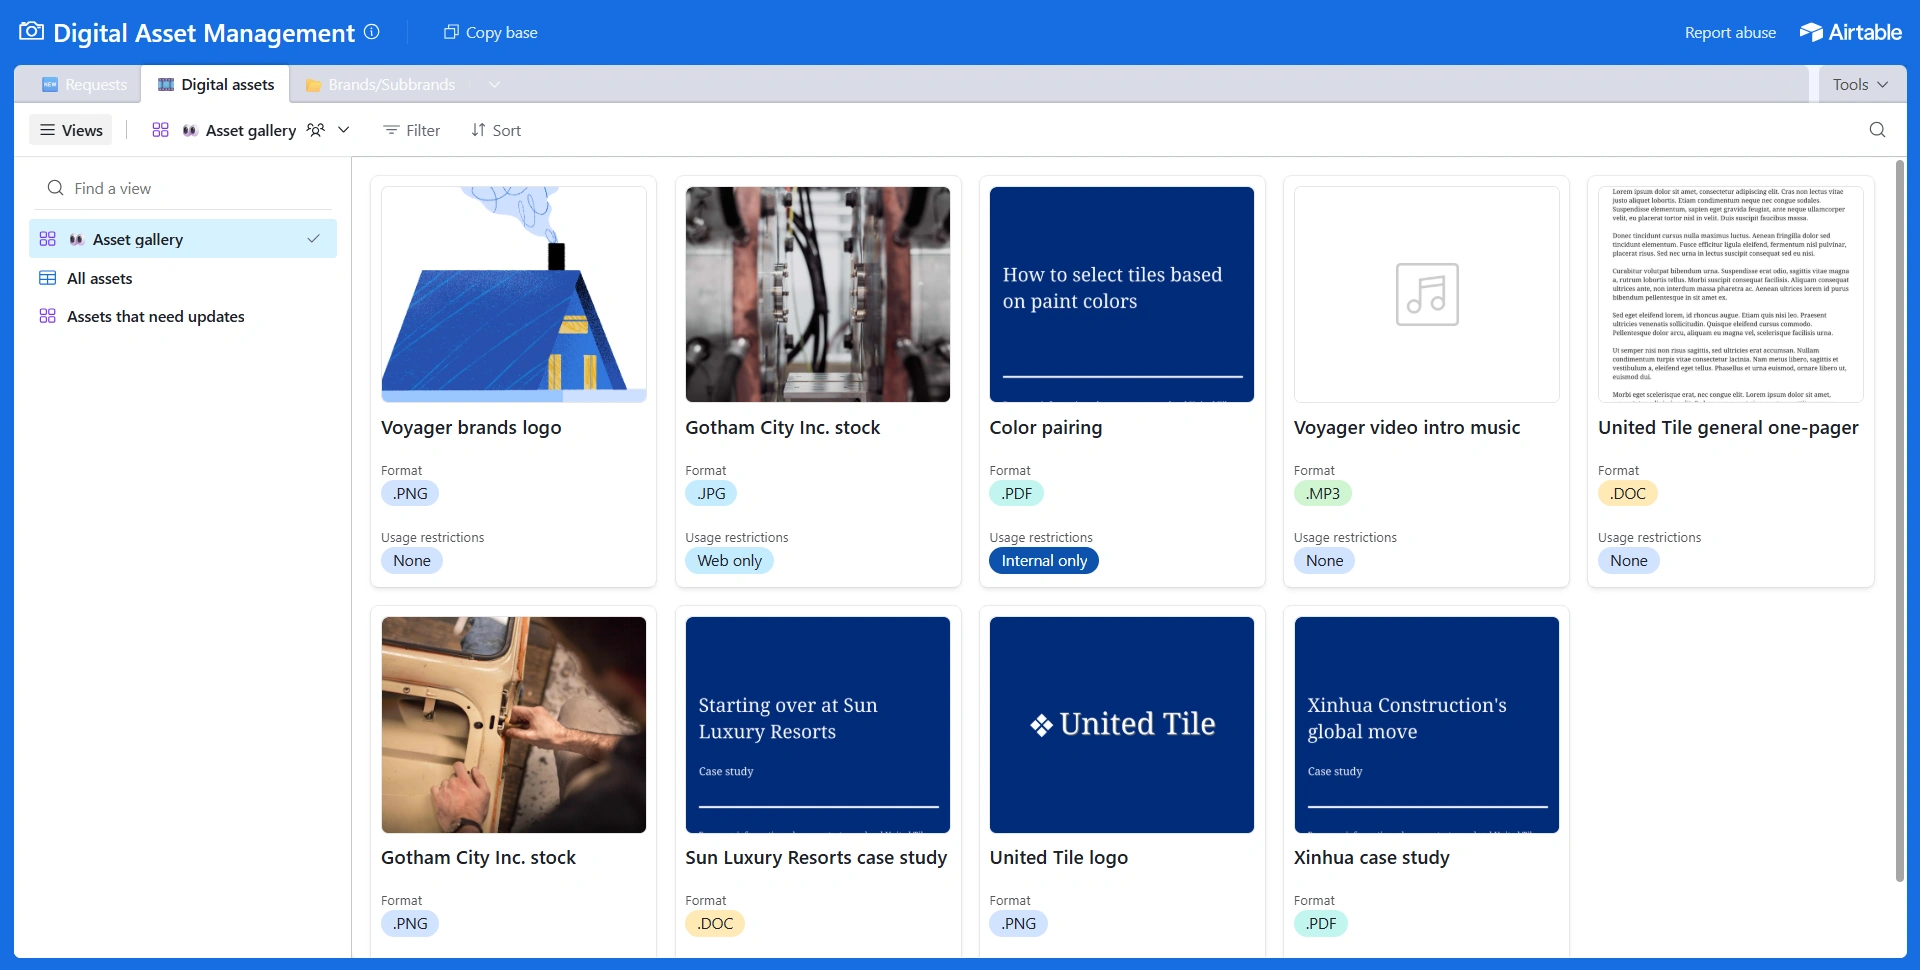
For POD, build around two separate tables: Designs and Products. Airtable’s linked records let you associate several products with one underlying design instead of duplicating the entire artwork record.
A useful structure would include:
- Designs: design ID, artwork preview, master-file location, collection, source or license notes, and approval status.
- Products: linked design, product type, provider, production-file location, mockup location, listing URL, and publication status.
Use a stable design ID such as BOT-014 throughout the filenames and records. You should be able to identify its master artwork, print exports, mockups, and listings without opening every file.
Keep “print approved” and “listing approved” separate. A perfectly prepared print file can still have an incorrect product image or an unfinished description. Conversely, polished listing copy does not mean the production file has been checked.
Also distinguish size variants from separate products. If several sizes belong within one listing, record them that way rather than treating every exported image dimension as a new storefront listing.
Airtable is not what produces the artwork or creates the products in this workflow. It is the control layer that helps you see what exists, what has been approved, and what still needs attention. That becomes increasingly valuable when multiple people—or multiple production batches—are involved.
Stack the Tools — Build a Faster, Repeatable POD Production Workflow
The biggest improvement comes from removing several connected bottlenecks. Faster artwork generation is less valuable if product setup remains entirely manual. Faster product creation is less valuable if the corresponding print files and mockups are still waiting to be made.
A practical sequence for a new collection looks like this:
- Use eRank to define the collection’s buyer intent and relevant search language.
- Screen proposed branding and wording, and verify the rights to incorporated assets.
- Check product economics before committing to a large range.
- Generate artwork candidates with Bulk AI Image Creator, then curate an approved set.
- Use Bulk Image Upscaler where additional pixels are needed for the intended print products.
- Create the required production variants with Bulk Image Resizer.
- Generate matched listing imagery with Batch-Replace Smart Objects.
- Create products from approved blueprints with Bulk POD Product Creator, then review the product information and add the appropriate listing images.
- Track the design-to-product relationships and approval stages in Airtable.
These are complementary tools, not a claim that every application automatically connects to the next. Exported folders, stable design IDs, and a clear approval process provide the handoffs. Keep generated candidates separate from approved masters, and production files separate from listing images.
Consider an illustrative collection of 50 approved designs offered across three product families. If each design gets one listing per family and four images per listing, that means 150 product listings and 600 listing images. Size options may sit inside those listings as variants. The point is not a promised output speed; it is how quickly the associated workload multiplies.
Test the complete process on three designs before expanding to fifty. Check the physical sample, the largest size, the mockup representation, the listing information, and the margin. Save the successful configurations so the next collection begins with an established production system rather than another round of setup.
That is the real power of stacking automation: you can build a larger, consistently prepared catalog without making repetitive production your full-time job. Use the recovered time to develop distinctive collections, improve conversion, test marketing, and learn which products customers actually want. A bigger repository of search-relevant products is useful; a bigger repository built around validated demand, dependable quality, and sound margins is far more valuable.