Bulk Background Remover Plugin For Photoshop: A Complete Guide

Removing the background from one image in Photoshop is a manageable task. Turning a folder of images into usable transparent assets involves much more repetition: opening files, selecting subjects, refining edges, trimming empty canvas, standardizing dimensions, positioning cutouts, exporting, naming files, and closing the originals.
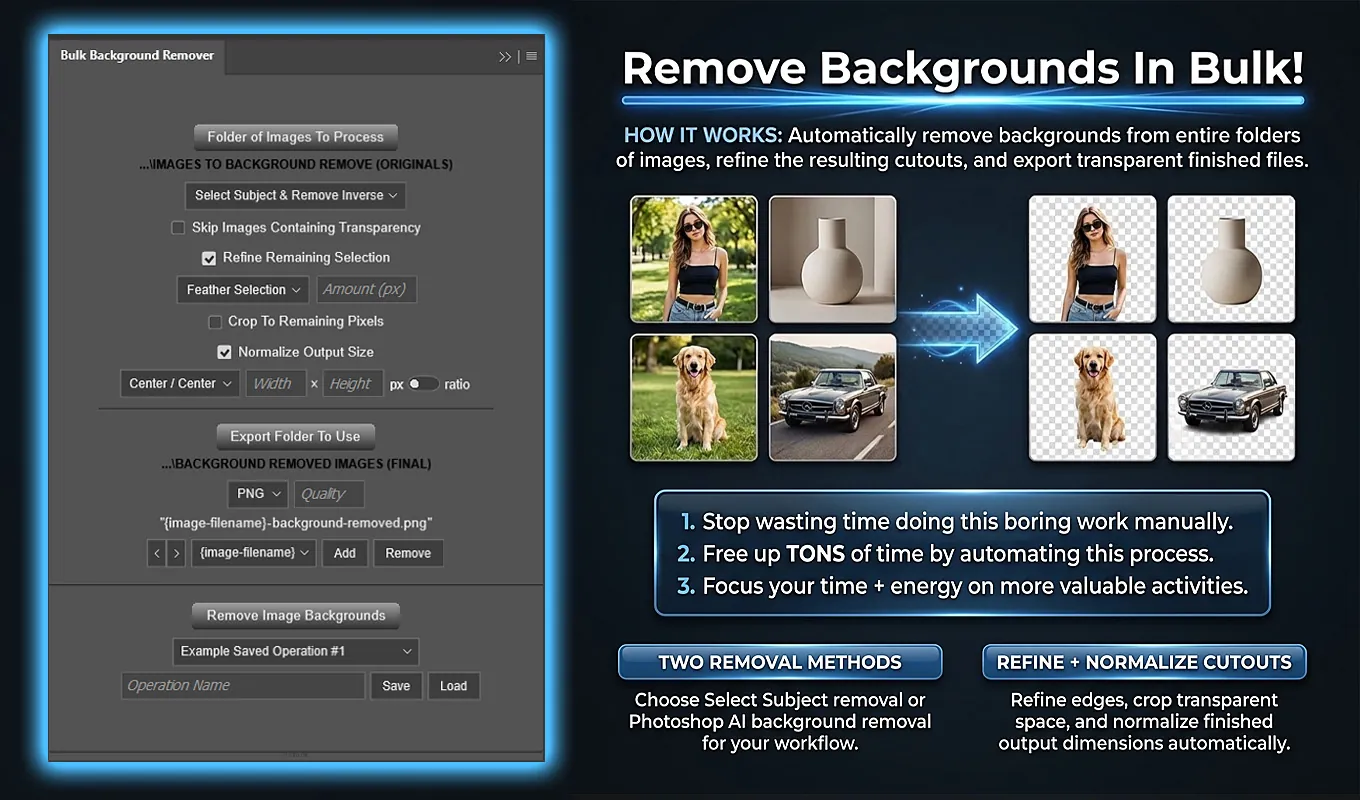
Bulk Background Remover: Automated Cutouts is a third-party Photoshop plugin that automates that folder-wide workflow. You select the source folder, choose a Photoshop-native background-removal method, configure any refinement and canvas adjustments, and specify how the results should be exported.
The important distinction is that this is not a separate background-removal engine with proprietary AI. The plugin uses Photoshop’s own Select Subject or Remove Background functionality, then automates the surrounding production steps. Its value comes from making a complete cutout workflow repeatable across many files rather than requiring you to perform each step manually.
This guide covers installation, source preparation, both removal methods, transparency skipping, mask refinement, cropping, normalization, export settings, filenames, saved operations, and the practical checks that help you run a successful batch.
1. Install the plugin and prepare your source folder
Where to find Bulk Background Remover
Bulk Background Remover: Automated Cutouts is distributed through Adobe Exchange and Adobe’s Creative Cloud plugin marketplace. Search for the full product name so you can identify the correct plugin.
The typical installation process is:
- Find Bulk Background Remover: Automated Cutouts in Adobe Exchange or the Creative Cloud plugin marketplace.
- Acquire or purchase the plugin.
- Allow Adobe Creative Cloud to install it.
- Open or restart Photoshop if required.
- Access the installed plugin through Photoshop’s Plugins menu.
Adobe’s installation screens can change as Creative Cloud and Photoshop are updated, so the exact sequence of marketplace screens may vary. The plugin operates inside Photoshop; it is not a standalone application.
Choose the images the batch should process
In the plugin interface, click Folder of Images To Process and choose your source directory. A shortened representation of the selected path appears in the interface so you can confirm the location.
The plugin processes supported files directly inside that folder. It does not recursively process arbitrary nested subfolders. If your images are distributed across several subfolders, organize the files you want to process into an appropriate batch folder or run the relevant folders separately.
Supported source extensions are:
- .jpeg and .jpg
- .png
- .tiff and .tif
- .psd and .psb
- .gif
- .ai
- .eps
- .svg
- .webp
Unsupported files are ignored. A folder containing no supported source files cannot start a batch.
The folder selection does not freeze a list of files at the moment you select it. The plugin retrieves the folder’s current contents when processing begins. If you add or remove images before clicking Remove Image Backgrounds, those changes are reflected in the actual batch.
Use a representative test folder before a large run
A useful preparation step is to create a small folder containing examples of the images you expect to process. Include subjects with different shapes, contrasting backgrounds, fine edges, and different source dimensions where relevant.
This is particularly helpful when deciding whether to contract a mask, soften an edge, or standardize the output canvas. A setting that suits a large, solid product may not suit a smaller subject with delicate details.
Run that small folder first, inspect the exported files, and then use the selected settings for the larger batch. This is a practical testing workflow, not a requirement to configure every image individually.
Keep the source and destination roles clear
The input folder supplies the original documents. Export Folder To Use specifies where processed derivatives are saved. Selecting a separate destination makes it easier to review results without confusing them with the originals.
The plugin edits an opened working document, exports the processed result, and closes the source document without saving. Its normal batch workflow does not write layer merging, masks, cropping, normalization, or subject positioning back over the original source file.
Before processing, the plugin checks that both selected folders remain accessible. If a previously selected directory has been moved or deleted, you need to select an accessible location rather than relying on an outdated folder reference.
2. Understand how each background-removal method creates the cutout
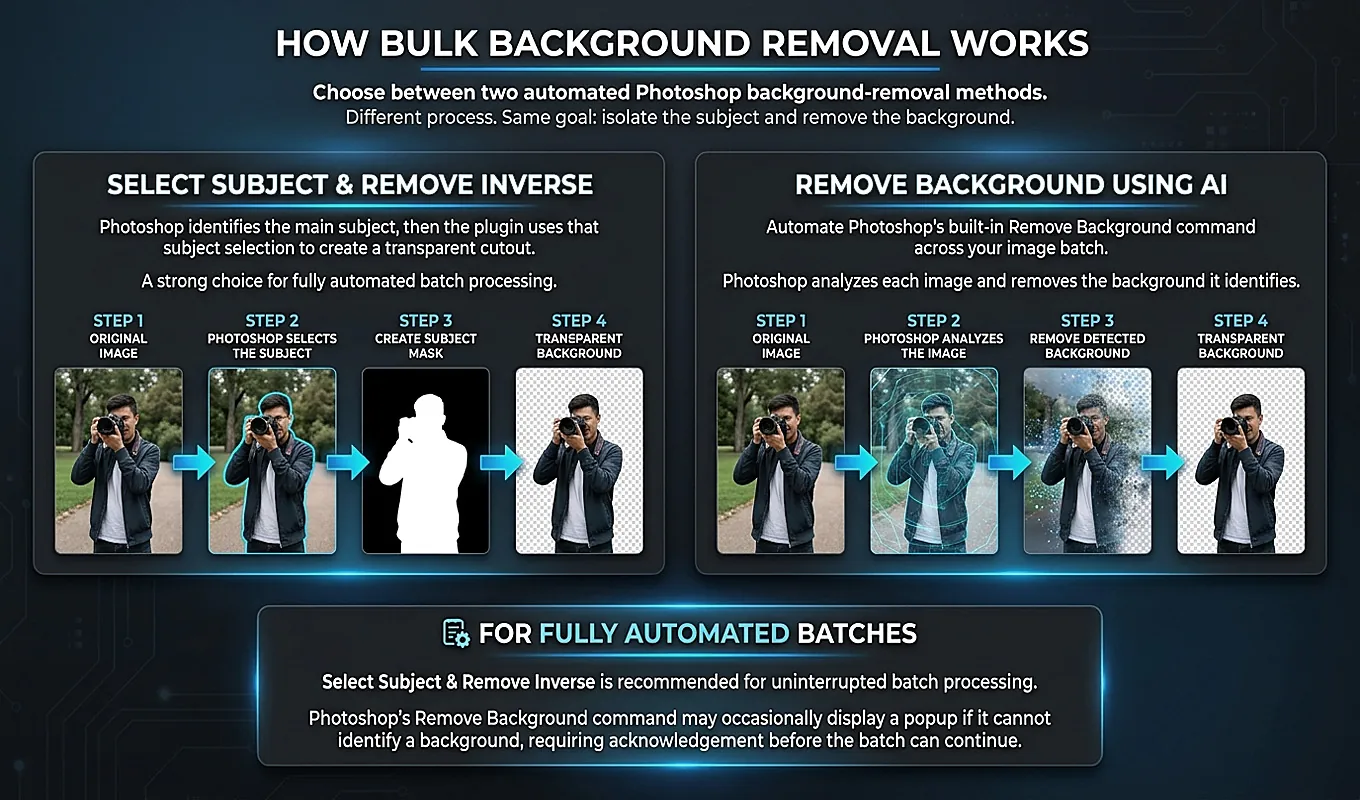
The Background Removal Method dropdown contains exactly two choices: Select Subject & Remove Inverse and Remove Background Using AI. Select Subject & Remove Inverse is the normal default.
Both methods use native Photoshop functionality. Choosing between them changes the removal operation the plugin invokes, not the underlying fact that Photoshop performs the subject or background detection.
How the document is prepared first
Before background removal, the plugin prepares the working layers. If the source contains multiple visible layers, it merges those visible layers.
This preparation uses Merge Visible rather than flattening the document. The distinction matters because Merge Visible can preserve transparency that already exists in the visible working content.
If the resulting working layer is Photoshop’s special locked Background layer, the plugin converts it into a normal layer. A normal layer can expose transparent pixels where the background is hidden or removed.
This preparation also explains an important output limitation: saving the processed document as PSD or PSB does not preserve the source document’s original multilayer structure. The visible working content has already been consolidated before the cutout is created.
Select Subject & Remove Inverse: selection first, mask second
This method invokes Photoshop’s Select Subject functionality through its autoCutout command. Photoshop attempts to identify the subject and create an active selection around it.
The plugin does not assume that invoking Select Subject means the operation succeeded. It checks whether the resulting selection has valid rectangular bounds with positive width and height. If no meaningful subject selection exists, the attempt is treated as unsuccessful.
When a valid subject selection exists, the plugin creates a Reveal Selection layer mask. The selected subject remains visible, while the unselected background becomes hidden and therefore transparent in the rendered result.
Despite the wording “Remove Inverse,” the current implementation does not destructively delete every pixel outside the subject selection. It achieves the cutout through a subject-revealing mask.
That mask-based approach is central to the refinement workflow. The plugin can later load the mask as a selection, change its boundary, and replace the mask with the refined version.
A technically valid selection is not the same as a visually perfect cutout. The bounds check confirms that Photoshop produced a meaningful selection; the accuracy of the subject boundary still depends on Photoshop’s detection and the image itself.
Remove Background Using AI: Photoshop’s native Remove Background command
The second method invokes Photoshop’s native Remove Background functionality. The plugin automates that command rather than sending the image through a proprietary segmentation model developed for the plugin.
When removal is reported as successful, the resulting mask can be used by the optional refinement stage. The configured crop or normalization and export steps then follow.
This method has an important automation limitation. If Photoshop cannot identify a background to remove from a particular image, Photoshop may display its own operation-pausing popup. That dialog must be manually acknowledged before Photoshop continues, and the plugin cannot reliably suppress it.
For that reason, selecting Remove Background Using AI and starting a batch produces a confirmation warning. You can choose Proceed Anyway or Cancel Operation.
If the priority is the greatest possible unattended batch-processing reliability, Select Subject & Remove Inverse is the recommended choice. That recommendation is about avoiding the specific blocking-dialog behavior associated with Photoshop’s Remove Background command; it is not a guarantee that every source image will yield an ideal selection.
The selected method does not automatically change when an image is difficult
Bulk Background Remover does not automatically fall back from one method to the other. An unsuccessful Select Subject attempt is not automatically retried with Remove Background Using AI, and an unsuccessful AI removal is not automatically retried with Select Subject.
This makes the batch configuration predictable: the method you choose remains the method used for that batch. If representative test images indicate that another method is more suitable, change the setting deliberately before processing the larger folder.
3. Decide what to skip and how to refine the cutout edges
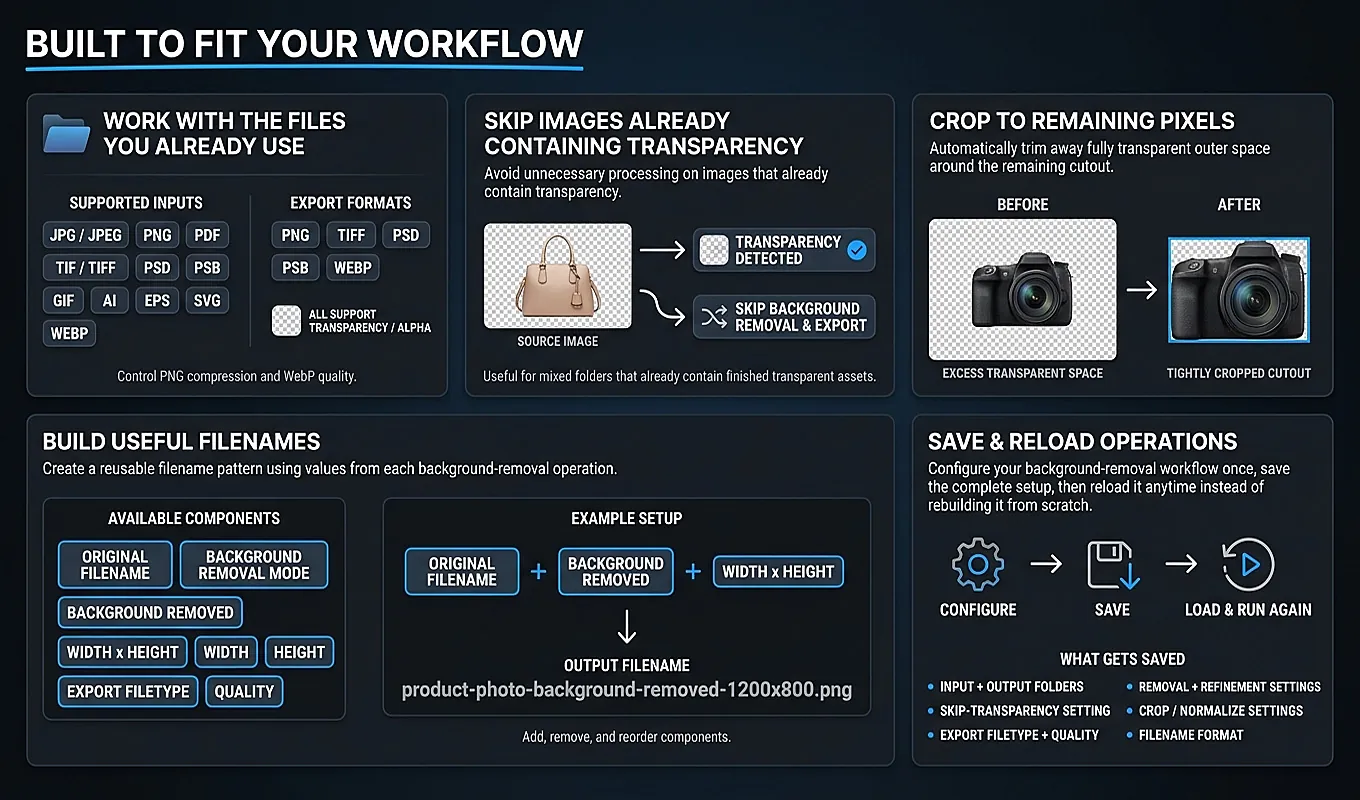
Two optional controls affect which images receive processing and how successful cutouts are adjusted: Skip Images Containing Transparency and Refine Remaining Selection.
These settings solve different problems. Transparency skipping avoids work on qualifying images altogether. Refinement changes the mask boundary after a successful removal.
What Skip Images Containing Transparency actually checks
When enabled, Skip Images Containing Transparency examines the prepared working image before background removal. The check happens after visible layers have been merged where necessary and a locked Background layer has been converted into a normal layer.
At a technical level, the plugin loads the working layer’s transparency as a selection, inverts that selection, and determines whether a meaningful transparent region exists. A completely transparent layer also counts as containing transparency.
This is a check of actual layer transparency, not a shortcut based on the source extension. A PNG can be fully opaque, while a document in another supported format may contain transparent areas.
The setting also does not determine whether an image is a finished, acceptable cutout. An image with transparent margins may still contain other content you would prefer to remove. What matters to this control is the presence of transparency in the prepared working image.
A qualifying transparent image is skipped completely
If the transparency check qualifies an image for skipping, the plugin does not continue with the rest of the production workflow for that image.
It does not:
- Attempt background removal.
- Refine a cutout mask.
- Crop the transparent canvas.
- Normalize the canvas dimensions or ratio.
- Export a new derivative.
The opened source document is closed without saving, and processing moves to the next source image. The skipped image still counts as completed progress.
This behavior is useful for a folder containing both opaque originals and already-transparent assets. It is not suitable when you want every existing transparent image copied, renamed, cropped, or normalized into the export folder.
If already-transparent assets need standardized output dimensions, leave Skip Images Containing Transparency disabled so that this setting does not exclude them from the configured workflow. Remember that the plugin is still running the selected background-removal method; transparency skipping is not a separate “normalization only” mode.
Enable one refinement operation for the batch
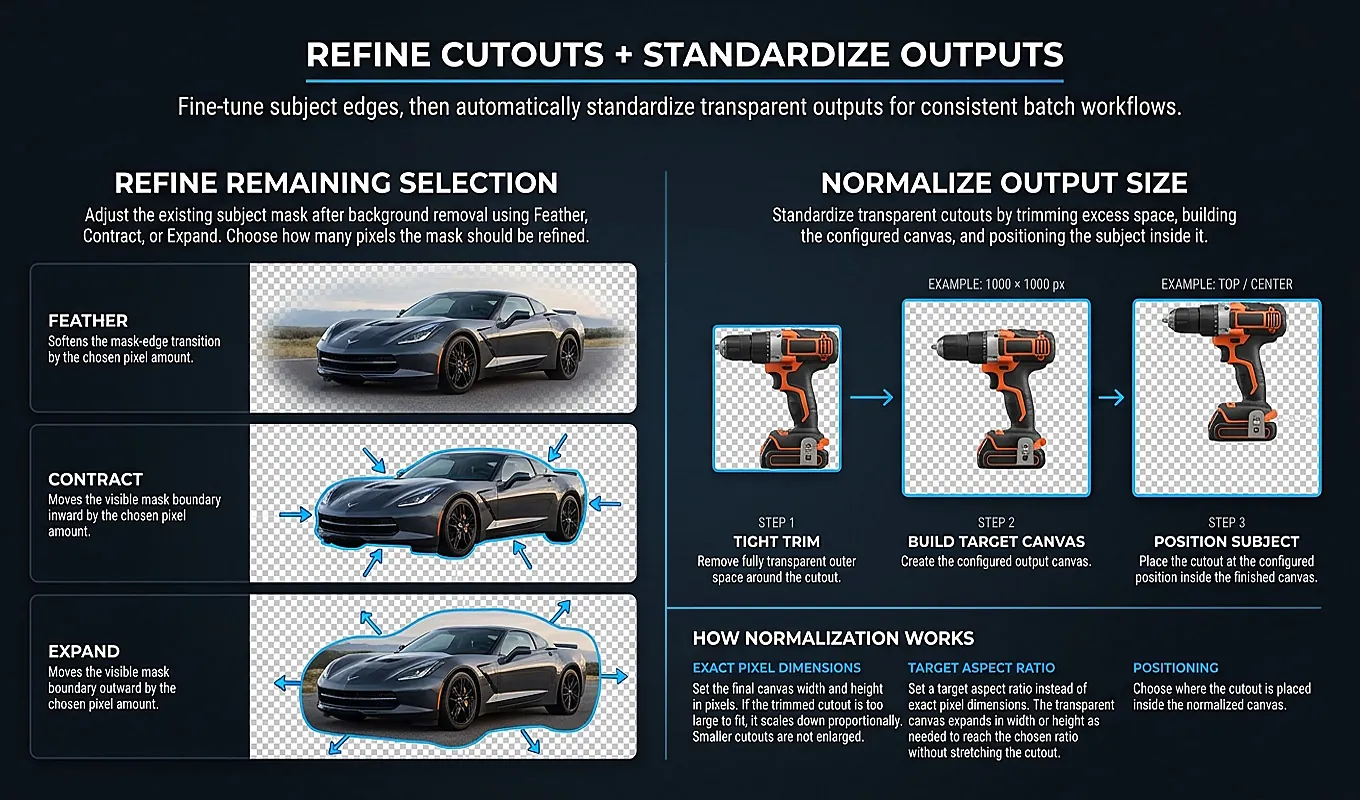
Turning on Refine Remaining Selection reveals a Selection Refinement Method dropdown and an Amount (px) field. The dropdown offers Feather Selection, Contract Selection, and Expand Selection. Feather Selection is the default displayed option.
The amount must be a whole number from 1 through 10,000 pixels. That number is passed directly to the selected Photoshop selection-refinement operation.
You choose one refinement operation for the batch. This is not a sequence that automatically feathers, contracts, and expands each mask in turn.
Feather Selection: soften the transition
Feather Selection applies Photoshop’s Feather operation using the configured pixel radius. The transition between retained subject pixels and the transparent background becomes softer.
Use it when an otherwise acceptable cutout has a boundary that looks too hard for its intended use. Because feathering changes the transition rather than simply relocating a crisp boundary, inspect the result against the type of background on which the asset will ultimately appear.
The right radius depends on the source size and the desired appearance. The availability of a large accepted range is not a recommendation to use a large amount.
Contract Selection: reveal less of the outer edge
Contract Selection moves the subject-mask selection inward by the configured number of pixels. Less of the outer edge region remains visible.
This can help remove residual background contamination, halos, or unwanted pixels around a cutout. It can also remove subject-edge content if used too aggressively, so a small representative test is particularly valuable.
For example, Contract Selection at 2 px is a concrete setting you can test for a product-image batch with slight edge contamination. It should be treated as a testable starting point, not as a universally correct cleanup amount.
Expand Selection: reveal more around the boundary
Expand Selection moves the subject-mask selection outward by the configured number of pixels. More pixels around the detected boundary remain revealed.
This can help when the initial mask is too aggressive and hides edge regions you want to retain. As with contraction, inspect whether the added area contains useful subject detail or simply reintroduces unwanted background.
Expansion is a predictable boundary adjustment, not a guarantee that every fine detail will be recovered automatically.
How the mask is rebuilt during refinement
Refinement takes place only after the selected removal method reports that the background was successfully removed. The plugin then:
- Loads the current layer mask as an active selection.
- Applies the chosen Feather, Contract, or Expand operation.
- Deletes the existing mask without applying it destructively to the layer.
- Creates a replacement Reveal Selection mask from the refined selection.
- Deselects the temporary selection.
The result is a modified subject mask. Cropping or normalization happens afterward, so the later canvas operation works from the refined cutout rather than the unrefined mask.
Because the same selected operation and pixel amount are used across the batch, refinement is most effective when the chosen treatment makes sense for the group of images you are processing.
4. Trim or normalize the canvas without distorting the subject
Background removal and canvas preparation are separate tasks. A successful cutout can still sit inside a large original canvas, or it can have dimensions that do not match the requirements of a catalog, website, or design layout.
Bulk Background Remover offers two mutually exclusive settings for this stage: Crop To Remaining Pixels and Normalize Output Size.
Crop To Remaining Pixels removes transparent outer space only
Crop To Remaining Pixels uses Photoshop’s Trim operation based on Transparency. It trims the top, bottom, left, and right edges to remove fully transparent outer canvas around the remaining visible content.
The result is a tightly bounded cutout canvas. If there is no removable transparent region around the outside, the document dimensions remain unchanged.
This setting does not resize the subject, change its proportions, add padding, force an aspect ratio, or produce a standardized output size. It also does not crop through visible subject pixels merely to reach particular dimensions.
For example, if a subject occupies a small portion of a large canvas and the surrounding area becomes transparent after removal, cropping removes that unnecessary outer space. The subject itself retains its existing size.
Why Crop and Normalize cannot both remain enabled
The interface prevents Crop To Remaining Pixels and Normalize Output Size from staying enabled simultaneously. Turning on one turns off the other.
This does not mean normalization leaves the original transparent margins in place. Normalize Output Size performs its own preliminary Crop To Remaining Pixels step. It first establishes the tight cutout bounds, then applies the requested canvas normalization.
Choose Crop when the cutout’s natural bounds should determine the output dimensions. Choose Normalize when you need a specified canvas size or shape.
The normalization controls
Enabling Normalize Output Size reveals an Alignment dropdown, Width and Height fields, and a px / ratio unit toggle.
The default measurement mode is px. The default alignment is Center / Center.
The unit mode is crucial because the same Width and Height fields mean different things in the two modes:
- In px mode, they specify exact final canvas dimensions.
- In ratio mode, they specify the proportions of the final canvas rather than its literal pixel dimensions.
Entering 4 and 5 in ratio mode requests a 4:5 canvas. Entering 4 and 5 in px mode requests a canvas only 4 × 5 pixels in size. Always check the unit setting along with the numbers.
Pixel mode: create an exact canvas and reduce oversized subjects only
In px mode, Width and Height each accept a whole number from 1 through 300,000 pixels. A Width of 2000 and Height of 2000 requests an exact 2000 × 2000 final canvas.
After trimming the transparent outer space, the plugin determines whether the cutout fits inside the requested canvas. If it is too large, the image is scaled down proportionally until it fits. If it already fits, it is not enlarged.
The fitting scale is effectively the smallest of these three values:
- 1.0
- Requested canvas width divided by the trimmed cutout width
- Requested canvas height divided by the trimmed cutout height
The 1.0 cap is what prevents upscaling. When reduction is necessary, Photoshop’s image resize operation uses constrained proportions rather than independently stretching the width and height.
Consider a trimmed cutout measuring 3000 × 1500 pixels and a target canvas of 1000 × 1000 pixels. The cutout must be reduced to approximately one-third of its current size. It becomes approximately 1000 × 500, and the final canvas becomes 1000 × 1000. The unused area is transparent.
Now consider an 800 × 600 cutout and a 2000 × 2000 target. The cutout remains 800 × 600. The plugin expands the canvas to 2000 × 2000 and positions the subject according to the chosen alignment.
This behavior standardizes document dimensions without automatically enlarging smaller sources. It also means that identical canvas sizes do not necessarily produce identical apparent product sizes: smaller cutouts remain smaller.
Ratio mode: expand the canvas while keeping the cutout’s size
In ratio mode, Width and Height describe an aspect ratio. Each term must be a positive whole number from 1 through 100,000.
Examples include 1 × 1, 4 × 5, 16 × 9, and 3 × 2. These are canvas proportions, not output resolutions.
After trimming, the plugin compares the cutout’s current aspect ratio with the requested ratio. It expands whichever canvas dimension is necessary:
- If the requested ratio is wider than the trimmed cutout, it increases canvas width.
- If the requested ratio is taller or narrower, it increases canvas height.
- If the ratio already matches, no expansion is needed.
The subject is not resized merely to reach the ratio. Visible subject content is not cropped away, and the subject is not distorted. The operation produces the smallest expanded transparent canvas that contains the current cutout while reaching the requested proportions, with calculated dimensions rounded upward where necessary.
For example, an 800 × 1200 cutout placed on a 4:5 canvas needs a width of 960 pixels. The result is a 960 × 1200 canvas containing the original-size cutout.
A 1600 × 900 cutout on a 4:5 canvas instead needs additional height. Its canvas becomes 1600 × 2000, while the cutout remains 1600 × 900.
Both outputs have the requested canvas shape, but they do not have the same pixel dimensions. Use px mode when the deliverable requires a specific resolution; use ratio mode when the requirement is the shape of the canvas.
Position the subject using one of nine alignments
Normalization provides nine predefined alignment positions:
- Left / Top
- Left / Center
- Left / Bottom
- Center / Top
- Center / Center
- Center / Bottom
- Right / Top
- Right / Center
- Right / Bottom
After the final canvas exists, the plugin determines the remaining subject bounds and translates the subject layer to the chosen position.
Left and Right place the corresponding subject edge at the canvas boundary. Top and Bottom place the subject against the corresponding vertical boundary. Center aligns the subject centrally along that axis.
For a smaller cutout on a larger square canvas, Center / Center distributes the extra space around it. Center / Bottom keeps it horizontally centered while placing its bottom edge at the lower canvas boundary.
These are predefined positions, not arbitrary X/Y-coordinate inputs. The settings standardize canvas dimensions and placement; they do not specify a fixed padding amount around every subject.
This distinction is useful when planning layouts. Center / Bottom can establish consistent product baselines, while Left / Center can leave the expanded area to the right available for a downstream composition.
5. Choose a batch configuration that matches the deliverable
The most useful settings are the ones that produce the asset you actually need. A compact transparent cutout, an exact-size catalog image, and a ratio-based design asset should not necessarily use the same configuration.
Start by deciding what must be consistent across the output set: the subject’s natural bounds, the pixel dimensions, the canvas shape, the placement, or some combination of these.
For tightly bounded transparent assets
If the goal is to remove the background and eliminate unnecessary transparent margins, use Select Subject & Remove Inverse, enable Crop To Remaining Pixels, and choose an appropriate transparency-preserving export format such as PNG.
Leave Normalize Output Size off. Add refinement only if the test results show an edge issue that the selected operation can help address.
This configuration suits individual cutout assets that will later be placed into layouts, where each subject can retain its own natural canvas dimensions.
It does not make every output the same size. A tall product and a wide product will naturally produce differently shaped, tightly cropped files.
For exact-size catalog or marketplace assets
If every deliverable must have the same canvas dimensions, choose Normalize Output Size in px mode. For example:
- Background Removal Method: Select Subject & Remove Inverse
- Normalize Output Size: enabled
- Width: 2000
- Height: 2000
- Unit: px
- Alignment: Center / Center
- Export filetype: PNG
The plugin trims each successful cutout, reduces it proportionally if necessary, creates the exact square canvas, and centers the subject.
This is a good fit for a library that requires consistent file dimensions. However, it is not an automatic “make every product equally large” setting. An 800-pixel cutout will not be enlarged to match a larger source simply because both are exported on a 2000-pixel canvas.
For products that need a shared lower edge
Use the same exact-size pixel normalization but select Center / Bottom alignment.
This positions each cutout against the bottom boundary of the normalized canvas while keeping it horizontally centered. It can make a group of product images more consistent when the intended layout calls for a common baseline.
The canvas dimensions and lower-edge placement become consistent, even when the products have different shapes. Their apparent sizes can still differ because the workflow preserves smaller cutouts rather than upscaling them.
For a consistent canvas shape without cropping the subject
If the deliverable calls for a 4:5 portrait canvas, a 1:1 square, or another ratio rather than an exact pixel resolution, choose ratio mode.
For a 4:5 output, set Width to 4 and Height to 5. Choose the alignment according to where the subject should sit in the expanded canvas.
This is useful when you want the entire cutout preserved and are willing to let the final pixel dimensions vary according to the source. It avoids cropping visible subject content simply to force the shape.
Do not use this configuration when a specification requires every file to be exactly 2000 × 2500 pixels. That is a pixel-mode requirement, not merely a ratio requirement.
For mixed folders containing existing transparent assets
Enable Skip Images Containing Transparency when you want the batch to focus on images that do not already contain transparency.
This can reduce unnecessary processing in a mixed folder, but it changes what appears in the destination. Existing transparent assets are not exported by the operation.
If the destination must contain a newly prepared version of every asset, including the already-transparent ones, do not enable this skip setting. Likewise, do not enable it if your main reason for including those assets is to crop or normalize them.
For a batch with a recurring edge problem
Use refinement to address a demonstrated issue rather than adding it automatically to every operation.
If test cutouts have a thin unwanted outer edge, test Contract Selection with a modest amount. If the detected boundary hides too much edge content, test Expand Selection. If the transition is unnaturally hard, test Feather Selection.
For a varied image set, inspect more than one representative result before choosing the amount. A consistent pixel adjustment is useful when the same treatment makes sense across the batch; it is less useful when different subjects require opposing corrections.
The simplest effective configuration is usually preferable to an elaborate one. If the native selection already produces satisfactory edges, leave refinement disabled and concentrate on the canvas and export requirements.
6. Configure transparent exports, filenames, and destination safeguards
Export settings determine what kind of derivative you receive, while the filename builder determines how easily those derivatives can be identified later. Configuring both before a large run prevents repetitive cleanup afterward.
Choose from five transparency-preserving output formats
The export dropdown offers PNG, TIFF, PSD, PSB, and WEBP. PNG is the initial selected format. JPEG is not an export option.
These choices support the transparent result of the background-removal workflow. Choose the format according to how the assets will be delivered or used after processing.
PNG: lossless output with a compression control
PNG is a straightforward choice for transparent cutout assets. The editable Quality field accepts an integer from 0 through 100.
For PNG, that user-facing value is mapped inversely to Photoshop’s compression range of 0 through 9. Higher Quality means lower PNG compression; lower Quality means higher PNG compression.
PNG remains lossless. Lowering the Quality number does not introduce JPEG-style visual degradation. The setting changes compression behavior, not the accuracy of the subject mask or the resolution of the image.
This is important when interpreting a preset such as PNG Quality 90. It describes the plugin’s PNG compression setting, not a claim that 10 percent of the image detail is discarded.
WebP: lossy compression with transparency
WEBP also exposes an editable Quality value from 0 through 100. The selected number is supplied directly to Photoshop’s WebP quality setting.
The plugin uses lossy WebP compression. Unlike PNG’s compression control, changing WebP Quality can affect the rendered image’s compression quality, so inspect a test export at the setting you intend to use.
WebP can retain the transparent background produced by the cutout workflow. The current save configuration excludes XMP metadata, EXIF metadata, and Photoshop-extra metadata.
TIFF: a transparent output option with fixed interface quality
TIFF output uses Photoshop’s TIFF saving, with RLE layer compression in the current configuration.
The interface fixes Quality at 100 for TIFF. There is no editable 0–100 TIFF quality adjustment in this workflow.
PSD and PSB: processed Photoshop documents, not original layer stacks
PSD output uses Photoshop-format saving with alpha channels, an embedded color profile, layers, Maximize Compatibility, and spot-color support where applicable.
PSB uses Photoshop’s Large Document Format, with Maximize Compatibility enabled.
Both formats use fixed Quality 100 in the plugin interface. Their value is preserving the processed Photoshop working result, not preserving the source’s original multilayer composition.
Because visible layers are merged during preparation, do not choose PSD or PSB on the assumption that the exported derivative will contain every original source layer in its original arrangement. The untouched source document remains the place to retain that original structure.
Build filenames from useful output information
The filename-format builder lets you add, remove, and reorder components. Components are joined with hyphens, and each available component can appear only once.
At least one component must remain before the operation can run or be saved. The default PNG naming pattern is {image-filename}-background-removed.png.
The available components are:
- {image-filename}: the original source filename without its source extension.
- {background-removal-mode}: select-subject for Select Subject & Remove Inverse, or ai-background-removal for Remove Background Using AI.
- background-removed: the literal text background-removed.
- {width}x{height}: the final document dimensions, such as 2000x2000.
- {width}: the final output width.
- {height}: the final output height.
- {export-filetype}: the selected format in lowercase, such as png, webp, or psd.
- {quality}: quality- followed by the configured value, such as quality-90.
Controls let you move a selected component left or right, making it possible to arrange the same information according to your preferred naming convention.
For example, a filename built from the original name, removal mode, final dimensions, and Quality might produce:
shoe-select-subject-2000x2000-quality-90.png
A simpler naming format might retain only the original name and the literal background-removed component:
shoe-background-removed.png
Including the original name makes the relationship between source and derivative easy to recognize. Including dimensions is especially useful when the same subject is prepared in multiple canvas sizes.
Dimension components use the actual final document size
The Width and Height components are generated after processing, not taken from the original source before cropping or normalization.
If cropping produces a 740 × 1120 canvas, the combined dimension component becomes 740x1120. If pixel normalization produces 2000 × 2000, it becomes 2000x2000.
In ratio mode, this can help distinguish outputs that share a canvas shape but have different pixel dimensions. A 4:5 batch does not imply one universal Width × Height value.
Filename sanitization and duplicate protection
Generated names are sanitized before saving. Invalid filesystem characters are replaced with underscores, and trailing spaces and periods are removed.
If a generated filename would otherwise become empty, the fallback base is background-removed-image.
If the destination already contains the generated filename, the plugin adds a numbered suffix rather than simply reusing the existing name. For example:
- product-background-removed.png
- product-background-removed (1).png
- product-background-removed (2).png
This is useful when rerunning a batch or exporting different sources that happen to produce the same generated name.
Still, choose a naming format that makes the outputs understandable. A format containing only the literal background-removed component may be valid, but it provides much less source identification than one that includes {image-filename}.
Long-path protection
The plugin also safeguards against excessively long filenames and deeply nested output paths. Its current limits are approximately 255 characters for a safe full path and 240 characters for a safe filename.
It reserves room for duplicate numbering through (999) and maintains a minimum reasonable filename-base allowance of 20 characters.
When necessary, the generated filename base is shortened while retaining the file extension and room for duplicate numbering. If the export directory itself leaves too little space for a usable filename, the plugin stops and asks for a shorter or less deeply nested destination path.
A reasonably short export-folder path and a focused filename format are therefore helpful even though the plugin includes protective handling.
7. Save the workflow and change only what differs on the next job
Once a batch configuration produces the results you need, saving it is more reliable than reconstructing the same settings from memory for every project.
The bottom of the interface includes a saved-operation dropdown, an Operation Name field, and Save and Load buttons. When no real saved operation is selected, the dropdown uses the placeholder Example Saved Operation #1.
What the saved operation contains
A saved operation represents the full practical workflow, not just the background-removal method.
It stores:
- The operation name and input/output folder references.
- The removal method and Skip Images Containing Transparency state.
- The refinement state, method, and pixel amount.
- The Crop To Remaining Pixels and Normalize Output Size states.
- The normalization Width, Height, px/ratio mode, and horizontal/vertical alignment.
- The filename components, export filetype, and Quality.
This means a recurring operation can restore a complete production recipe, such as Select Subject, Contract 2 px, a 2000 × 2000 canvas, Center / Bottom placement, and PNG output.
Save a descriptive operation name
An Operation Name is required before saving. The maximum name length is 500 characters, and saved operations are stored locally by the plugin.
A useful name identifies the result the operation is intended to produce. For example:
- Catalog Products — 2000 Square — Bottom Aligned — PNG
- Tightly Trimmed Cutouts — Select Subject — PNG
- Portrait Assets — 4:5 Canvas — Centered — WebP
You do not need to include every individual setting in the name. Include enough information to choose the correct workflow without having to load several operations and compare them.
Load the workflow, then review the job-specific details
Selecting a saved operation and clicking Load restores its settings to the interface. Conditional controls appear or disappear according to those restored choices.
For example, a saved operation with normalization enabled restores the dimensions, unit mode, and alignment, while an operation with refinement enabled restores the method and amount.
The efficient way to reuse it is to preserve the settings that still suit the job and change only the requirements that differ.
A product-catalog operation might retain its removal method, edge treatment, square canvas, and filename structure while you select a new source folder and a new export destination. A related campaign job might use the same core cutout treatment but change the canvas mode to 4:5 ratio and select a different alignment.
If both versions will be used repeatedly, save them as separately named operations so each deliverable has a recognizable configuration.
Saved folders are references, not permanent guarantees of access
The plugin stores input and output folder references using persistent filesystem tokens. When loading an operation, it attempts to regain access to those locations.
If a folder has moved, been deleted, been renamed, or can no longer be accessed through its saved token, the plugin informs you and asks you to select the necessary folder again.
Even when the folder restores successfully, confirm that it is the correct location for the current job. A saved operation includes its old source and destination references; loading it does not automatically identify your next project’s folders.
The source folder’s contents are still retrieved when the batch begins. Reusing a saved operation therefore reuses the workflow and folder reference, not an old frozen list of source images.
Validation and deletion of saved operations
Before an operation can be saved or run, its configuration is validated. Relevant checks include selected and accessible source/output folders, at least one supported input image, at least one filename component, a valid removal method, valid enabled refinement and normalization settings, and valid export type and Quality.
Saved-operation entries can also be deleted. The delete control opens Delete Saved Operation? with Delete and Cancel choices. Confirming removes that saved operation from local storage.
For recurring work, the practical goal is a small set of clearly named, tested operations. You can then treat each new folder as another job using an established production method rather than another occasion to rebuild the settings from scratch.
8. Run the batch, verify the outputs, and resolve common problems
With the configuration prepared, the final step is to start processing and confirm that the exported assets meet the deliverable requirements.
A straightforward first batch
For a first test, use a small representative folder and a simple configuration. For example, this sequence produces tightly cropped PNG cutouts:
- Click Folder of Images To Process and select the test folder.
- Choose Select Subject & Remove Inverse.
- Leave Skip Images Containing Transparency disabled unless you specifically want qualifying images omitted from processing and export.
- Leave Refine Remaining Selection disabled for the first test so you can evaluate the native mask before adding an edge adjustment.
- Enable Crop To Remaining Pixels rather than Normalize Output Size.
- Click Export Folder To Use and select the destination.
- Select PNG, choose a valid Quality value, and retain or configure a filename format that includes the original name.
- Click Remove Image Backgrounds.
For an exact-size test, replace the cropping choice with Normalize Output Size, set the required Width and Height in px mode, and choose an alignment. You do not need to enable Crop separately because normalization performs its own preliminary trim.
If you select Remove Background Using AI, acknowledge the pre-batch warning and choose Proceed Anyway only if you are prepared for the possibility of a Photoshop-controlled dialog requiring manual attention.
What happens to each source image
For a normal configured batch, the plugin follows this working sequence:
- Open the source in Photoshop.
- Prepare its visible working content and convert a special Background layer to a normal layer if necessary.
- Check existing transparency if the skip setting is enabled.
- Close a qualifying skipped image without saving and move on, without producing an export for it.
- For a non-skipped image, invoke the selected background-removal method.
- After successful removal, apply the configured mask refinement if enabled.
- Perform the selected crop or normalization operation.
- Generate the filename using the final document information and export the processed result.
- Close the original source document without saving and proceed to the next image.
This is the practical difference between issuing a background-removal command once and automating transparent-asset production. The plugin handles the repeatable preparation and delivery steps around the removal itself.
Read the progress display correctly
During processing, the plugin displays a modal titled Removing Image Backgrounds... with a status area, progress bar, completed-image counter, and Cancel Operation button.
The progress wording can look like “0 / X backgrounds removed...” Already-transparent images that are skipped still advance completed progress, so the displayed count should not be interpreted simply as the number of newly exported files.
This distinction matters when reviewing a mixed folder. A completed batch can contain fewer new derivatives than supported source files because qualifying transparent images were intentionally bypassed.
Cancel when necessary
You can click Cancel Operation while the batch is running. The Escape key can also cancel while the operation-progress modal is displayed.
The plugin checks cancellation throughout processing. When necessary, it closes the current source document without saving before the batch exits.
If you cancel partway through a run, inspect the destination for outputs that were already written and determine what still needs processing. Do not use the progress display alone as a substitute for checking the resulting file set.
Recognize successful completion
After a fully completed, uncancelled operation without a recorded run error, the plugin shows Background Removals Completed! with the message “This operation is completely finished.”
The original source files remain unchanged by the normal processing workflow. The generated derivatives are in the selected export directory.
Completion means the configured operation has finished. It does not establish that Photoshop’s segmentation is visually correct for every subject, so a review of the exported assets remains important.
Check the outputs against the actual specification
A useful review separates cutout quality from file-delivery correctness.
- Inspect subject boundaries for missing details, unwanted background remnants, or excessive softness.
- Check that the canvas dimensions or shape match the intended px or ratio requirement.
- Confirm that the subject is positioned according to the selected alignment.
- Check that transparency is present where expected.
- Confirm that filenames contain the intended source identification and final-dimension information.
- Account for any images intentionally excluded by transparency skipping.
If a recurring boundary issue appears, adjust the relevant refinement setting and test again. If the file dimensions are wrong, check the unit mode before changing the numbers. If the destination is missing already-transparent assets, check whether the skip setting was enabled.
Common problems and their likely explanations
The batch will not start
Confirm that the source and export folders are selected and accessible, the source folder contains supported files directly inside it, and at least one filename component remains.
Then check enabled settings. Refinement requires a whole-number amount from 1 through 10,000. Pixel normalization requires Width and Height from 1 through 300,000. Ratio terms must each be positive whole numbers from 1 through 100,000. Quality must be an integer from 0 through 100, with TIFF, PSD, and PSB fixed at 100 in the interface.
There are fewer exported files than source images
First distinguish the total folder contents from the supported input files. Unsupported extensions are ignored, and files in nested subfolders are not recursively included.
Next check transparency skipping. Qualifying transparent images are not exported, even though they count toward completed progress. If a run was cancelled or encountered a removal problem, review the outputs rather than assuming that every source produced a successful derivative.
The AI method pauses during processing
Photoshop may be displaying its own dialog because Remove Background could not identify a background to remove. That popup requires manual acknowledgment, and the plugin cannot reliably suppress it.
For future runs where unattended processing is the priority, use Select Subject & Remove Inverse rather than relying on the AI method to avoid every blocking message.
Select Subject does not produce a usable cutout
The plugin checks for a meaningful selection rather than blindly creating a mask from an unsuccessful attempt. It does not automatically switch removal methods.
Inspect the source and test the selected native Photoshop operation on a representative difficult image. The plugin automates Photoshop’s detection; it cannot guarantee a correct subject boundary for every image.
Small subjects do not fill the normalized canvas
This is expected in pixel mode. The plugin scales down oversized cutouts but does not upscale smaller ones. A larger requested canvas adds transparent area around a smaller subject.
Exact canvas normalization is therefore different from enlarging every subject to a fixed visual size.
Ratio outputs have different pixel dimensions
Ratio mode standardizes shape, not resolution. It preserves each trimmed cutout’s size and expands the canvas as necessary.
If every output must have identical Width × Height dimensions, select px mode and enter those dimensions explicitly.
PSD or PSB does not contain the original layer arrangement
The plugin merges visible layers during preparation. PSD and PSB preserve the processed working result, not the input document’s original multilayer structure.
Use the unchanged source document when you need the original layer arrangement.
A saved operation cannot restore its folders
The stored folder reference may no longer provide access because the location moved, was renamed, was deleted, or became inaccessible. Select the required folder again and confirm that both source and destination are appropriate for the current job.
The plugin asks for a shorter export path
A deeply nested destination can consume too much of the safe full-path allowance. Select a shorter destination path rather than relying on filename shortening to solve a directory path that already leaves insufficient room.
Bulk Background Remover is most useful when the job involves a complete folder of deliverables, not just a single background-removal click. With a tested method, appropriate edge treatment, the correct canvas mode, and a saved export configuration, you can turn the repeated open–mask–trim–position–name–export routine into one configured batch operation. Find Bulk Background Remover: Automated Cutouts through Adobe Exchange or the Creative Cloud plugin marketplace, begin with a representative test folder, and build a reusable workflow around the transparent assets you actually need.