Bulk Image Cropper: Aspect Ratio Cropping Explained

Aspect Ratio Crop in Bulk Image Cropper crops images to a chosen width-to-height proportion, such as 1:1, 4:5, or 16:9. It retains the largest matching crop rectangle that fits within each source image, while your alignment setting determines which part of the image stays inside that rectangle.
The most important distinction is that this is cropping, not resizing. Entering 1200 × 628 requests that proportion; it does not instruct the plugin to produce an image measuring exactly 1200 × 628 pixels. Understanding that distinction—and how alignment affects the result—is the foundation of using this mode effectively.
What Aspect Ratio Crop Does Within Bulk Image Cropper
Bulk Image Cropper: Automated Batch Cropping is a third-party Photoshop plugin that automates cropping, transparency-padding adjustments, and exporting across a folder of images. Aspect Ratio Crop is one of its five crop modes.
For this mode, the basic workflow is straightforward: select a source folder, enter a ratio, choose an alignment and export settings, select an output folder, and start the batch. The plugin opens each supported source image, performs the configured crop, exports the result, and moves through the remaining files.
You can configure one ratio for the whole folder or add multiple crop operations to generate several variants from each source. For example, a single batch can produce square, portrait, and landscape versions without requiring you to reopen and crop every image manually.
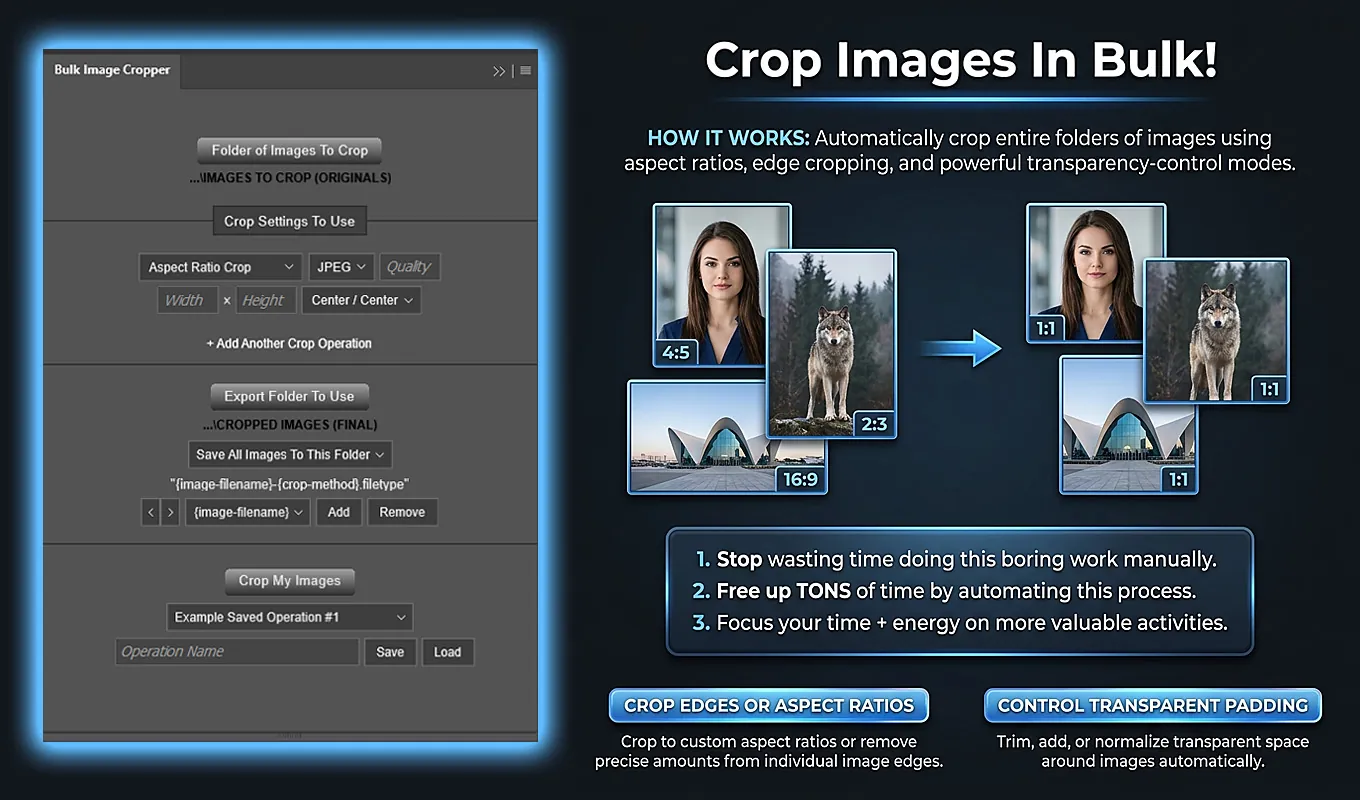
Width and Height Define a Proportion, Not a Resolution
When Aspect Ratio Crop is selected, its mode-specific controls are Width, Height, and Alignment. Width and Height each accept a whole number from 1 to 100,000.
The two numbers describe the relationship between the output’s width and height:
- 1 × 1 produces a square proportion.
- 4 × 5 produces a portrait proportion.
- 3 × 2 produces a landscape proportion.
- 16 × 9 produces a wider landscape proportion.
Equivalent numeric pairs describe the same crop shape. A setting of 4 × 5 is equivalent to 800 × 1000 or 1080 × 1350. Similarly, 1 × 1 and 1000 × 1000 both request a square.
Larger numbers do not request higher resolution. Entering 1000 × 1000 instead of 1 × 1 does not enlarge the image, preserve additional pixels, or improve image detail. The final dimensions depend on the source image and the largest crop that fits the requested proportion.
The order matters, however. Width 4 and Height 5 is portrait; Width 5 and Height 4 is landscape.
How the Crop Rectangle Is Calculated
The plugin compares the source image’s width divided by its height with the requested ratio’s Width divided by Height. That comparison determines which dimension needs to be reduced.
When the source is wider than the target ratio
The crop retains the full source height and removes excess width from the left, right, or both sides, depending on alignment.
The retained width is calculated as: source height × target ratio Width ÷ target ratio Height.
When the source is taller than the target ratio
The crop retains the full source width and removes excess height from the top, bottom, or both sides.
The retained height is calculated as: source width × target ratio Height ÷ target ratio Width.
When the source already matches the target ratio
No dimensional reduction is needed. The crop effectively preserves the complete existing image dimensions.
Consider a source image measuring 2400 × 1600 pixels:
- For 1:1, the full 1600-pixel height is retained, producing a 1600 × 1600 crop. A total of 800 pixels is removed horizontally.
- For 4:5, the retained width is 1600 × 4 ÷ 5 = 1280 pixels, producing a 1280 × 1600 crop. A total of 1120 pixels is removed horizontally.
- For 16:9, the retained height is 2400 × 9 ÷ 16 = 1350 pixels, producing a 2400 × 1350 crop. A total of 250 pixels is removed vertically.
These examples also explain why one source can produce variants with different pixel dimensions. The plugin is finding the largest crop for each requested shape, not scaling every result to a common resolution.
Nine Alignments Control Which Area Is Retained
The ratio determines the crop rectangle’s shape and size. Alignment determines its position within the source image.
Aspect Ratio Crop provides nine choices:
- Left / Top
- Left / Center
- Left / Bottom
- Center / Top
- Center / Center
- Center / Bottom
- Right / Top
- Right / Center
- Right / Bottom
The default is Center / Center.
For horizontal cropping, Left retains the leftmost available area, Center distributes the removed width between both sides, and Right retains the rightmost area. For vertical cropping, Top retains the uppermost area, Center distributes the removed height between top and bottom, and Bottom retains the lowest area.
Using the 2400 × 1600 source and a square target, the crop must remove 800 pixels of width. Left / Center removes that excess from the right. Center / Center removes 400 pixels from each side. Right / Center removes the excess from the left.
Only the alignment component on the cropped axis changes the result. If the full height is retained, Top, Center, and Bottom do not change the vertical bounds. If the full width is retained, Left, Center, and Right do not change the horizontal bounds.
Choose alignment according to composition. A subject near the left edge may benefit from a left-anchored crop; important content near the top may benefit from a top-anchored crop. Alignment selects a geometric region—it does not guarantee that every important detail will remain inside the crop.
Plan a 200-Image Batch With Three Aspect Ratios
Suppose a designer has 200 product and lifestyle photographs and needs three versions of each: square images for one deliverable, portrait images for another, and landscape images for a third.
The batch can contain three operations:
- Rule 1: Aspect Ratio Crop, Width 1, Height 1.
- Rule 2: Aspect Ratio Crop, Width 4, Height 5.
- Rule 3: Aspect Ratio Crop, Width 16, Height 9.
If the subjects are consistently centered, Center / Center is a reasonable starting alignment for each rule. Each operation can then receive its own export format and applicable Quality value.
With 200 valid source images and three rules, the batch contains 600 crop/export operations. The user configures three rules rather than repeating the crop-and-export setup 600 times.
The preparation still matters: inspect representative source images, decide whether the chosen alignments suit them, and plan how the three output sets should be organized. Automation removes repetitive execution; it does not remove the need to make sound composition decisions.
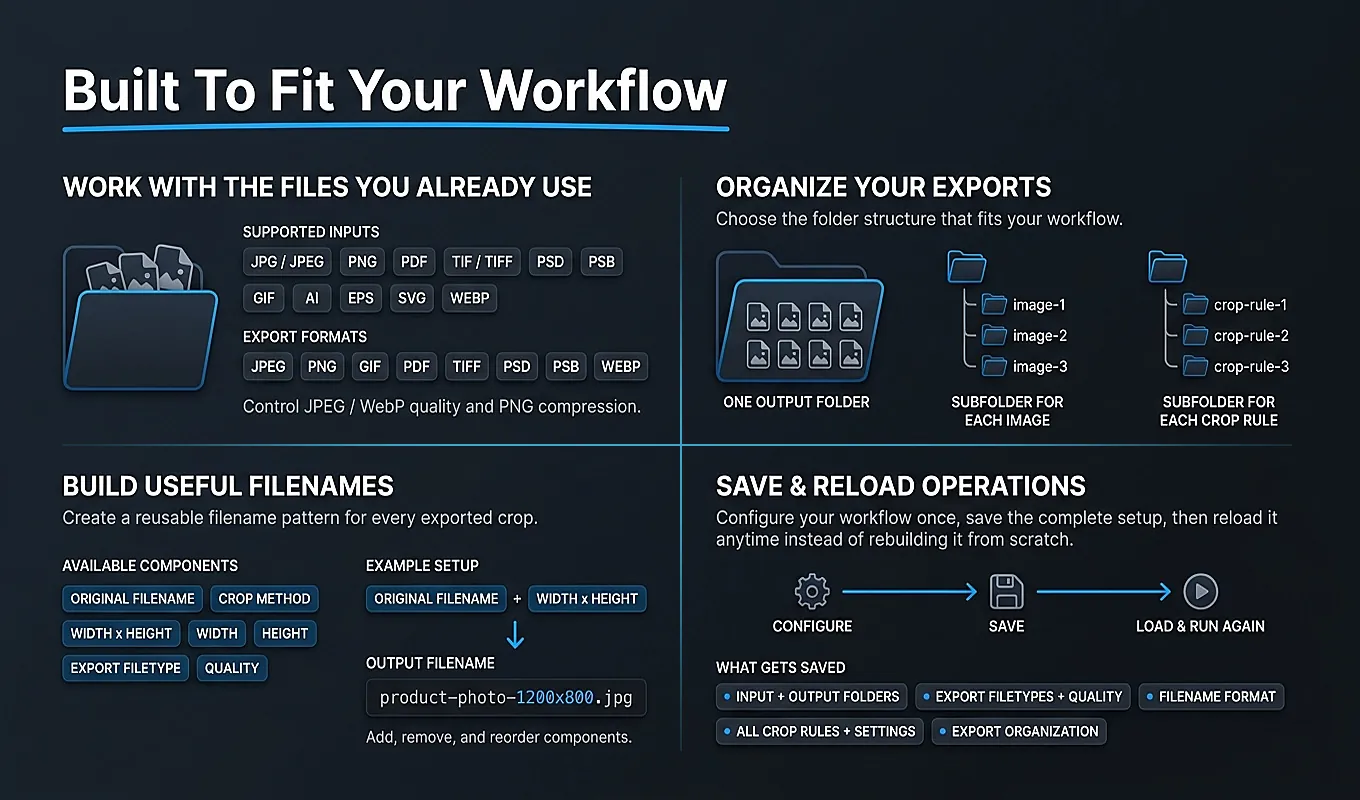
Configure and Run an Aspect Ratio Crop Batch
Bulk Image Cropper is available through Adobe Exchange and Adobe’s Creative Cloud plugin marketplace. After installation, open it from Photoshop’s Plugins menu.
- Select Folder of Images To Crop and choose the directory containing your source files. The plugin processes supported images directly inside that folder, not arbitrary nested subfolders.
- In Crop Settings To Use, select Aspect Ratio Crop. It is the initial default mode.
- Enter the Width and Height values for your target ratio. Both fields must contain integers from 1 to 100,000.
- Select an Alignment. Keep Center / Center if a centered crop suits the source images, or choose another anchor to retain a different region.
- Choose the export filetype and enter Quality where applicable. JPEG is the default export format.
- If additional variants are needed, click + Add Another Crop Operation and configure each new rule’s ratio, alignment, export format, and Quality.
- Select Export Folder To Use, choose the folder-organization option, and configure the filename format.
- Click Crop My Images to validate the configuration and begin processing.
The plugin checks required settings, folder accessibility, and whether the input folder contains supported images before the batch begins. The initial input fields need to be filled in appropriately; selecting the crop mode alone does not complete the configuration.
During processing, the Cropping Your Images... modal displays status, a progress bar, and a completed-operation count. Progress is based on the number of valid source images multiplied by the number of configured crop operations. You can stop the batch with Cancel Operation or the Escape key while the modal is active.
After the configured rules have been processed for a source image, its working document is closed without saving changes back to the original file. The crops are exported separately, leaving the source unchanged.
For recurring work, you can enter an Operation Name and save the configuration. Saved operations retain the crop rules, alignments, export settings, selected folders, output organization, and filename format so the workflow can be loaded later.
Multiple Rules Produce Independent Crops, Not a Cropping Chain
Adding another operation does not make it crop the result of the preceding operation. Every rule begins from the original source-document state.
This matters especially when generating different aspect ratios. From a 2400 × 1600 source, a square rule produces 1600 × 1600. A separate 16:9 rule produces 2400 × 1350 because it uses the original image—not the square output.
If the landscape crop were applied to the square result instead, image area already removed by the square crop would be unavailable. Bulk Image Cropper avoids that unintended cumulative cropping by reverting the working document between independent rules.
Each rule can also have a different alignment. A square variant could use Left / Center while a landscape variant uses Center / Top. Both are calculated from the same original image, with their own crop geometry and export settings.
Think of multiple operations as parallel deliverables from one source, not as successive editing steps.
Name and Organize Outputs So the Ratios Stay Identifiable
A multi-ratio batch creates an organizational task as well as a cropping task. If hundreds of outputs land in one folder with similar names, finding the correct version can become the next source of repetitive work.
Bulk Image Cropper offers three output-organization choices:
- Save All Images To This Folder places every generated file directly in the selected export folder.
- Create A Subfolder For Each Image groups all variants from one source in a folder based on its original filename.
- Create A Subfolder For Each Crop Rule groups the outputs from each configured rule together. Rule-folder names include relevant settings such as aspect ratio, alignment, export filetype, and Quality.
Grouping by crop rule is useful when each ratio has a separate destination. Grouping by image is useful when you want to review all versions of one source together.
The filename builder can include the source filename, crop method, actual final dimensions, export format, and Quality. For aspect-ratio batches, the dimensions component is particularly useful.
For example, selecting {image-filename}, {crop-method}, and {width}x{height} could produce filenames such as:
- product-01-aspect_ratio_crop-1600x1600.jpg
- product-01-aspect_ratio_crop-1280x1600.jpg
- product-01-aspect_ratio_crop-2400x1350.jpg
The crop-method value is aspect_ratio_crop for every output made with this mode. Consequently, the default source-name-plus-crop-method format does not, by itself, identify which aspect-ratio rule produced a file. Adding actual dimensions or using crop-rule folders makes the outputs more informative.
Both the filename format and folder-organization choice apply across the batch. If a generated filename already exists, the plugin creates a numbered alternative rather than overwriting that existing output.
Export Format and Quality Are Separate From Crop Geometry
Every crop operation has its own export-filetype and Quality controls. These determine how its result is saved; they do not change the selected ratio, alignment, or calculated crop dimensions.
The editable Quality range is an integer from 0 to 100 for JPEG, PNG, and WebP:
- JPEG uses a proportional mapping to Photoshop’s JPEG quality range of 0–12. A plugin Quality value of 100 maps to Photoshop quality 12.
- PNG remains lossless. The plugin’s Quality value maps inversely to PNG compression, so a higher value corresponds to lower compression—not additional image detail.
- WebP uses lossy compression, with the selected 0–100 value passed to the WebP quality setting.
For GIF, PDF, TIFF, PSD, and PSB, the Quality field is fixed at 100 rather than being a user-configurable quality parameter.
This separation lets one batch serve different delivery needs. For example, a square rule can export JPEG while a portrait rule exports PNG. Neither format choice turns the aspect-ratio fields into resizing controls.
Likewise, increasing Quality cannot restore content removed by the crop or add resolution beyond the retained source pixels. Decide on composition and dimensions first, then choose the appropriate export settings.
Check Representative Crops Before Scaling Up
Before processing a large collection, run the configuration on a small folder containing representative source images. Include examples with different proportions and subject positions, rather than testing only the easiest image.
Review the exported results for three things:
- Composition: does the retained region include the subject and any essential surrounding detail?
- Dimensions: does the largest available crop leave enough pixels for the intended deliverable?
- Organization: can you immediately identify each ratio and find the appropriate output set?
Each rule has one alignment setting that is applied across its batch. If some sources need a left-anchored crop and others need a right-anchored crop, one fixed alignment may not suit the whole collection.
In that situation, you can separate sources into folders for different alignment-based runs, or configure additional rules with different alignments and review the resulting variants. Additional rules still produce independent outputs from the original sources.
A short test helps confirm the creative decisions before automation repeats them across the full folder. It also distinguishes a consistent aspect ratio from consistently good framing: the plugin can standardize the shape, but the chosen crop must still suit the content.
Aspect Ratio Crop FAQ
Can I use Aspect Ratio Crop to get exactly 1080 × 1350 pixels?
Not by entering those numbers alone. Width 1080 and Height 1350 request the same 4:5 proportion as Width 4 and Height 5. The final pixel dimensions depend on the source. If a deliverable also requires exactly 1080 × 1350 pixels, that requires a separate resizing step; Aspect Ratio Crop itself does not perform that scaling.
Can I enter decimal ratio values?
No. The Width and Height fields require integers from 1 to 100,000. Express the proportion with whole numbers instead: use 3 × 2 rather than 1.5 × 1, for example.
What happens if an image already has the requested ratio?
The crop effectively retains its existing dimensions. A 1600 × 900 image already matches 16:9, so no dimensional crop is needed. It is still processed and exported according to the rule’s output settings.
Does the mode add canvas space to avoid cutting off content?
No. Aspect Ratio Crop reaches the requested proportion by removing excess image area when the source ratio differs. It does not expand the canvas to preserve the entire source inside a new shape. Alignment helps choose what remains, but it cannot preserve everything when the required crop excludes part of the source.
How does existing transparent padding affect the calculation?
The calculation uses the current document’s width and height, including any transparent outer canvas. Aspect Ratio Crop does not first tightly trim the image around its visible content. Transparency-boundary adjustment is handled by the plugin’s separate transparency modes.
Also remember that adding a transparency rule and an aspect-ratio rule does not create a sequential trim-then-crop workflow: configured rules produce independent outputs from the original source state.
For folder-wide ratio standardization, the practical starting point is simple: choose the proportion, select the alignment that suits your sources, test representative images, and configure clear output names. Bulk Image Cropper then handles the repeated cropping and exporting, including multiple ratio variants, while preserving your original files.