Can Photoshop Automatically Tile A Watermark Across Multiple Images?


Yes. Photoshop can automatically tile a text or image watermark across a folder of images using Bulk Image Watermarker: Automated Batch Logos, a third-party Photoshop plugin. Its Pattern Watermark layout creates a repeated watermark field for each image, while its batch workflow handles opening the files, applying the pattern, exporting the results, and closing the source documents without saving changes.
The important distinction is that you need two kinds of automation: repeating the watermark across each image and repeating that operation across the entire folder. Here is how to configure both, including tile size, spacing, rotation, and output settings.
Two kinds of repetition: across the image and across the folder
A tiled watermark is not just a logo applied to several photographs. It is a watermark repeated in rows and columns across the surface of each photograph. A folder of 100 images therefore needs 100 individually constructed watermark fields, each suited to its document dimensions.
Bulk Image Watermarker handles this through a Watermark Rule using the Pattern Watermark layout. The rule defines the watermark source, opacity, width, horizontal spacing, row spacing, and angle. During processing, the plugin builds the repeated field for the current image rather than relying on a fixed overlay prepared for one particular canvas.
That distinction matters when a folder contains different resolutions or orientations. The pattern field is calculated for each document, and percentage-based watermark width can make the individual marks scale with the image width. You configure the treatment once; the plugin applies it as each source image opens.
What the automated workflow replaces in Photoshop
Manually creating a tiled watermark usually starts with a text layer or a placed logo. You resize it, set its opacity, duplicate it horizontally, arrange the gaps, and repeat the row vertically. If you want a diagonal pattern, you also need enough repeated material beyond the canvas edges to keep the rotated overlay from leaving corners uncovered.
Then comes the work outside the pattern itself: export the image, choose its filename, close the document without altering the original, and start again with the next file. A different canvas size can require another adjustment to the repeated field.
The Pattern Watermark workflow removes that repeated construction. It creates the watermark unit, duplicates the rows and columns, combines the field, rotates it, and centers it over the document. The batch operation then takes care of the file-by-file processing. Your attention shifts from arranging individual copies to choosing and checking the watermark treatment.
Choose what Photoshop will repeat: text or an image
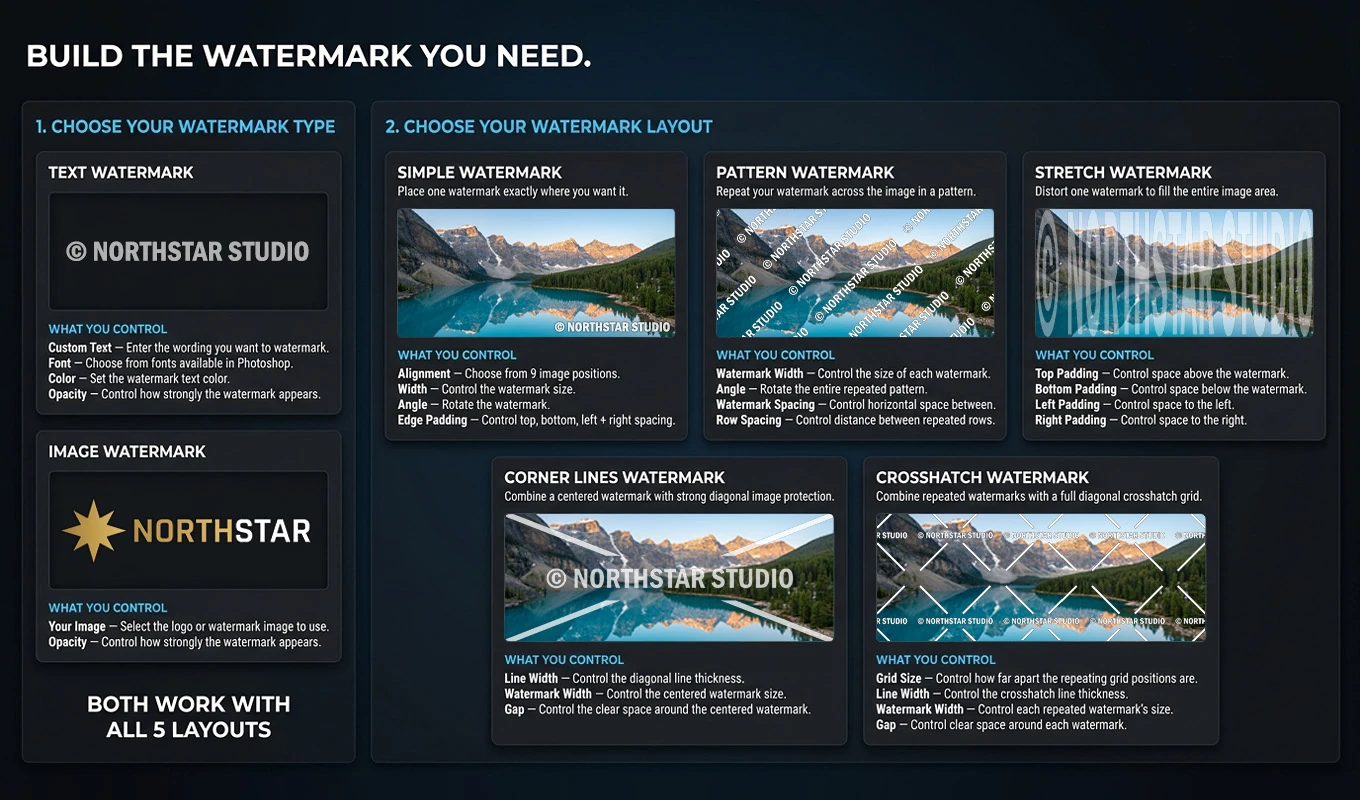
Every Pattern Watermark rule can use either Text Watermark or Image Watermark. The selected source becomes the unit repeated throughout the field.
For text, enter the wording in Text To Use, choose a font from those available to Photoshop, and set a hexadecimal color. For example, you might repeat “CLIENT PROOF,” a copyright notice, your business name, or a website address. The text cannot be empty when the operation runs.
For a logo or other graphic, select Image Watermark and use Image To Use to choose the source file. Photoshop must be able to place that file into the document. Prepare the asset as you want it to appear: if you want only the logo repeated, use an asset without an unwanted visible rectangular background.
Opacity is available for both styles, from 0 to 100. It is worth testing this alongside the tile density: many faint marks can have a substantially different visual effect from a few widely spaced, more opaque marks.
Control the size of each tile and the space around it
Pattern Watermark exposes three related controls: Watermark Width, Space Between Watermarks, and Space Between Rows. Width determines the size of the individual mark. The other two settings determine the horizontal gaps between marks and the gaps between repeated rows.
The layout uses a shared px/% measurement control for width and spacing. For Watermark Width specifically, percentage sizing is based on the current image width. A 10% width produces a 150-pixel-wide watermark on a 1500-pixel-wide image and a 300-pixel-wide watermark on a 3000-pixel-wide image.
That makes percentage width useful for mixed-resolution folders. A fixed 180-pixel watermark is relatively prominent on a small image but much smaller relative to a large one. Percentage width adapts the mark’s size to the document instead of keeping its absolute pixel width unchanged.
Spacing deserves its own visual check. Increasing Space Between Watermarks spreads the copies farther apart within each row. Increasing Space Between Rows opens more space between rows. Reducing either value makes the field denser, but density is not automatically better: a proof watermark should remain readable without making the underlying image unnecessarily difficult to assess.
For your first test, use pixel mode if you want straightforward, measurable gaps. Once the appearance works, evaluate whether percentage-based watermark width would better suit the range of image sizes in your actual folder.

Rotate the finished pattern, not every watermark by hand
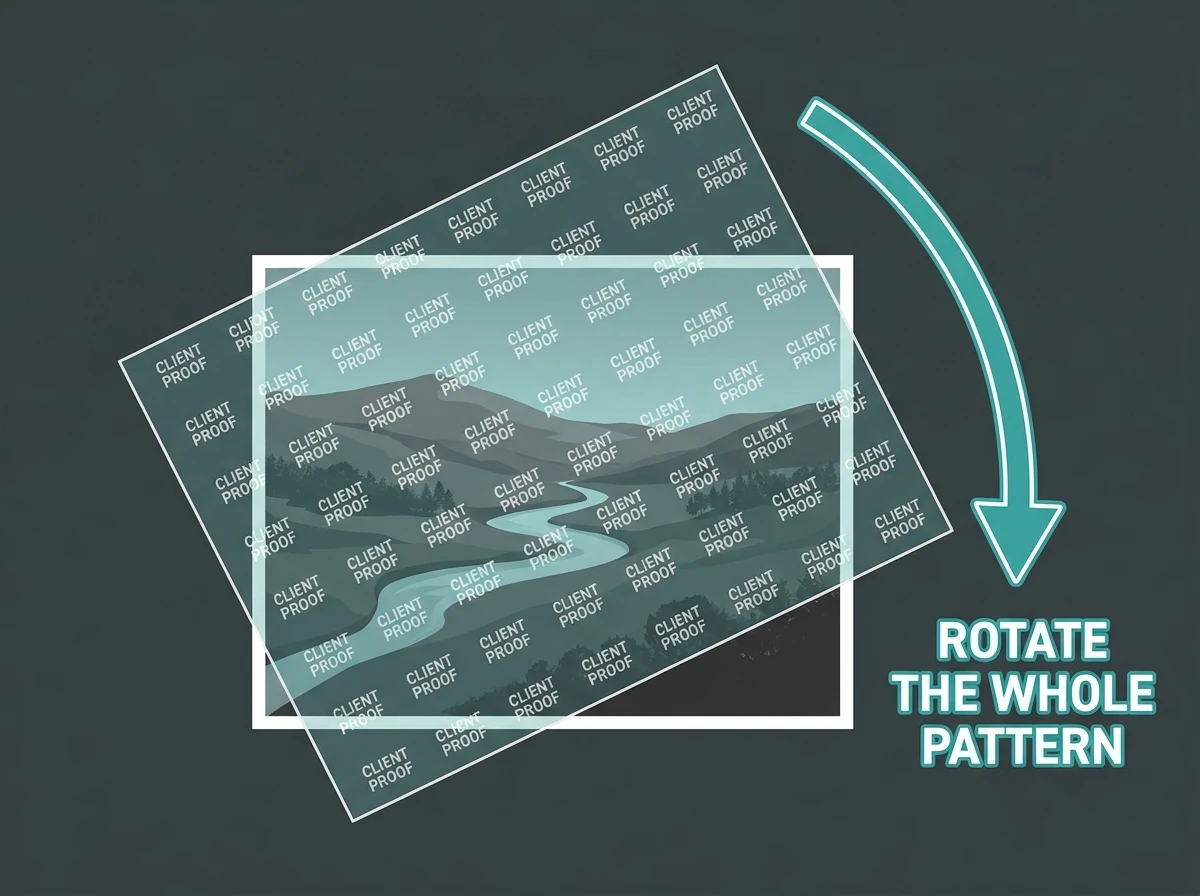
The Pattern Watermark Angle setting rotates the completed repeated field. You do not need to rotate and reposition each watermark copy separately.
The plugin first builds a field large enough to extend beyond the document, using the document diagonal in its coverage calculation. It then combines the repeated pattern, rotates it to the selected angle, and centers the result over the image. Building beyond the visible boundaries helps reduce the risk of uncovered corners after rotation.
This is particularly useful for diagonal proof marks. A grid built only to the exact canvas width and height can expose empty areas when rotated; the larger field addresses that construction problem automatically.
Pattern mode does not use the nine-position alignment control found in Simple Watermark. Its purpose is a centered repeated overlay rather than a single watermark anchored to a corner. An angle such as 45° is a useful starting point for diagonal text, but inspect the exported result before treating any angle as your standard.
How to tile a watermark across a folder of images
Install Bulk Image Watermarker through Adobe Exchange or Adobe’s Creative Cloud plugin marketplace, then access it from Photoshop’s Plugins menu. Once the plugin is open, follow this sequence:
- Select Folder of Images To Watermark and choose the source directory.
- In Watermark Rule #1, choose Text Watermark or Image Watermark. Enter the text and select its font and color, or use Image To Use to select the watermark graphic.
- Set Watermark Layout to Pattern Watermark.
- Configure Opacity, Watermark Width, Space Between Watermarks, Space Between Rows, the px/% setting, and Angle.
- Leave the application setting on Apply To All Images if every supported source image should receive the tiled overlay.
- Select Export Folder To Use and choose the global export filetype. Set Quality where that format allows it.
- Check the filename-format builder. The default format uses the source name followed by “watermarked,” making the derivative copies easy to identify.
- Click Watermark My Images to validate the configuration and begin processing.
For each source image, the plugin opens the document, evaluates the rule, constructs the repeated watermark, and exports the finished result. The source document is then closed without saving.
You do not need an additional rule for every watermark copy. One Pattern Watermark rule creates the repeated field. Additional rules are only necessary when you want another watermark treatment or different application conditions.

A practical starting setup for tiled client proofs
Suppose you have a folder of 2400 × 1600 images and want a diagonal text overlay for client review. The following is an illustrative starting configuration, not a built-in preset or a universally ideal design:
- Watermark Style: Text Watermark.
- Text To Use: CLIENT PROOF, using an available font that remains readable at the chosen size.
- Color: #FFFFFF, with Opacity set to 20.
- Watermark Layout: Pattern Watermark, using pixel measurements.
- Watermark Width: 180 px; Space Between Watermarks: 120 px; Space Between Rows: 100 px.
- Angle: 45°; Application: Apply To All Images.
Export a few representative images and inspect them at the size at which clients will actually view them. If the words are too small, increase Watermark Width. If the field feels crowded, increase the gaps. If white text disappears over bright areas, reconsider the color or opacity rather than simply adding more copies.
For a folder with widely varying resolutions, revisit the percentage-width option. The goal is an appropriate relationship between the watermark and the image, not just identical numbers in the settings.
Apply the tiled overlay only to the images that need it
You can apply a Pattern Watermark rule to the whole folder or restrict it to particular source images. Filename targeting is especially useful when previews and other files share a directory.
For example, enable Apply If Filename Contains and enter “preview.” Matching is case-insensitive substring matching, so both “product-preview-01.jpg” and “PREVIEW-image.png” can qualify.
Orientation conditions can further narrow the rule. A filename condition combined with vertical and horizontal orientation selections means the filename must match and the image must be either vertical or horizontal. The condition categories combine using AND logic; the selected orientations form an OR group. Square images would not qualify unless that orientation were also selected.
Brightness thresholds are also available when average image brightness is relevant to the treatment. That average comes from Photoshop’s document histogram, rather than a filename label.
There is one important output consequence: if no Watermark Rule applies to a source image, the current implementation does not export that image. A preview-only rule therefore produces watermarked copies of matching previews, not unchanged copies of everything else in the folder. Use Apply To All Images when every supported source image needs an output.
Add a corner logo without losing the repeating pattern
A tiled proof overlay and a conventional corner logo serve different purposes. You can include both in one output by adding another Watermark Rule.
For example, configure Rule #1 as a low-opacity Pattern Watermark using “CLIENT PROOF.” Then add Rule #2 as an Image Watermark using Simple Watermark, aligned Right / Bottom with suitable width and padding.
Rules are sequential and cumulative. If both qualify, the repeated proof pattern is added first, the corner logo is added to the same working document afterward, and the combined image is exported once. The plugin does not create one pattern-only output and a separate logo-only output.
Each rule has its own source, opacity, layout, and application conditions. You can therefore keep a corner logo on every image while restricting the tiled proof text to filenames containing “preview.” Remember that a newly added rule starts from the normal defaults; it does not copy the previous rule’s completed settings.
Export watermarked copies while keeping your originals clean
The export filetype and Quality are global settings for the operation, not separate choices for each watermark rule. Choose the format for the finished combined result.
JPEG is an option for photographic delivery, PNG provides lossless output, and PSD output is configured to preserve layers. JPEG and WebP have editable quality settings. PNG also has an editable Quality control, but it remains lossless: that setting changes compression rather than introducing lossy image quality reduction.
The filename builder can retain the original source name and append “watermarked.” It can also include final document dimensions, which can help distinguish different-sized images in a mixed batch. Watermarking normally adds content within the existing canvas rather than resizing or cropping the document, so those dimensions ordinarily remain the source dimensions.
Outputs go directly into the selected export folder. If a generated name already exists, the plugin creates a numbered alternative instead of reusing that name. After processing, the source document closes without saving, preserving the clean original file.

Questions to settle before processing a large folder
How should I test the pattern before committing to the batch?
Run a small sample folder through the actual export workflow. Include your smallest and largest images, different orientations, and backgrounds on which the watermark might be hard to see. Inspect tile size, spacing, edge coverage, and opacity in the resulting files. This is a practical test procedure, not a separate live-preview feature.
Will the plugin include images inside nested folders?
No. It processes supported files directly inside the selected source directory; it does not recursively crawl arbitrary subfolders. Put the images for the operation in that directory, and remember that unsupported files are ignored. The plugin retrieves the source-file list immediately before processing, so additions or removals made after folder selection are reflected when the operation runs.
Can I stop if the first outputs reveal a problem?
Yes. During processing, the Watermarking Your Images progress modal includes a Cancel Operation button. Escape can also cancel while that modal is active. Progress is tracked by source images rather than by individual watermark copies or rules.
Can I reuse the same tiled watermark setup?
Yes. Save the configuration as a Saved Operation to retain the watermark rules, layout settings, folders, export settings, and filename components. If a saved logo file or folder later becomes inaccessible, you will need to select the affected item again.
Once the sample outputs look right, Bulk Image Watermarker gives you a practical way to run the same tiled treatment across the full folder. Start with one Pattern Watermark rule, refine the size and spacing on representative images, and save the finished setup when you expect to use it again.