How To Automatically Improve The Detail And Clarity Of Multiple Images


To make multiple soft-looking images appear clearer, you can apply a controlled sharpening treatment across an entire folder instead of editing and exporting each file individually. The important part is choosing settings that improve visible edges and textures without exaggerating noise or creating bright outlines.
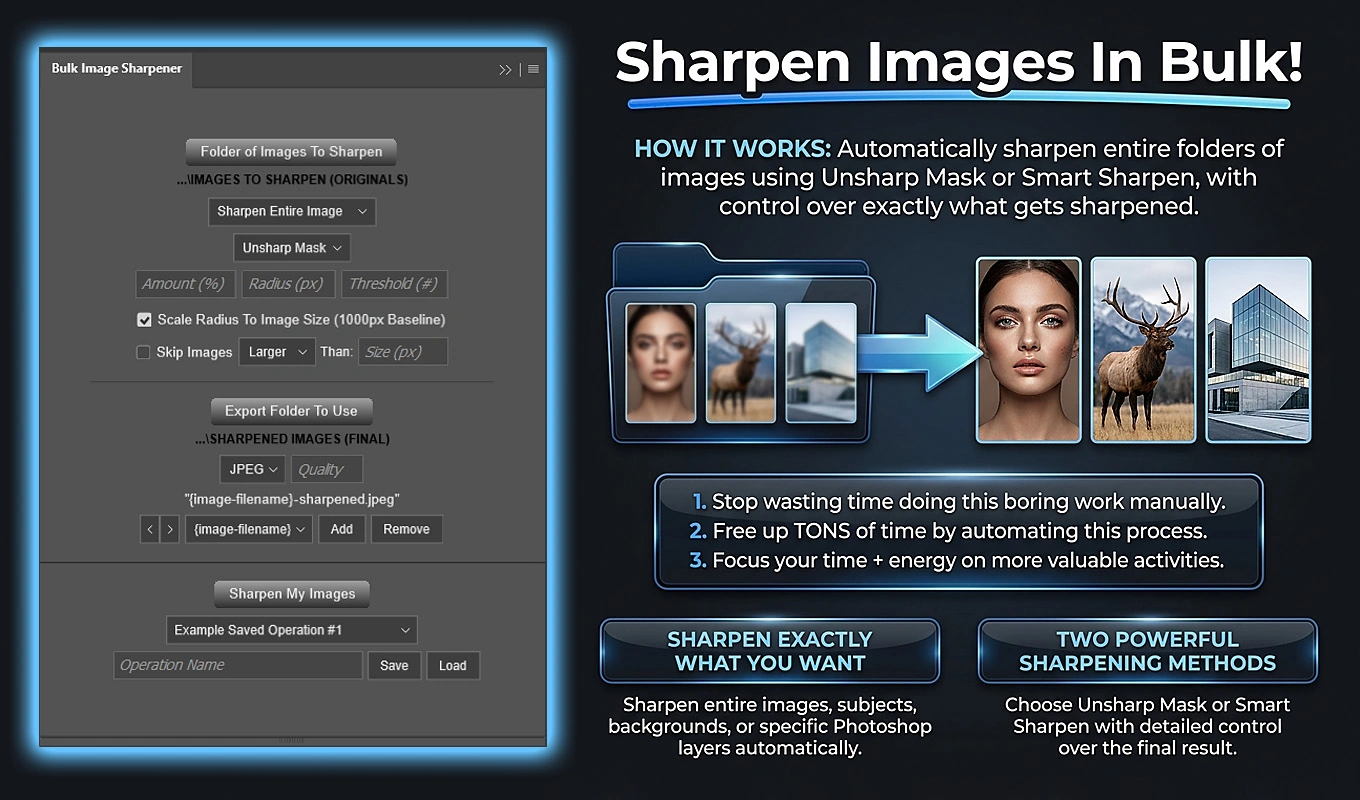
Bulk Image Sharpener: Automated Sharpening is a Photoshop plugin designed for this workflow. You choose a source folder, decide which part of each image to sharpen, configure Unsharp Mask or Smart Sharpen, and export separate sharpened copies. For images with different resolutions, it can also adjust the sharpening radius automatically.
Here is how to set up that process, choose a sensible treatment, and check that the resulting images genuinely look better.
Understand what sharpening can actually improve
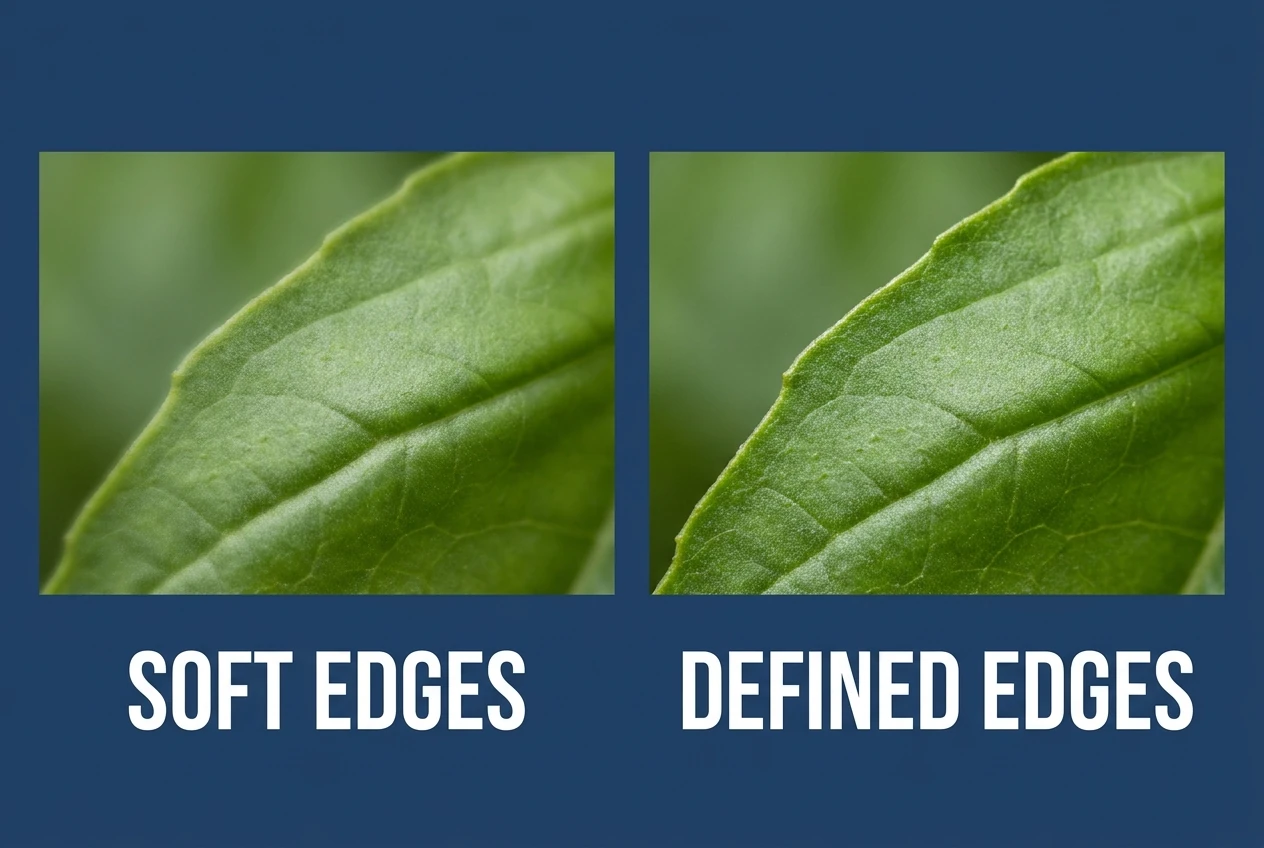
Sharpening makes existing detail look more defined by increasing contrast around edges. It can help slightly soft photographs, product images with indistinct boundaries, and finished graphics that need a clearer appearance at their intended viewing size.
It does not create new resolution or reconstruct detail that was never captured. A photograph with severe missed focus will not become equivalent to a sharply focused original simply because you increase the sharpening strength. Bulk Image Sharpener is a sharpening tool, not an AI upscaler or resolution-generation tool.
This distinction matters when choosing images for a batch. Images that are already reasonably clear usually benefit from a restrained finishing treatment. Images with heavy blur, strong noise, or visible compression artifacts need more caution: sharpening can make those problems more noticeable along with the useful detail.
The goal is therefore not maximum sharpness. It is a cleaner, more readable appearance at the size where people will actually view the images.
Prepare a batch that can share one sharpening treatment
A successful automated batch starts with images that can reasonably use the same settings. Different dimensions are manageable because the plugin can scale its radius, but very different image problems may require separate batches.
For example, clean product photographs and noisy low-light photographs should not automatically receive the same aggressive treatment. Group images by their general condition and intended use, rather than assuming that everything in one folder needs identical sharpening.
- Install Bulk Image Sharpener through Adobe Exchange or Adobe’s Creative Cloud plugin marketplace. After installation, open or restart Photoshop if necessary and access the plugin through the Plugins menu.
- Place the source images directly inside the folder you want to process. The plugin supports common inputs including JPEG, PNG, TIFF, PSD, and WebP, but does not recursively process arbitrary nested subfolders.
- Create a small test folder containing representative images: a typical image, a softer one, a noisier one, and examples of your smallest and largest dimensions.
- Choose a separate export folder so the sharpened derivatives are easy to compare with the originals.
In the plugin, use Folder of Images To Sharpen to select the test folder. Running a small representative batch first gives you actual exported files to evaluate before applying the treatment to the full collection.
Also decide the intended delivery size. Inspecting a photograph that will be used as a small website image is different from judging one intended for a large print. Sharpening normally does not resize the document, so prepare the required dimensions separately if your delivery workflow calls for resizing.
Choose a sharpening method and sensible starting settings
Bulk Image Sharpener offers two native Photoshop sharpening methods: Unsharp Mask and Smart Sharpen. Neither is automatically the best choice for every image. Choose based on how much control you need and what the test results show.
Use Unsharp Mask for a straightforward clarity boost
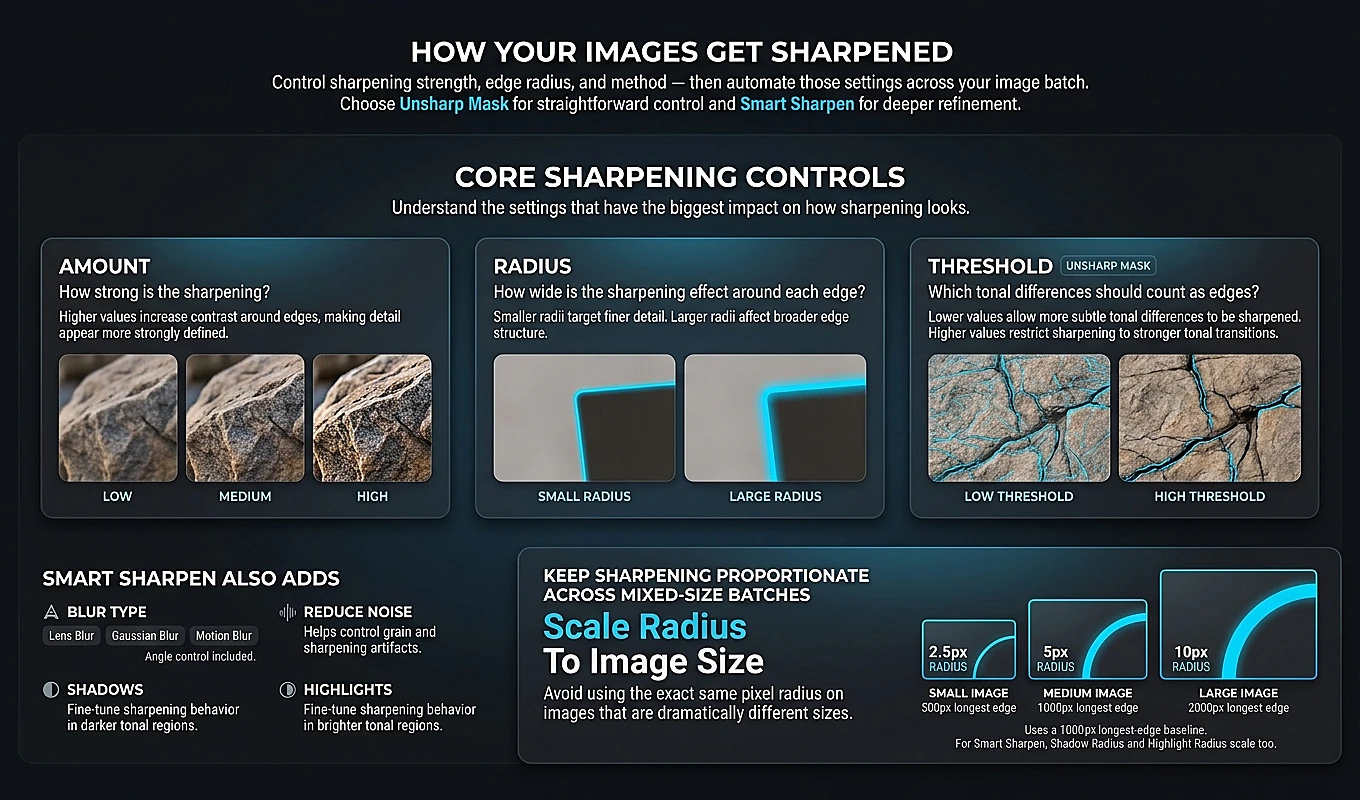
Unsharp Mask is a useful starting point when your images need a consistent finishing treatment rather than a specialized blur-removal configuration. Its three controls address different parts of the effect:
- Amount controls the strength of the sharpening.
- Radius controls the pixel distance over which edge contrast is increased.
- Threshold controls how different neighboring tonal values must be before Photoshop treats them as an edge to sharpen.
For a first test on reasonably clear photographs, you might try Amount 100%, Radius 1.0 px, and Threshold 3. These are illustrative starting settings, not guaranteed ideal values or plugin defaults.
If the result looks harsh, reduce Amount. If you see broad light or dark outlines around objects, reduce Radius. If smooth areas become unnecessarily gritty, a higher Threshold may help exclude small tonal variations from the sharpening treatment.
The plugin accepts Amount from 1–500%, Radius from 0.1–1000 px, and an integer Threshold from 0–255. Those ranges provide flexibility, but their upper limits should not be treated as targets. More sharpening is not necessarily more useful detail.
Use Smart Sharpen when you need more control over softness and noise
Smart Sharpen adds a blur-removal model, Reduce Noise, and separate shadow and highlight controls. Its main settings are Amount, Radius, and Reduce Noise.
The blur-removal choices are Remove Lens Blur, Remove Gaussian Blur, and Remove Motion Blur. Remove Motion Blur also exposes an Angle setting from −180° to 180°.
That angle is useful when you are trying to address directional softness, but one angle should not be expected to suit a collection with unrelated motion directions. The plugin applies your selected configuration across the batch; it does not independently diagnose and choose a different blur-removal setup for every image.
Smart Sharpen’s shadow and highlight sections each provide Amount, Radius, and Tonal Width. These let you refine the tonal correction, including fading sharpening in darker or brighter regions. They can be useful when the main treatment improves detail but makes shadows look rough or bright edges look excessive.
Start with the main sharpening controls, assess the exported result, and then adjust noise reduction or tonal controls where needed. Changing every setting at once makes it harder to understand which adjustment improved the image.
Put the extra detail where it helps most
Improving clarity does not always mean sharpening every part of a photograph equally. A detailed product or portrait subject may benefit from extra definition while a smooth background looks better left alone.
For general finished images, choose Sharpen Entire Image. The plugin consolidates visible content with Merge Visible when necessary, then sharpens the resulting layer. It uses Merge Visible rather than Flatten Image to avoid unnecessarily eliminating existing transparency.
For portraits or product photographs, Sharpen Subject Only can be more appropriate. This mode uses Photoshop Select Subject, copies the selected subject pixels onto a new layer above the complete merged image, and sharpens that copied layer. The background is not deleted.
Sharpen Background Only reverses that emphasis. After subject detection, the plugin inverts the selection, copies the background pixels to a new layer, and sharpens that layer. This can help when background texture needs more definition but the main subject should not receive the same additional treatment.
These are automatic targeting options, not a guarantee that every subject boundary will be perfect. If Photoshop cannot produce a meaningful subject selection, Subject Only and Background Only fall back to sharpening the entire visible image for that source file.
For a subject-focused batch, include representative examples of simple and difficult backgrounds in your test folder. That helps you evaluate both the sharpening strength and whether the selected target fits the images.
Keep the radius proportional when image sizes differ
A fixed pixel radius has a different relative effect on a small image than on a large one. A 2-pixel radius occupies a much larger proportion of a 500-pixel image than of a 5000-pixel image.
Enable Scale Radius To Image Size (1000px Baseline) when you want the radius to adapt to mixed resolutions. The plugin calculates the scale factor from the document’s longest edge:
Applied radius = configured radius × (document longest edge ÷ 1000).
With a configured Radius of 1.0 px, the result is:
- A 1000 × 800 image receives a 1.0 px radius.
- A 2000 × 1200 image receives a 2.0 px radius.
- A 4000 × 3000 image receives a 4.0 px radius.
- A 500 × 500 image receives a 0.5 px radius.
Think of the entered Radius as your setting for an image whose longest edge is 1000 pixels. The plugin then adjusts that spatial dimension for each source document.
With Unsharp Mask, only Radius scales; Amount and Threshold stay fixed. With Smart Sharpen, the main Radius, Shadow Radius, and Highlight Radius all scale. Amount, Reduce Noise, Tonal Width, and Motion Blur Angle do not scale.
The calculation uses the complete document dimensions, not the size of a detected subject. This keeps the reference consistent when switching between whole-image and subject-focused sharpening.
Scaling helps make the treatment more proportional, but image size does not describe image quality. A large noisy photograph and a large clean photograph may still need different settings.
If some dimensions should be excluded altogether, use Skip Images. It compares the longest edge with your chosen cutoff. For example, Smaller than 1000 px skips images below that threshold while still processing images exactly 1000 pixels long. Larger comparisons are also strict: an image exactly equal to the cutoff is not skipped. Excluded images are neither sharpened nor exported.
Export separate copies with useful filenames
Once the sharpening settings are ready, finish the delivery side of the workflow. Bulk Image Sharpener combines sharpening and export, so you do not have to save every processed document manually.
- Select Export Folder To Use.
- Choose the output filetype and its applicable Quality setting.
- Configure the filename components so you can identify the sharpened derivatives.
- Click Sharpen My Images to run the configured batch.
For photographic delivery, JPEG is a practical option when lossy compression is acceptable. PNG is useful when you need lossless output or transparency. WebP is another supported option; the plugin exports it using lossy compression.
JPEG, PNG, and WebP expose editable Quality from 0–100, but the setting does not mean exactly the same thing for every format. For PNG, it changes compression rather than introducing visual quality loss. PNG remains lossless. Avoid choosing a low JPEG or WebP quality if compression artifacts would undermine the detail you just improved.
The default filename format combines the original image name with “sharpened.” Keeping the source-name component makes comparison straightforward. You can also include the sharpening method or actual applied radius.
The actual-radius component is especially useful with adaptive scaling. It records the main radius used for that particular image, rather than only the baseline value you entered. Outputs from a mixed-resolution batch can therefore identify their different applied radii.
For each supported source, the plugin opens the document, checks any size-exclusion rule, prepares the selected target, applies the sharpening, exports the result, and closes the source document without saving. The original files remain unchanged during the normal workflow.
Existing output names receive numbered suffixes rather than being overwritten. This also makes repeated test runs easier to keep separate. If you need to stop processing, Cancel Operation is available, and Escape can cancel while the operation modal is active.
Review the exported images for real improvement
Automation removes repetitive work, but visual judgment still determines whether a sharpening treatment is successful. Review the test exports before running the full source folder, then spot-check the larger batch after it completes.
Compare an original and its sharpened derivative at the same zoom level. Use 100% view to inspect edge artifacts and noise, then assess the image at its intended display size. A change that looks dramatic when magnified may be unnecessary—or distracting—in normal use.
Check several specific areas rather than relying on an overall impression:
- Fine detail: do hair, fabric, lettering, or product edges look more readable?
- High-contrast boundaries: have bright rims or dark outlines appeared around objects?
- Smooth regions: do skin, skies, or plain backgrounds look grainier?
- Target boundaries: in subject-only work, does the transition between the subject and surrounding image look natural?
- Size extremes: do the smallest and largest images both look appropriate with radius scaling enabled?
If edges look exaggerated, reduce Amount or Radius and repeat the small test. If noise becomes distracting, reconsider the strength, Unsharp Mask Threshold, or Smart Sharpen Reduce Noise. If sharpening is being applied to the wrong region, reconsider the target mode rather than trying to solve a targeting problem with stronger settings.
After the full batch finishes, inspect a spread of images instead of checking only the first output. Include the softest photographs, the noisiest images, unusual subjects, and both ends of the resolution range. If you used Skip Images, remember that excluded sources will not have exported copies.
Bulk Image Sharpener provides a practical way to improve the apparent detail and clarity of multiple images without repeating the same Photoshop steps for every file. Start with a representative test, use restrained settings, scale the radius when resolutions vary, and judge the exported results at their actual viewing size. That combination makes automated sharpening useful—not merely more aggressive.