How To Batch Replace Text While Keeping Photoshop Layers Available For Further Editing


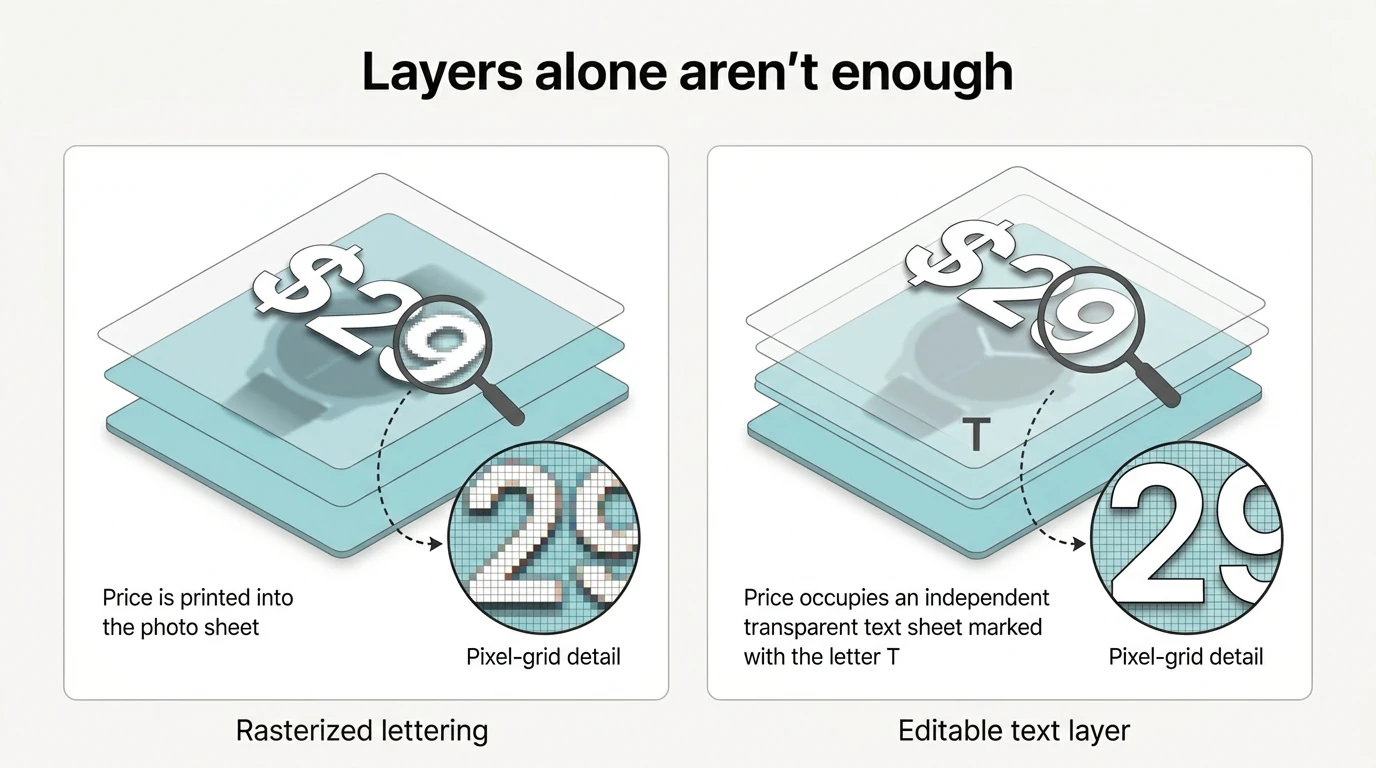
To batch-replace text without losing the ability to edit your Photoshop files later, you need two things: replacement must happen inside actual text layers, and the updated documents must be saved in a layered working format such as PSD or PSB. A folder of updated JPEGs may look correct, but it will not give you editable Photoshop text.
Bulk Text Replacer: Batch-Update Text Layers automates this workflow. It applies text-replacement rules across a folder of supported documents, adjusts the changed text’s layout, and exports separate updated files. Choose PSD or PSB output to retain a layered document for subsequent editing; the original source files are closed without saving.
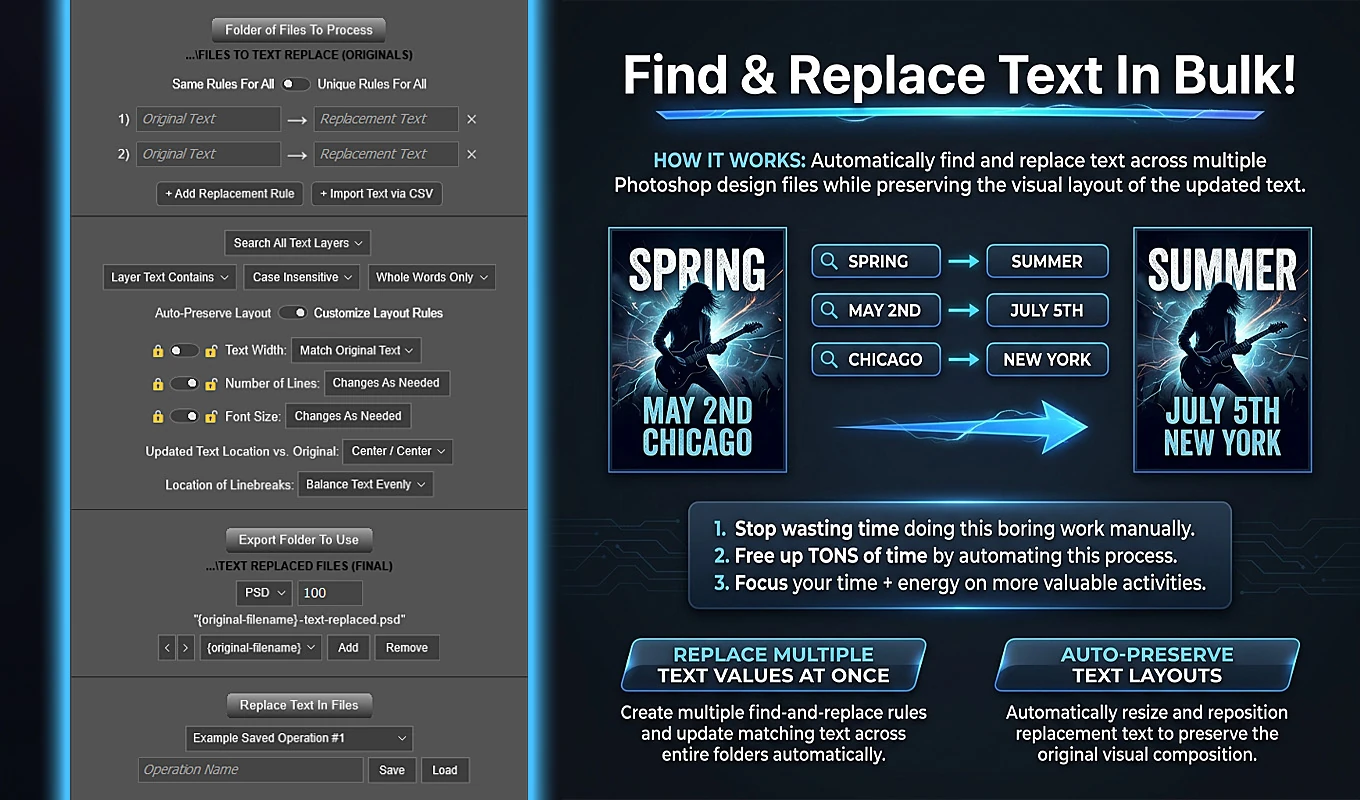
A Layered Document Is Not Necessarily an Editable-Text Document
A Photoshop file can contain many layers while its lettering is still baked into image pixels. Preserving those image layers does not turn the lettering into text you can revise with the Type tool.
For this workflow, the wording you want to replace must already exist in editable Photoshop text layers. Bulk Text Replacer modifies those layers rather than rasterizing the text as part of normal replacement. When you export a layered PSD, you can reopen the processed document, select the updated text layer, and continue editing its wording.
That distinction matters when handing off a project. The goal is not merely an image showing the new price or headline. It is an updated working document in which someone can make another copy change, adjust the typography, or continue developing the design without rebuilding the text.
Prepare a Source Folder of Working Photoshop Documents
Start with the layered working files, preferably the PSD or PSB templates you would normally open for manual editing. Open a representative document and confirm that the target wording can be selected and edited as text.
Bulk Text Replacer accepts these source extensions:
- PSD
- PSB
- TIFF or TIF
The extension alone does not prove that editable text exists. A TIFF or PDF, for example, may open in Photoshop without providing usable text layers. The plugin skips documents in which it finds no text layers. JPEG, PNG, GIF, WebP, AI, EPS, and SVG are not accepted batch inputs.
Place the supported files directly inside the source folder you plan to select. The plugin discovers text layers inside nested Photoshop layer groups, but it does not recursively process filesystem subfolders.
For a first run, use a small, representative set of templates: perhaps one square layout, one portrait layout, and one design with a longer headline. Choose a separate output folder so the updated working files are easy to distinguish from their originals.
Run a Folder-to-Folder Batch With PSD Output
Install Bulk Text Replacer through Adobe Exchange or the Creative Cloud plugin marketplace, then launch it from Photoshop’s Plugins menu. The basic workflow is:
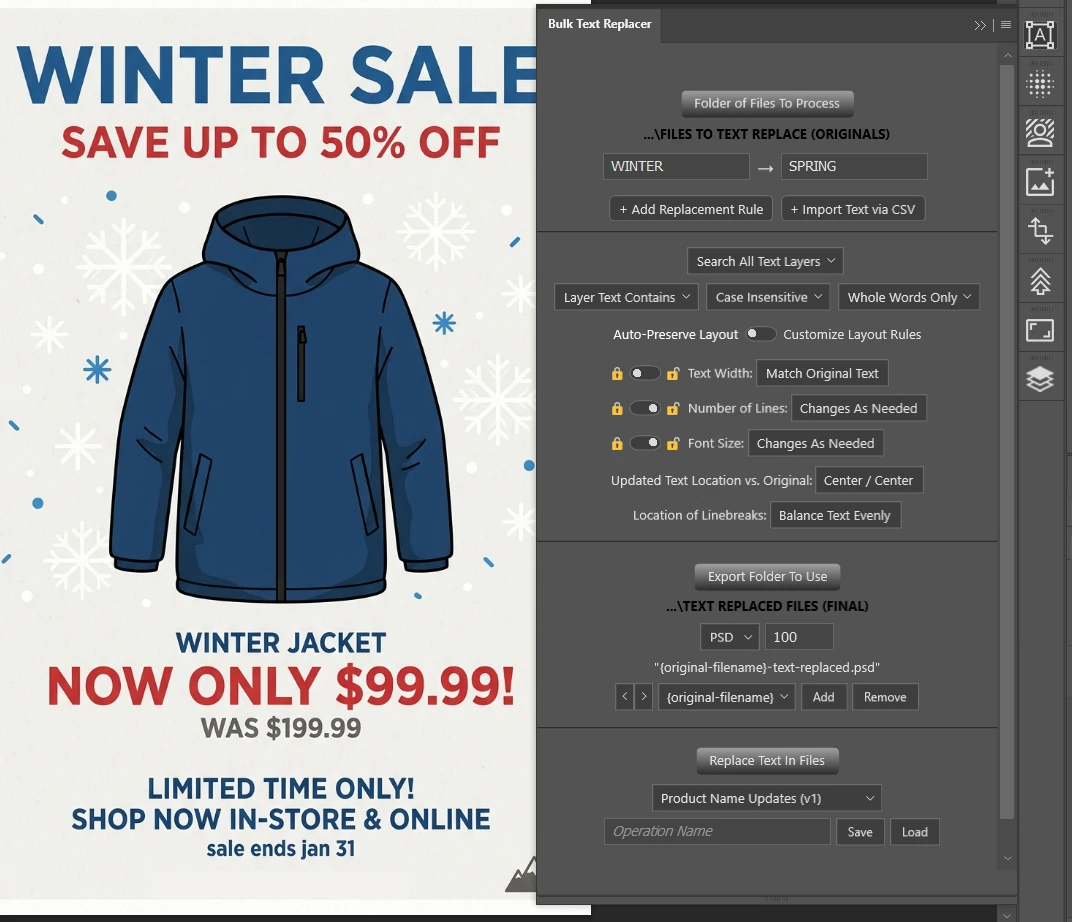
- Select Folder of Files To Process and choose the folder containing your source documents.
- Enter an Original Text → Replacement Text pair. Use + Add Replacement Rule if the batch needs more than one change. Both fields must contain text.
- Choose where to search. Search All Text Layers is suitable for broad replacements; Search By Layer Name restricts a rule to specifically named text layers.
- Set the matching behavior. For a complete standalone headline, Entire Layer Match is often appropriate. For a price or phrase embedded in longer copy, use Layer Text Contains.
- Choose Auto-Preserve Layout, or switch to Customize Layout Rules when the updated text must meet a particular width, line-count, font-size, or positioning requirement.
- Select Export Folder To Use and choose PSD as the export filetype. PSD is the default.
- Keep or configure the output filename, then click Replace Text In Files.
The default PSD naming pattern is {original-filename}-text-replaced.psd. For example, a source named product-banner.psd can produce product-banner-text-replaced.psd in the export folder.
For each supported source file, the plugin opens the document, discovers its text layers recursively, evaluates the replacement rules, applies the relevant layout adjustments, and exports the derivative. It then closes the source document without saving.
The file to continue editing is the exported PSD, not the unchanged original.
Restrict Replacements to the Text You Actually Want to Change
Keeping the document editable is only useful if the correct text was changed. A word appearing in a headline may also occur in legal copy, a product description, or a small footer.
Search All Text Layers evaluates text layers throughout the document, including layers inside nested groups. Use it when every qualifying occurrence should change.
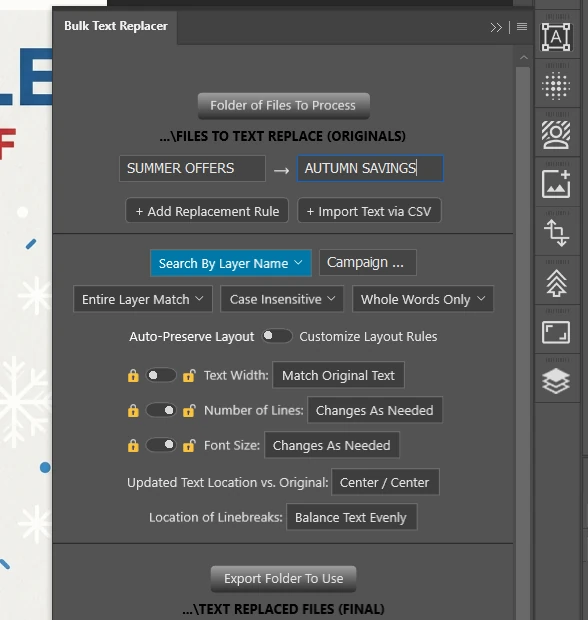
For more controlled template updates, use Search By Layer Name. If the intended layer is named Campaign Headline, enter that exact name. Layer-name matching is case-sensitive: Campaign Headline and campaign headline are different targets. If multiple text layers share the exact requested name, all qualifying layers can be evaluated.
Then choose how the text itself should match:
- Entire Layer Match replaces the complete layer contents when its normalized text matches Original Text. This is useful for standalone labels, headlines, and prices.
- Layer Text Contains replaces all qualifying occurrences within the eligible layer. This is useful when the target is part of a longer sentence.
- Whole Words Only helps prevent a short search term from matching inside a larger word. Any Text Match permits literal substring matching.
- Case Sensitive requires the requested capitalization. Case Insensitive allows capitalization differences in the text content.
The text-content case setting does not change how layer names are matched. For a targeted production workflow, an exact layer name combined with Entire Layer Match provides a narrow, understandable rule.
Refit the New Wording Without Rasterizing the Type
A successful replacement can still create an awkward design. Longer copy may wrap, shorter copy may look undersized, and a changed price may drift away from its intended position. Keeping text editable does not automatically keep its layout usable.
Auto-Preserve Layout addresses that second problem. It uses the original visible rendered text width as the horizontal constraint, lets Photoshop naturally re-wrap the replacement, and adjusts font size to bring the new rendered height close to the original. It then resizes the paragraph-text box and restores the original Center / Center position.
This is an approximate layout-fitting process, not a promise of identical typography. Auto mode can change both font size and line count, and it does not preserve the original explicit linebreak locations.
When production requirements are more specific, Customize Layout Rules lets you choose which property absorbs the change. Two particularly useful configurations are:
- For a price or headline that must stay on one line: set Text Width to Fixed, Number of Lines to Fixed with Set Specific Target at 1, and Font Size to Adjustable.
- For a description that must retain its font size inside a fixed-width area: set Text Width to Fixed, Number of Lines to Adjustable, and Font Size to Fixed with Match Original Text.
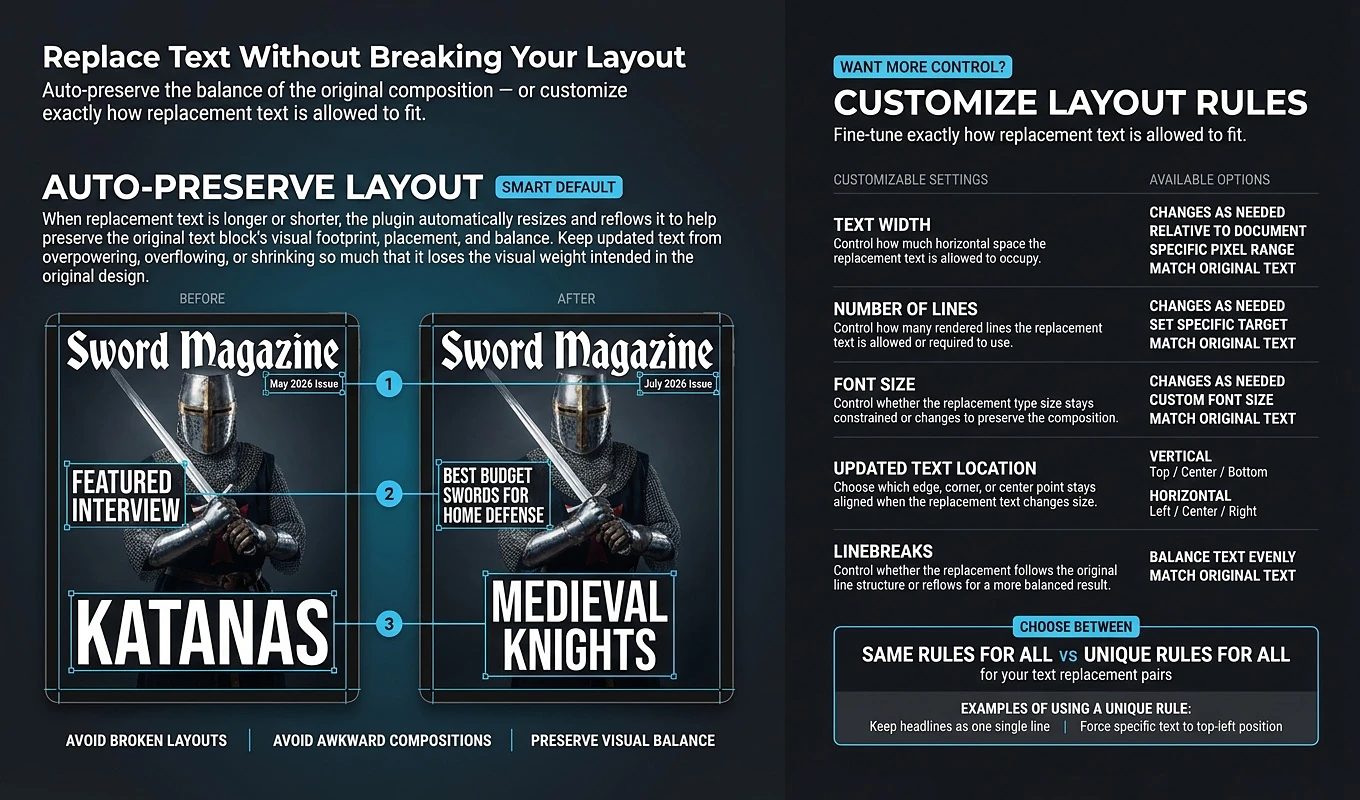
Custom mode also provides nine positioning anchors. For example, Center / Right can keep the right-center point of a price in place as its width or font size changes. Auto mode always uses Center / Center.
The plugin may convert point text to paragraph text when controlled wrapping is needed. The result remains an editable text layer, but a later editor may encounter a paragraph box rather than the original point-text structure.
Organize Multiple Changes Around Independent Text Targets
A single batch can update several pieces of copy in each document. Same Rules For All applies one shared search and layout configuration to every replacement pair. Unique Rules For All gives each pair its own settings, which is useful when a headline and price require different treatment.
There is an important planning detail: each rule evaluates the text-layer information captured when the document was first inspected. Rules are not a cascading chain that searches the results created by earlier rules.
For example, Basic → Plus followed by Plus → Premium does not turn an original Basic layer into Premium merely because the first rule created Plus.
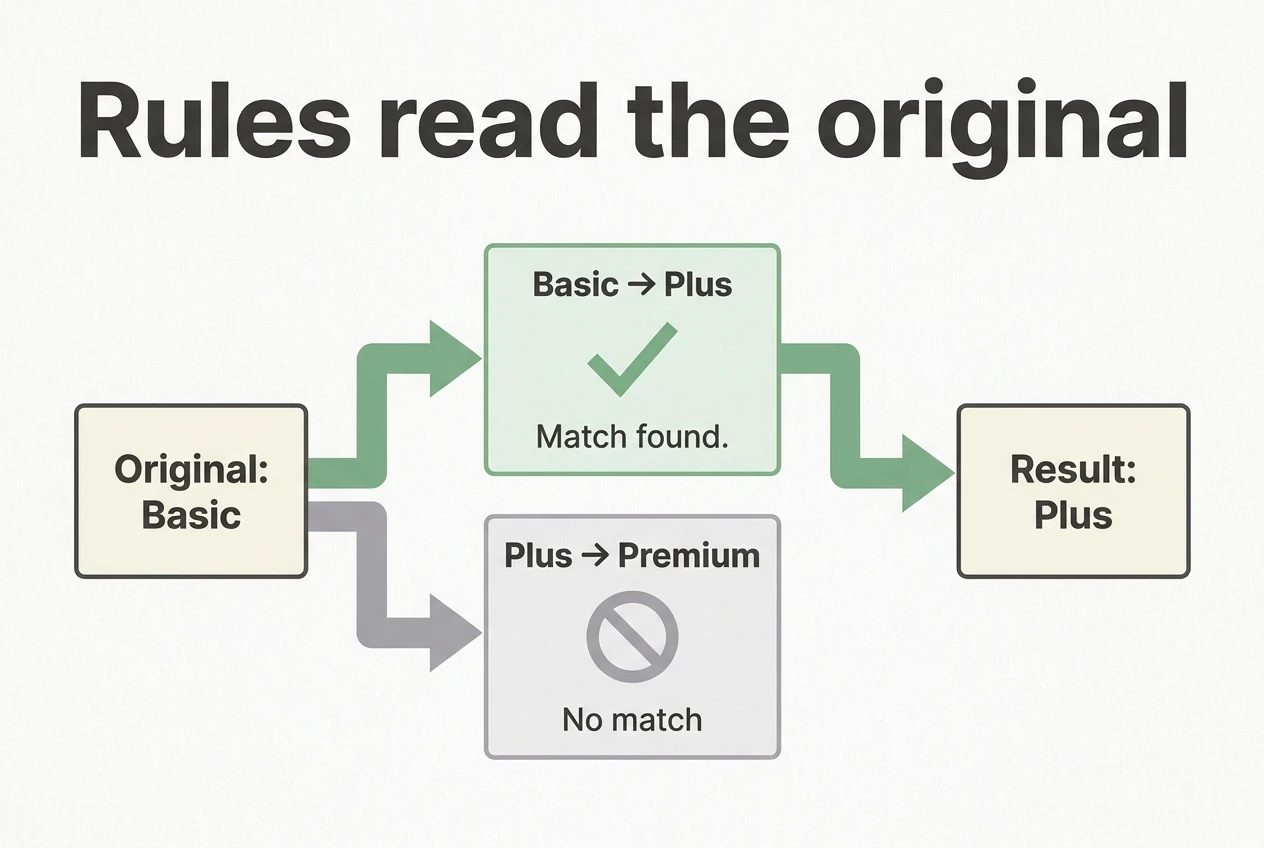
Also avoid assuming that separate rules affecting the same original layer will combine. If a layer reads “Spring offer: $29,” a Spring → Autumn rule and a $29 → $34 rule are not a reliable way to produce both changes together. A later matching rule can rewrite that layer from its original content and supersede the earlier modification.
When both changes belong in one text layer, a cleaner rule is to replace the complete original phrase with the complete revised phrase. When the headline and price occupy separate layers, target them independently by layer name.
For a large mapping list, replacement pairs can be imported from a CSV with exactly two columns headed ORIGINAL TEXT and REPLACEMENT TEXT. The CSV supplies the text pairs; search and layout behavior are configured in the plugin. These pairs are rules for the batch, not instructions to create a separate output version for every CSV row.
Example: Update Promotion Templates and Leave Them Ready for Revision
Suppose a folder contains square, portrait, and landscape PSD versions of the same promotion. Each document has a Campaign Headline text layer and an Offer Price text layer. The next campaign needs new wording, but the design team still needs working Photoshop files for later adjustments.
Create these two replacement pairs:
- SUMMER OFFERS → AUTUMN SAVINGS
- $29 → $34
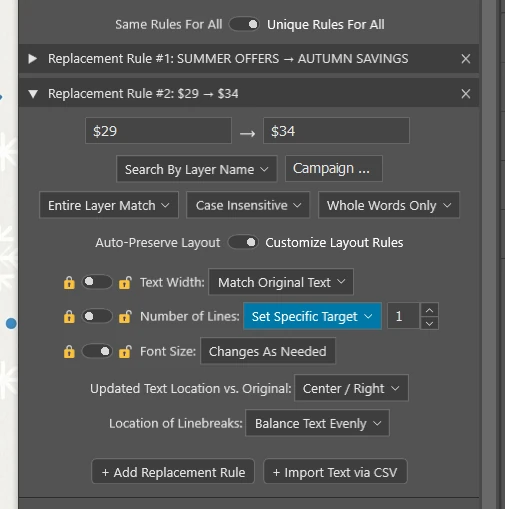
Switch to Unique Rules For All so the headline and price can use different settings.
Headline rule
Use Search By Layer Name with Campaign Headline, select Entire Layer Match, and leave Auto-Preserve Layout enabled. Each document uses its own original headline geometry as the reference, so the square and landscape designs are not forced into one shared pixel width.
Price rule
Use Search By Layer Name with Offer Price and select Entire Layer Match. Under Customize Layout Rules, set Text Width to Fixed with Match Original Text, Number of Lines to Fixed with a target of 1, and Font Size to Adjustable. Choose Center / Right if the price’s right-side position needs to remain stable.
Export the batch as PSD. A source such as promotion-square.psd produces a separate promotion-square-text-replaced.psd, while the original remains unchanged.
The resulting working file contains the updated text in editable layers. If a later revision changes the offer to $32, the designer can open the updated PSD and edit the price with Photoshop’s Type tool rather than rebuilding it over a flattened image.
Use PSD or PSB as the Working Deliverable
PSD is the straightforward choice when the next stage is more Photoshop editing. Bulk Text Replacer’s PSD export is configured to save layers, along with settings such as an embedded color profile and Maximize Compatibility.
For documents requiring Photoshop’s Large Document Format, PSB provides the layered output option. Choose the working format appropriate to the document rather than selecting an image-delivery format simply because it produces a convenient preview.
JPEG, PNG, GIF, and WebP outputs do not provide the same editable Photoshop text-layer structure. They can be useful delivery files, but they should not replace the layered master when another person needs to revise the design.
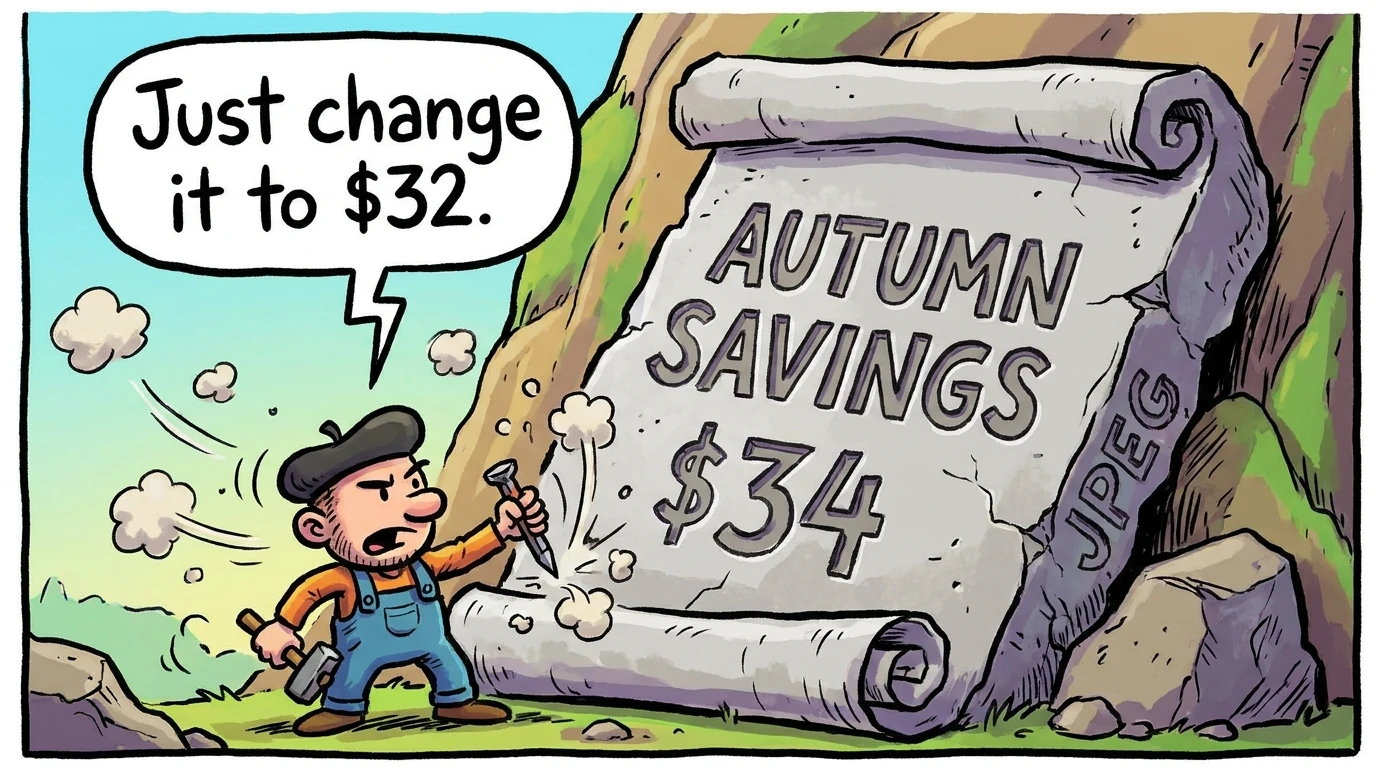
Keep the updated PSD or PSB as the working deliverable, then create any flattened delivery copies separately. Bulk Text Replacer also protects against duplicate output names by adding numbered suffixes, helping keep successive exports distinct rather than silently replacing an existing derivative.
Reopen a Sample Output and Verify the Editing Handoff
Before processing the full template library or handing off the results, reopen a few exported working files. Confirm both editability and the visual result.
- Inspect the Layers panel. Check that the document remains layered rather than appearing as one flattened image.
- Select a changed text layer with the Type tool. Make a small temporary wording change, then undo it to confirm the text is genuinely editable.
- Review the layout. Check line wrapping, font size, clipping, and the position of headlines and prices, especially where replacement text is substantially longer.
- Inspect unrelated copy. Confirm that matching words outside the intended targets were not changed.
- Check the source separately. It should still contain the original wording because the batch exports derivatives and closes sources without saving.
If a file produces no output, check whether it actually contains Photoshop text layers. Files with no text layers are skipped. A document that contains text layers but has no matching text can still be exported, so the presence of an output file alone does not prove a replacement occurred.
A representative test batch lets you refine matching and layout settings before applying the same configuration to the larger folder.
Save the Operation for the Next Editable Revision
Once the workflow produces the layered files you need, save the operation under a descriptive name. Saved operations retain the replacement pairs, shared or unique rule configuration, matching settings, layout rules, source and export folders, output format, and filename structure.
For the next revision, load that operation and update the relevant text pairs instead of rebuilding the entire setup. This is particularly useful for recurring price updates, seasonal campaigns, and template libraries whose layer names remain consistent.
The essential workflow is simple: start with editable text layers, target the intended copy, let the layout rules accommodate the replacement, and export PSD or PSB working files. Bulk Text Replacer brings those steps into one repeatable batch process, so the result is not just updated artwork—it is an updated Photoshop document that remains available for further editing.