How To Compress Multiple Images To A Target MB Size

To compress multiple images to a target MB size, you need a workflow that adjusts compression for each image—not simply one quality setting applied to every file. Different images can produce very different filesizes at the same export quality.
In Photoshop, Bulk Image Compressor: Batch-Reduce Filesizes automates this task with its Target Filesize mode. You choose an MB amount, select JPEG or WebP output, and let the plugin calibrate each supported image in a folder. The target applies to each processed image individually, not to the combined size of the folder.
The important part is configuring that target correctly, especially if your real requirement is to stay below an upload limit. Here is the complete workflow, including how to protect image quality and handle files that cannot reach the target within your chosen limits.
1. Set up target MB compression in Photoshop
Bulk Image Compressor is available through Adobe Exchange and Adobe’s Creative Cloud plugin marketplace. After installation, open it from Photoshop’s Plugins menu.
- Select Folder of Images To Compress and choose your source folder. The plugin processes supported files directly inside that folder; it does not recursively process nested subfolders.
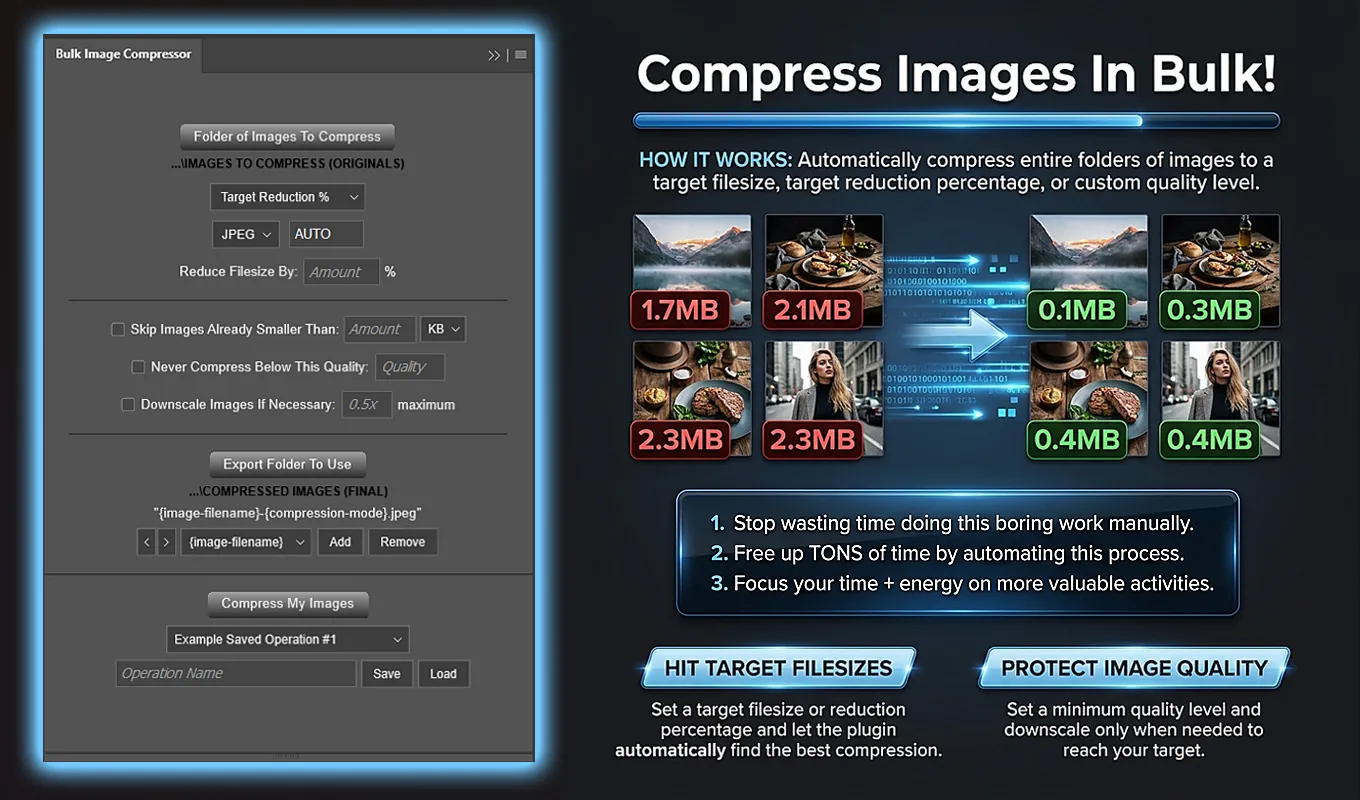
- Set Compression Mode to Target Filesize. The Quality field changes to AUTO because the plugin will determine a suitable quality for each image.
- Enter your desired Target Filesize amount and choose MB from the unit dropdown. For example, enter 1.5 for a target of approximately 1.5 MB per image.
- Choose JPEG or WEBP as the compressed output format.
- Optionally enable Never Compress Below This Quality to establish a quality floor. You can also enable Downscale Images If Necessary and specify how far dimensions may be reduced.
- Select Export Folder To Use. A separate output folder makes it easier to distinguish the compressed files from their sources.
- Keep the default filename format or customize it using the filename components.
- Click Compress My Images to start the batch.
The plugin validates the configuration, reads the current source-folder contents, and processes the supported images. During the operation, a progress window shows completed images and provides a Cancel Operation button.
For each image that is not skipped, the plugin saves temporary compressed candidates, measures their actual filesizes, and uses binary search to narrow the quality range. It therefore works from real encoded output sizes rather than assuming that a particular quality value will produce a particular MB size.
2. Distinguish an approximate target from a hard maximum
“Make each image approximately 2 MB” and “make sure no image exceeds 2 MB” are different requirements. This distinction matters when preparing files for upload forms, submission portals, or other systems that reject oversized images.
Bulk Image Compressor treats a result within ±10% of the target as successful. A 2 MB target therefore has an accepted range of 1.8–2.2 MB. That is suitable for an approximate-size objective, but the upper end exceeds a strict 2 MB cap.
For a hard maximum, choose a lower target to leave room for that tolerance. If the receiving system and plugin use the same MB definition, a 1.8 MB target has an accepted range of 1.62–1.98 MB, keeping in-range results below 2 MB.
There is one further consideration: if your quality and downscale limits prevent an image from reaching the accepted range, the plugin saves the closest permitted result it discovered. That result can still be too large. Choosing a lower target provides headroom; it does not turn Target Filesize into a guaranteed maximum-size constraint.
For strict upload limits, use a conservative target and check the actual exported filesize before delivery.
3. Enter the MB amount using the correct units
The Target Filesize field accepts values with up to two decimal places, so you can enter amounts such as 1 MB, 1.5 MB, or 1.75 MB. Make sure the unit dropdown says MB rather than KB.
The plugin calculates its units as follows:
- 1 KB = 1,024 bytes.
- 1 MB = 1,048,576 bytes.
A receiving system may define its limit differently. For example, a stated “2 MB” limit might mean exactly 2,000,000 bytes. In that case, the 1.98 MB upper result from a 1.8 MB target would still exceed the byte limit because the plugin uses the larger, 1,048,576-byte definition.
If the receiving system publishes an exact byte limit, use it when planning your target. A useful calculation is: target MB × 1,048,576 × 1.10 should remain below the maximum allowed bytes.
For a 2,000,000-byte cap, a 1.70 MB target gives an accepted upper size of 1.87 plugin MB, or approximately 1,960,837 bytes. That provides headroom under the stated cap for results that reach the accepted range.
4. Choose the output format required for delivery
Choose your output format before running the batch. JPEG and WebP encode images differently, so the quality needed to approach your target can differ between formats.
Use JPEG when the receiving system requires JPEG files or when broadly compatible photographic output is your priority. The plugin exports JPEG files with a .jpeg extension. JPEG does not preserve alpha transparency.
Use WebP when the destination accepts it and it suits your assets. The plugin uses lossy WebP compression, and transparency can be retained where the image and Photoshop’s WebP export pathway support it.
The input format does not dictate the compressed output format. For example, a PNG or PSD source can become a JPEG or WebP derivative. PNG is supported as an input, but it is not a compressed-output option.
If every delivered file must have the selected output format, pay particular attention to the skip setting: skipped originals bypass conversion.
5. Balance compression quality against image dimensions
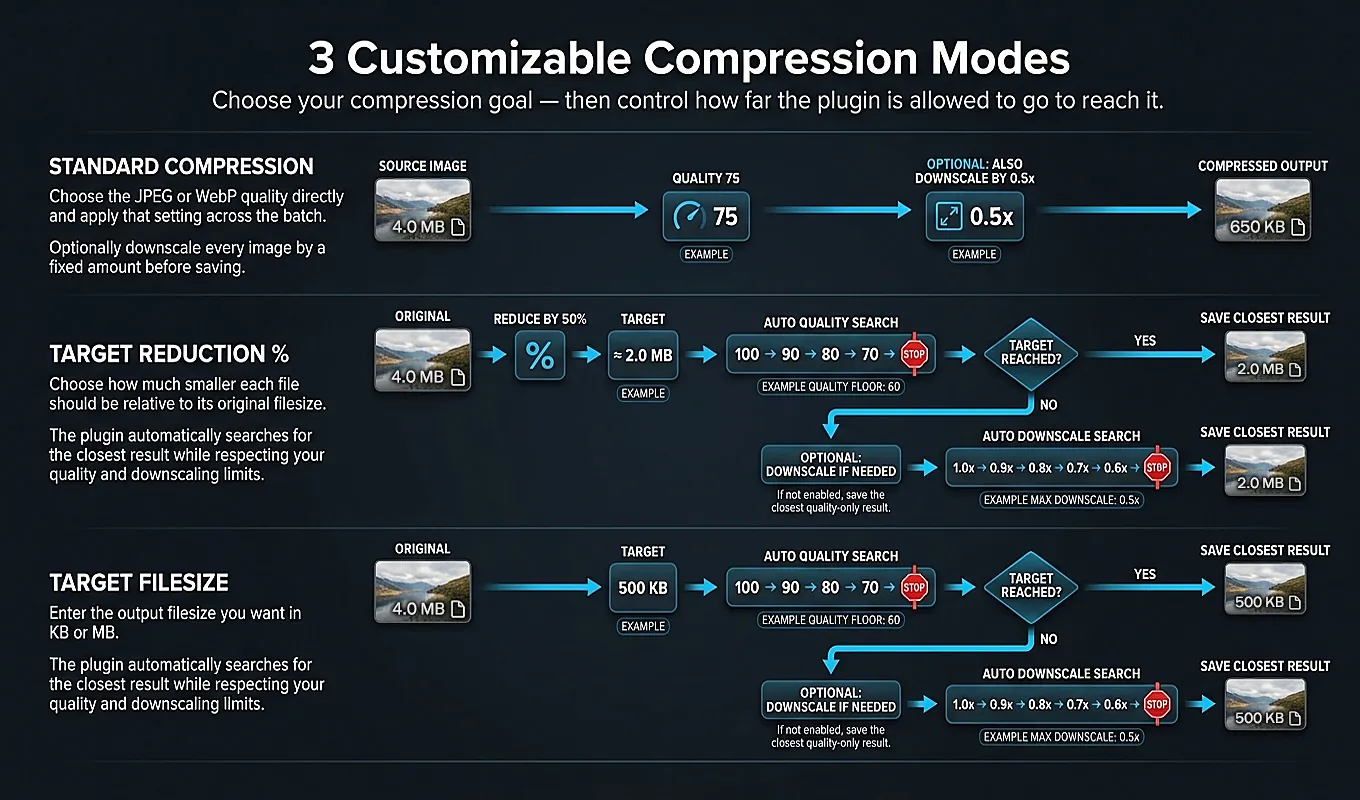
Reaching a smaller filesize involves tradeoffs. Lowering compression quality can introduce visible artifacts, while reducing dimensions removes pixels. Which tradeoff is acceptable depends on how the images will be used.
Bulk Image Compressor’s target-based workflow tries quality adjustment first. It preserves the original pixel dimensions whenever quality alone can reach the target within the permitted range.
Use a quality floor to limit compression
Enable Never Compress Below This Quality if you do not want the search to continue below a chosen setting. For example, a floor of 75 limits how far the algorithm may reduce quality while pursuing the MB target.
That number is an encoder setting, not a guarantee of identical visual appearance across different images. JPEG settings also map onto Photoshop’s discrete native 0–12 quality levels, while WebP uses a native 0–100 scale.
Allow bounded downscaling when quality alone is insufficient
If the lowest permitted quality still produces a file larger than the accepted target range, Downscale Images If Necessary can introduce a second adjustment: proportional resizing.
A value of 0.5x maximum means the plugin may search between the original dimensions and half the original width and height. It does not mean every image will be resized to exactly 0.5x.
For a 4000 × 3000 image, that boundary permits dimensions as small as 2000 × 1500. The algorithm may find that a less aggressive reduction is sufficient, or it may leave the image at its original dimensions.
During this downscale search, compression stays at the lowest permitted quality. The plugin searches image scales within your allowed boundary and measures the resulting filesizes. Aspect ratio is preserved.
If full resolution is essential, leave adaptive downscaling disabled and accept that some images may remain above the target. If smaller dimensions are acceptable, bounded downscaling gives difficult images another way to approach the filesize goal without lowering quality beyond your floor.
6. Skip small originals only when unchanged copies are acceptable
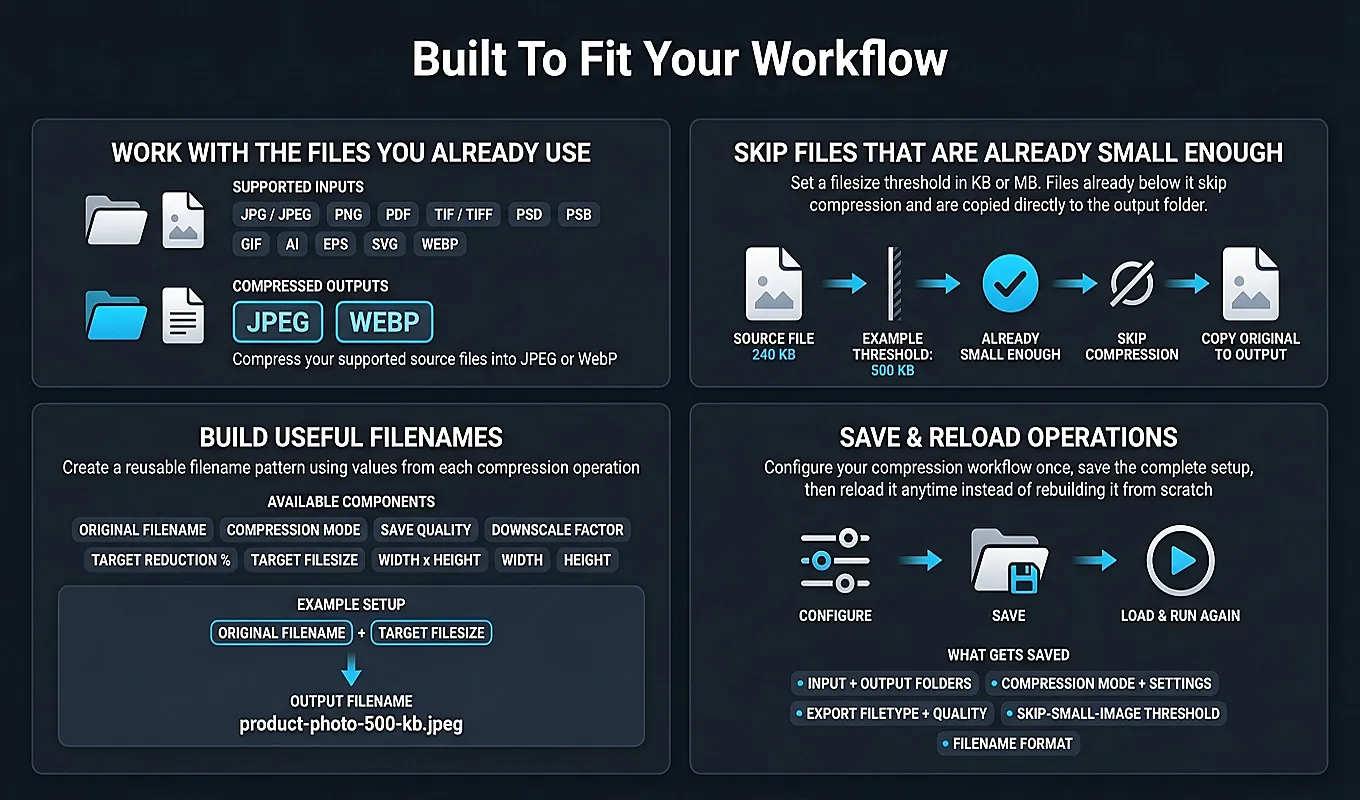
If your objective is simply to keep images below a limit, files that are already comfortably small may not need recompression. Enable Skip Images Already Smaller Than and enter an appropriate MB threshold to bypass those files.
The plugin checks the source file’s actual filesystem size before opening it in Photoshop. If it is strictly smaller than the threshold, the original file is copied unchanged into the export folder.
That behavior preserves the original encoding, dimensions, filetype, and filename. It also avoids an unnecessary lossy export.
For example, with a 1 MB skip threshold, a 700 KB JPEG is copied unchanged, while a 4 MB image proceeds through the configured target-size workflow.
However, a small PNG would also remain a PNG—even if JPEG is selected for compressed outputs. Skipped files do not use the dynamic output-filename pattern either.
Leave skipping disabled when every delivered image must be converted to JPEG or WebP, follow the same generated naming pattern, or go through target-based calibration. Enable it when retaining already-small originals is consistent with the delivery requirements.
7. Export separate files with names that identify the target
Select an export folder that makes the finished batch easy to find. Actively compressed images are exported as separate JPEG or WebP derivatives, and their working Photoshop documents are closed without saving changes to the originals.
The default filename format is usable as-is. If you manage several delivery sizes, adding the target to the name can make the output folder more understandable.
For example, a filename format built from {image-filename}, {target-filesize}, and {width}x{height} identifies the source, the requested size, and the final dimensions. You can also include {save-quality} or {downscale-factor} when you want filenames to show the settings actually selected during calibration.
Keep the distinction clear: {target-filesize} reports the requested target, not the measured final filesize. Final dimensions, save quality, and downscale factor reflect the actual processing result.
For generated compressed outputs, filename collisions receive numbered suffixes rather than unintentionally replacing an existing file with the same generated name.
8. Worked example: prepare product photos for a 2 MB upload limit
Suppose you need to deliver 40 product photos to an upload form that accepts JPEG files no larger than 2,000,000 bytes each. Your sources range from 3 MB to 12 MB, and their backgrounds and detail levels vary.
A practical starting configuration is:
- Compression Mode: Target Filesize.
- Target Filesize: 1.70 MB.
- Output filetype: JPEG.
- Never Compress Below This Quality: 75.
- Downscale Images If Necessary: 0.5x maximum, provided half-size dimensions remain suitable for the destination.
- Skip Images Already Smaller Than: disabled for this run.
- Export folder: a separate folder for the upload-ready derivatives.
- Filename components: original filename, target filesize, and final width × height.
The 1.70 MB target gives an accepted range of 1.53–1.87 MB. Using the plugin’s byte definition, the upper end is approximately 1,960,837 bytes—below the upload form’s 2,000,000-byte limit.
Each photo receives its own calibration. A simple-background image may reach the target through quality adjustment without resizing. A more detailed image may remain too large at the quality floor and require an adaptive downscale.
The 3 MB source and the 12 MB source both receive the same 1.70 MB goal. This is not percentage reduction: the intended final size is shared, even though the amount of reduction differs substantially.
After the batch, check actual filesizes against the upload cap and inspect visual detail at the intended viewing size. Any image that could not reach the target within the quality and dimension limits needs separate attention before delivery.
9. Adjust the constraints when an output is still too large
If a file is larger than your entered target, first check whether it is still inside the accepted ±10% range. A slightly larger result can be a successful target match. For a hard upload cap, however, the receiving system’s actual limit is the deciding factor.
When an output exceeds that limit, consider which constraint you can change:
- Allow more compression by lowering the minimum quality, if the resulting appearance is acceptable.
- Enable adaptive downscaling if it was disabled and reduced dimensions are suitable for the destination.
- Permit more downscaling by lowering the scale boundary—for example, from 0.5x to 0.4x—if the smaller dimensions still meet your needs.
If neither quality nor dimensions can change, the image may not be able to meet the filesize requirement under those constraints. Review the affected output rather than assuming that a shared target guarantees every file will fit.
The advantage of Bulk Image Compressor is that you do not have to perform the repeated export-and-check cycle manually for every image. Set the MB target, define acceptable quality and resolution boundaries, and let the plugin measure and calibrate each processed file. Available through Adobe Exchange and the Creative Cloud plugin marketplace, it provides a practical Photoshop workflow for turning a folder of differently sized images into a batch aimed at one delivery-size goal.