How To Compress Only Images Larger Than 1 MB

When a folder contains both oversized images and files that are already small enough, compressing everything creates unnecessary work and can introduce avoidable lossy recompression. A better approach is to check each source file’s size first and process only the files that need attention.
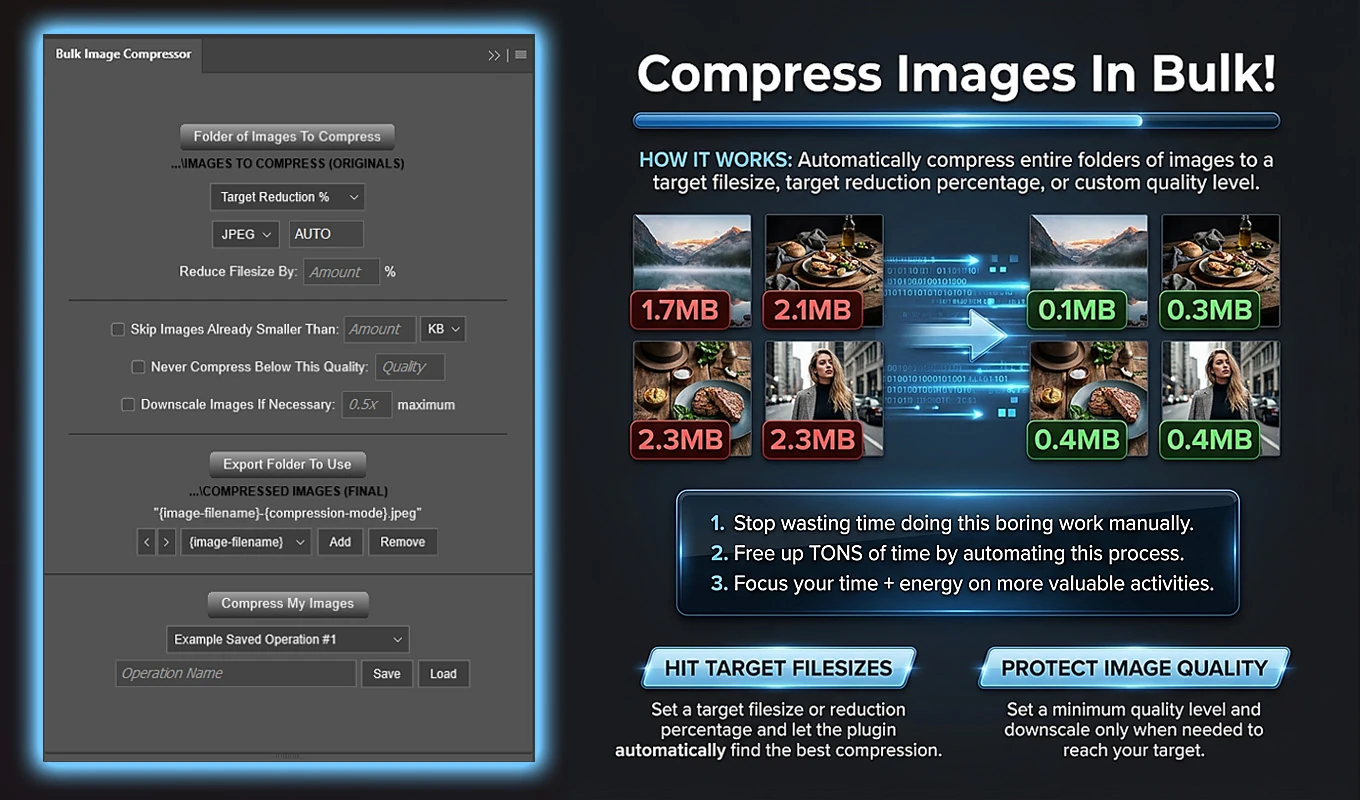
Bulk Image Compressor: Batch-Reduce Filesizes, a third-party Photoshop plugin, provides this workflow through its “Skip Images Already Smaller Than” setting. Set the threshold to 1 MB, then choose how the remaining images should be compressed.
Use the “Skip Images Already Smaller Than” setting
In Bulk Image Compressor, enable “Skip Images Already Smaller Than,” enter 1, and select MB as the unit. Typing a threshold automatically enables the checkbox.
Before opening each source image in Photoshop, the plugin checks its actual filesystem size. Files below the threshold bypass compression and are copied unchanged into your selected export folder. The remaining files proceed through your chosen compression workflow.
There is one important boundary detail: the comparison is “smaller than,” not “smaller than or equal to.” A file exactly 1 MB is eligible for processing. If you require strictly larger-than-1-MB selection, keep exact-boundary files outside the batch’s source folder.
The 1 MB filter is not the compression target
Two separate decisions control this job: which images should be processed, and what should happen to those images.
“Skip Images Already Smaller Than: 1 MB” answers the first question. It protects smaller source files from recompression. It does not tell the plugin to make every processed output smaller than 1 MB.
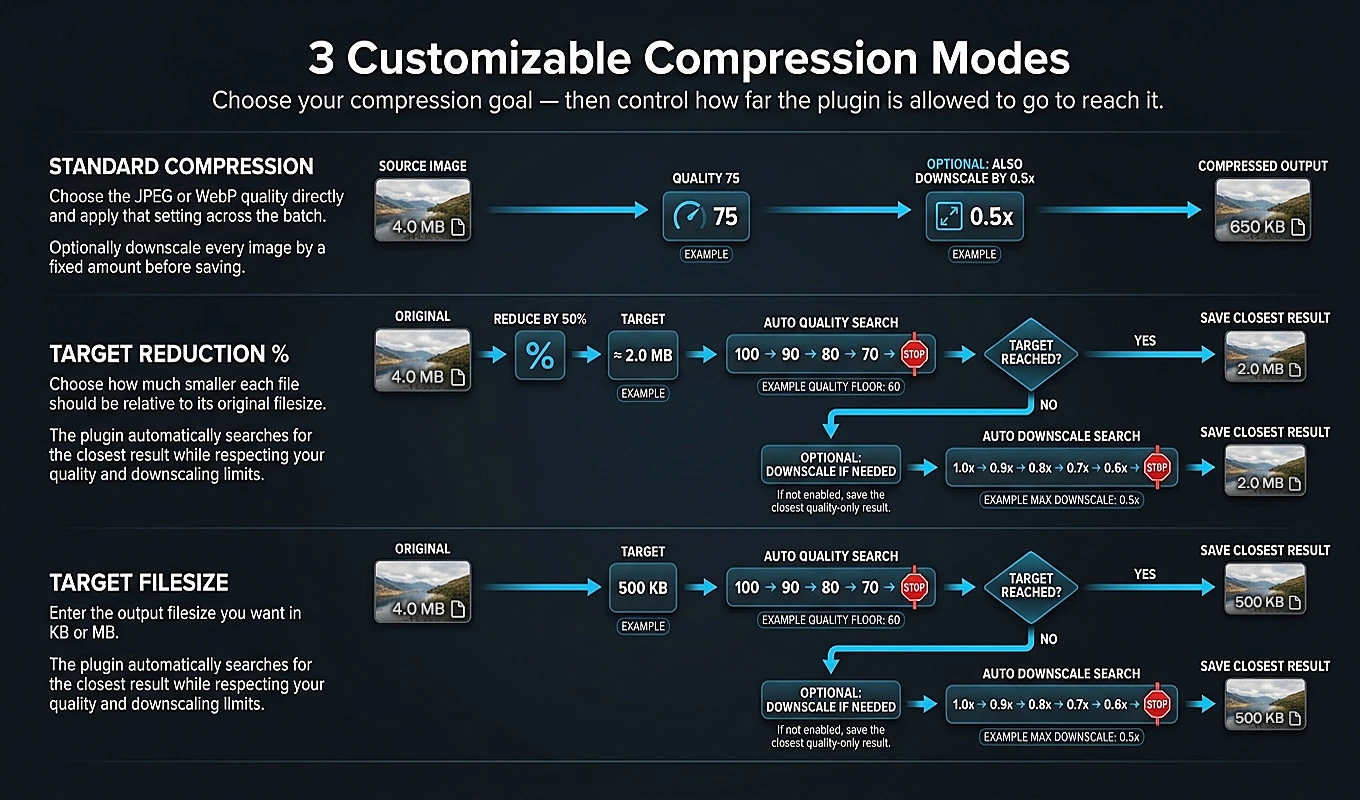
Your compression mode answers the second question. You can aim for a particular output filesize, reduce each eligible image by a percentage, or export all eligible images at a chosen quality.
If your objective is both selective processing and outputs below 1 MB, configure both a 1 MB skip threshold and a suitable Target Filesize. The threshold alone is not enough.
Understand the exact 1 MB boundary
The plugin calculates 1 MB as 1,048,576 bytes, equivalent to 1024 KB. Its skip decision uses the source file’s actual byte size, not a rounded size label or the image’s pixel dimensions.
- A source below 1,048,576 bytes is copied unchanged.
- A source exactly 1,048,576 bytes proceeds to compression.
- A source above 1,048,576 bytes proceeds to compression.
This explains why a file displayed as “1 MB” might be processed: the displayed value may be rounded. Check the exact byte count when the boundary matters.
For a strictly greater-than rule, exclude files measuring exactly 1,048,576 bytes from the selected source folder. If you need them included in the final delivery folder, copy them there unchanged afterward. Also check any destination’s size specification: a limit defined as 1,000,000 bytes is different from the plugin’s 1 MB.
Set up the selective-compression batch in Photoshop
For a practical starting workflow that leaves small files untouched and aims to bring larger files below 1 MB, use the following setup:
- Install Bulk Image Compressor through Adobe Exchange or Adobe’s Creative Cloud plugin marketplace, then open it from Photoshop’s Plugins menu.
- Choose “Folder of Images To Compress” and select your source folder. Supported files must be directly inside that folder; nested subfolders are not processed recursively.
- Select “Target Filesize” as the Compression Mode. Enter 900 and choose KB. Quality remains AUTO because the plugin determines it separately for each processed image.
- Choose JPEG or WebP as the compressed-output format.
- Set “Skip Images Already Smaller Than” to 1 MB and confirm that the checkbox is enabled.
- If needed, configure a minimum quality or conditional downscaling allowance. These settings apply to the images that actually undergo compression.
- Select “Export Folder To Use.” Prefer a separate output folder so generated files do not become part of a later source batch.
- Configure the filename format. Keeping the original image-filename component makes derivatives easier to match to their sources.
- Click “Compress My Images.”
The plugin checks the configuration and reads the source folder’s current contents when the operation starts. Smaller files are copied without being opened for compression. Eligible files are opened, processed, exported, and closed without saving changes to their originals.
Example: a product-image folder with mixed file sizes
Suppose you are preparing a product-image folder for online delivery. It contains small thumbnails alongside much larger photographs and transparent assets.
You choose WebP output, a 900 KB Target Filesize, and a 1 MB skip threshold. Here is how five hypothetical source files would be handled:
- thumbnail.png, 180 KB: copied unchanged as the original PNG.
- detail.jpg, 720 KB: copied unchanged as the original JPG.
- front-view.jpg, 1.8 MB: processed toward the 900 KB target and exported as WebP.
- transparent-product.png, 3.2 MB: processed toward the target and exported as WebP.
- master-photo.tif, 6 MB: processed toward the target and exported as WebP.
Only three sources undergo compression. The two smaller files retain their original filenames, formats, and dimensions.
The 900 KB value is a goal, not a promised result for every image. Actual output sizes depend on the image and the quality and resizing limits you allow.
Choose how the oversized images should be compressed
The skip threshold works with all three compression modes. Choose the mode according to the result you need from the eligible files.
Target Filesize: aim for a common output size
Use Target Filesize when larger images should end up near a chosen KB or MB value. The plugin tests temporary JPEG or WebP exports, measures their actual sizes, and searches for a suitable quality individually for each image.
A result within ±10% of the target is treated as successful. If the permitted settings cannot reach that range, the closest legal result discovered is used.
Target Reduction %: reduce each eligible source proportionally
Use Target Reduction % when the objective is to make larger files substantially smaller relative to their own starting sizes. A 75% reduction gives a 4 MB source a target of approximately 1 MB, but an 8 MB source a target of approximately 2 MB.
This mode is useful for proportional reduction, but it does not establish one shared output-size ceiling.
Standard Compression: use a chosen quality
Use Standard Compression when you want the eligible images exported at one explicit Quality value from 0–100. You can also apply a fixed downscale factor to every processed image.
This is a direct quality-based workflow, not a filesize search. Different source images can produce different output sizes at the same quality setting.
Choose the output format without changing the skipped files
JPEG and WebP are the two compressed-output choices. JPEG is suitable when you want JPEG delivery files and do not need alpha transparency. WebP provides lossy compression and can retain transparency where the source image and Photoshop’s WebP export pathway support it.
Your choice applies only to actively compressed images. Selecting JPEG does not convert a skipped PNG to JPEG. Selecting WebP does not convert a skipped JPG to WebP.
Consequently, a selective-compression batch may produce a mixed-format export folder. That is expected: preserving smaller files unchanged and converting every file to one format are different objectives.
Troubleshoot unexpected processing or missing files
An apparently small image was compressed
Check its exact source-file byte count and confirm the threshold’s unit. The plugin uses actual filesize rather than a rounded display value. A file exactly at the threshold is also processed because only files smaller than the threshold are skipped.
Also verify that the skip checkbox is enabled. Entering a threshold enables it, but the setting must remain active when you run the operation.
An expected image is missing
Check whether it is directly inside the selected input folder. Images in nested subfolders are not included. Unsupported filetypes are ignored, so confirm that the source uses a supported extension, such as JPG, PNG, TIFF, PSD, or WebP.
If you selected the folder earlier, remember that the plugin reads its current contents at run time. Files moved out of that folder before starting will not be included.
The progress counter appears to count every file as compressed
Skipped files still count as completed images because copying them is part of the batch. The completed-image counter is not a count of files that underwent lossy compression.
Set quality and resizing guardrails for the larger images
When using Target Filesize or Target Reduction %, you can enable “Never Compress Below This Quality.” For example, a minimum quality of 75 prevents the search from intentionally reducing quality below that configured floor, subject to the output format’s available quality levels.
The target modes try quality adjustment before changing dimensions. If the lowest permitted quality still produces a file above the accepted target range, “Downscale Images If Necessary” can provide a second way to reduce filesize.
A setting of 0.5x maximum permits the plugin to search between the original dimensions and half the original width and height. It does not force every image to become exactly half-size. The plugin may find that a larger scale is sufficient, or avoid resizing entirely.
If keeping original dimensions is essential, leave adaptive downscaling disabled. Understand that a quality floor combined with unchanged dimensions may leave some results above your requested filesize.
In Standard Compression, “Also Downscale Images By” behaves differently: it applies one fixed factor to every processed image. Skipped files bypass that resizing operation too.
What a successful export folder should contain
A successful selective-compression batch should preserve the smaller files while creating derivatives for the eligible larger files. Check both groups rather than looking only at the total file count.
- Skipped files should retain their original filenames, source formats, dimensions, and filesizes.
- Processed files should be JPEG or WebP derivatives using your configured filename pattern.
- Processed output sizes should be checked against your delivery requirement, especially when quality or resizing restrictions may prevent the target.
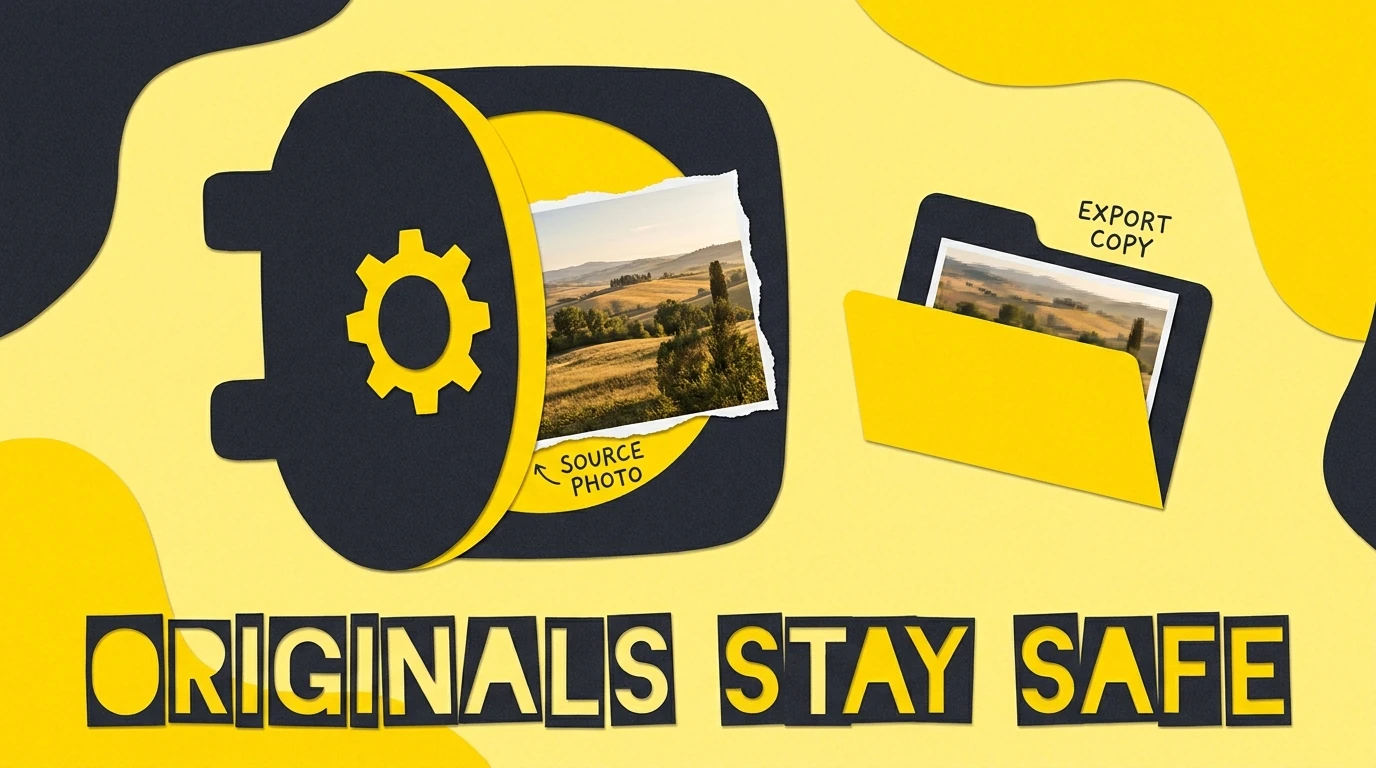
- The original source images should remain available in their pre-compression state.
Skipped files do not use the dynamic compressed-output filename builder. Processed files do, so retaining the image-filename component helps you distinguish each derivative from its source.
The plugin closes actively processed source documents without saving. You can therefore review the exports without sacrificing the originals if you decide to rerun the job with different settings.
If the finished images must be below 1 MB, leave headroom
Do not set Target Filesize to exactly 1 MB when your destination has a strict 1 MB maximum. The target modes accept results within ±10%, so an accepted result can be above the requested target.
For the plugin’s 1 MB definition of 1024 KB, a 900 KB target has an accepted range of 810–990 KB. That leaves space below the 1024 KB boundary.
This is still best-effort compression, not a hard maximum-size guarantee. If your quality floor or permitted downscaling prevents the target range from being reached, the closest legal result can remain oversized. Check final files before uploading them.
If the destination instead specifies a 1,000,000-byte ceiling, match both settings to that requirement. A conservative skip threshold of 976.56 KB sits just below 1,000,000 bytes, while an 850 KB output target has a nominal upper tolerance of 957,440 bytes. This avoids treating the plugin’s larger 1 MB unit as equivalent to the destination’s limit.
Save the 1 MB selection rule for repeat jobs
Once the workflow is configured and validated, give it an Operation Name and click Save. The saved operation includes the skip threshold, compression mode, target or quality settings, output format, optional quality and downscaling controls, filename components, and folder selections.
For later jobs, select the saved operation and click Load. If the next batch uses different input or export folders, select those folders before running. The source-file list is read again when the operation begins, so the workflow uses the folder’s current contents.
This replaces repeatedly sorting files by size, exporting the larger images, checking their outputs, and gathering the untouched smaller files into a delivery folder. Bulk Image Compressor, available through Adobe Exchange and Adobe’s Creative Cloud plugin marketplace, lets you define that selective workflow once and reuse it while preserving files that are already small enough.