How To Enlarge Hundreds Of Photos Using Photoshop's Firefly Upscaler

To enlarge hundreds of photos with Photoshop’s Firefly Upscaler, use Bulk Image Upscaler: Batch-Enhance Resolution to run the process across a source folder. Choose Firefly Upscaler 2x or 4x, configure your export settings, and start the batch. The plugin opens each supported image, applies the Firefly workflow, exports the enlarged result, and closes the source without saving changes.
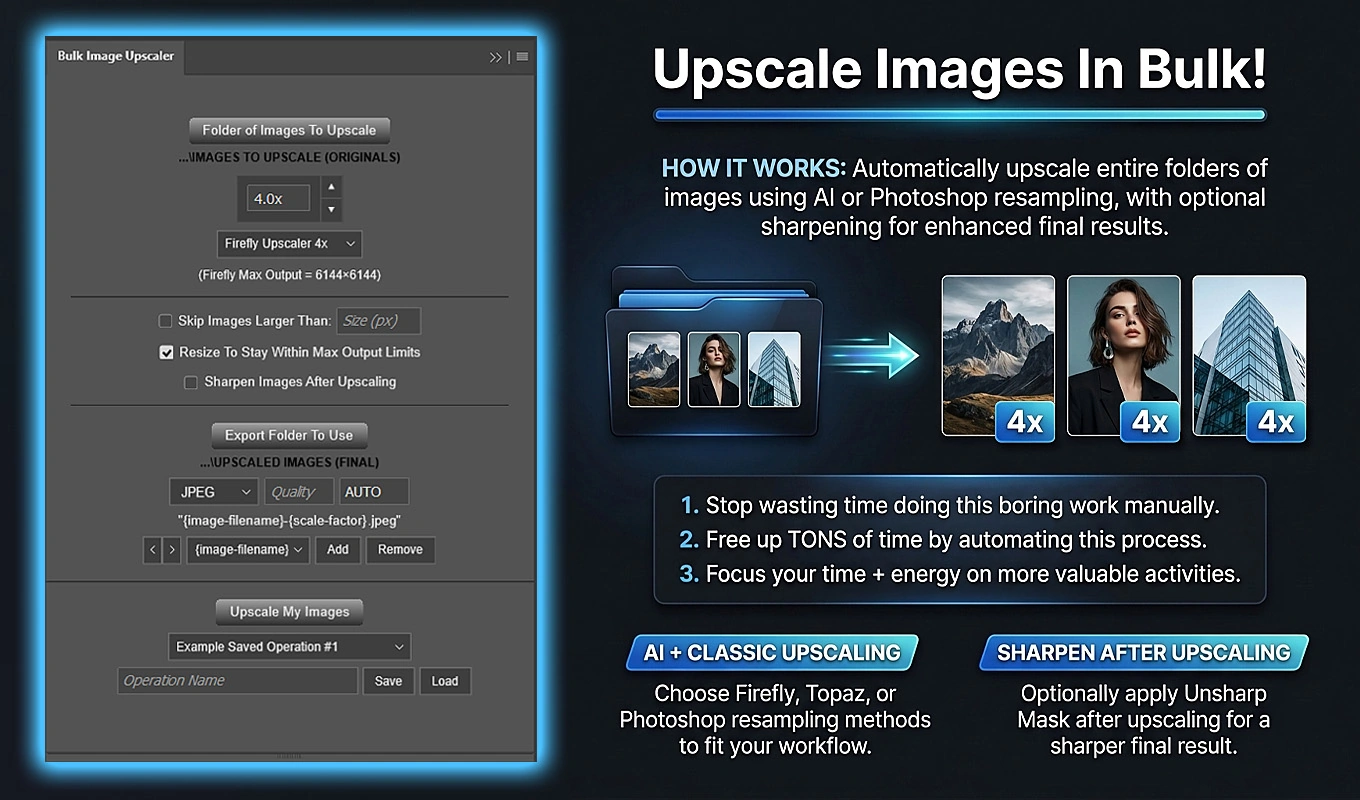
The important part is configuring the batch correctly before committing a large collection to generative processing. Firefly has a 6144-pixel output limit on each dimension, AI operations use Generative Credits, and some larger sources cannot receive the full requested enlargement. Here is how to set up the workflow and understand what will come out of it.
1. Install Bulk Image Upscaler in Photoshop
Bulk Image Upscaler is a third-party Photoshop plugin available through Adobe Exchange and Adobe’s Creative Cloud plugin marketplace. It automates the repeated work around upscaling: opening files, applying the selected method, optionally sharpening, exporting, naming, and closing documents.
- Find Bulk Image Upscaler: Batch-Enhance Resolution in Adobe Exchange or the Creative Cloud plugin marketplace.
- Acquire and install it through Adobe’s normal plugin installation process.
- Allow the Creative Cloud desktop application to complete installation.
- Open or restart Photoshop if necessary, then access the plugin from Photoshop’s Plugins menu.
Your installed Photoshop version must support the generative-upscale functionality used by Firefly. The plugin checks for that support before allowing an AI operation to run; installing the plugin does not replace that Photoshop requirement.
2. Put the Photos for This Batch in One Source Folder
Gather the photos you want to enlarge into a folder, then click Folder of Images To Upscale and select it. The interface displays a shortened version of the selected path so you can confirm the location.
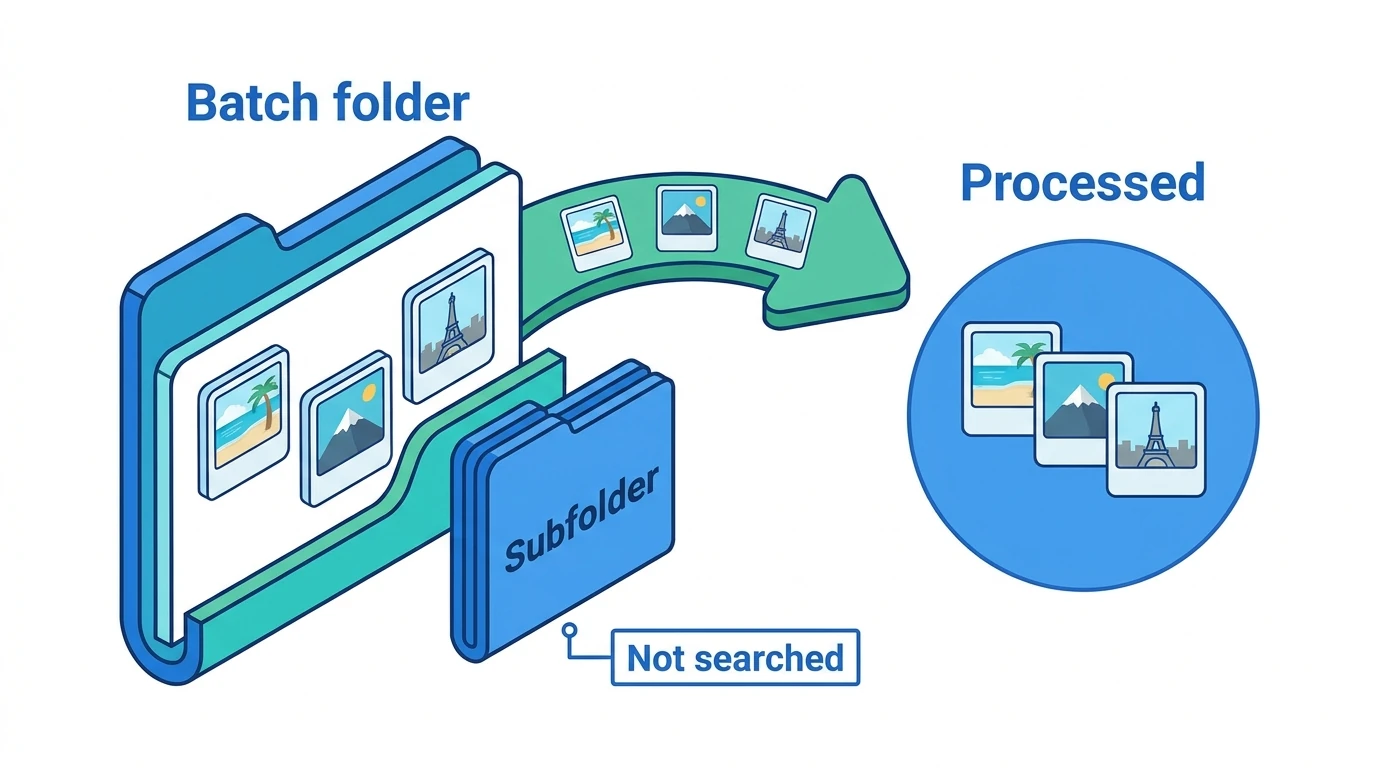
The plugin processes supported files directly inside that folder. It does not recursively search nested subfolders. If your collection is organized into separate trip, event, or client folders, gather the intended inputs into a dedicated batch folder or run those folders separately.
Common supported photo inputs include JPEG, PNG, TIFF, WebP, PSD, and PSB. Unsupported extensions are ignored. A folder containing no supported images will not proceed.
The source list is read when the operation begins, not when you first select the folder. You can therefore finish adding photos after choosing the folder, but make sure its contents are ready before clicking Upscale My Images.
For an initial trial, use a small folder containing representative photos: a small image, a medium image, a larger image, and subjects with fine detail. That gives you a useful preview before running the complete collection.
3. Select Firefly Upscaler 2x or 4x
In the Upscaling Method dropdown, select Firefly Upscaler 2x or Firefly Upscaler 4x. Firefly Upscaler 2x is the default method.
These are fixed enlargement factors. A 2× operation doubles both pixel dimensions; a 4× operation quadruples them. For example, a 1000 × 750 photo becomes 2000 × 1500 at 2×, or 4000 × 3000 at 4×, provided the requested output fits Firefly’s limits.
Selecting a Firefly variant automatically synchronizes the scale-factor control to 2.0x or 4.0x. While Firefly is selected, the arrows switch between those variants rather than making small fractional adjustments. Firefly does not offer an arbitrary multiplier such as 1.7× or 3.5× in this workflow.
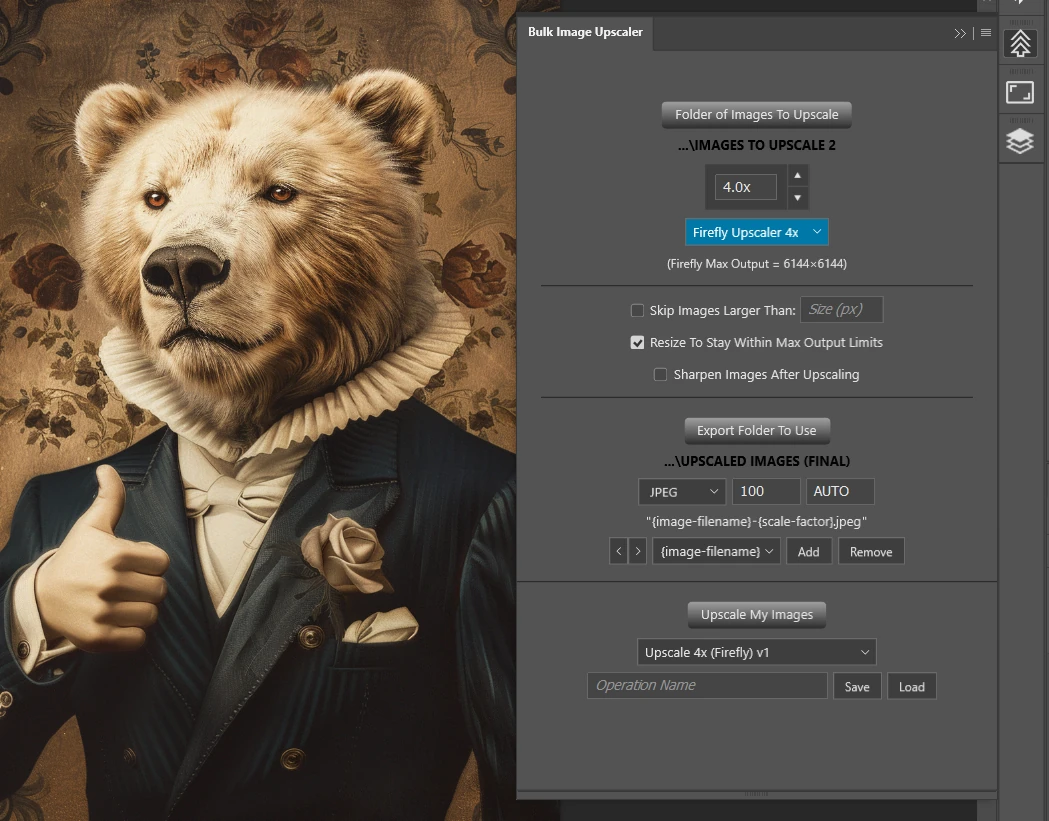
Choose the requested factor according to the pixel dimensions you need. Use 2× when doubling is sufficient; request 4× when you need a larger increase and the source dimensions allow it. One batch uses one primary method and scale configuration, with automatic adjustments for individual images that exceed the model limit.
4. Understand Why Firefly’s 6144-Pixel Ceiling Matters
When Firefly is selected, the interface displays Firefly Max Output = 6144×6144. This means neither output dimension may exceed 6144 pixels. A narrow image does not gain permission to exceed that width simply because its total pixel count is relatively small.
You can estimate whether an unchanged source will fit by checking its longest edge:
- At 2×, a source with a longest edge of 3072 pixels or less can fit.
- At 4×, a source with a longest edge of 1536 pixels or less can fit.
Bulk Image Upscaler handles oversized requests through Resize To Stay Within Max Output Limits. This Smart Default stays enabled for AI workflows, so you do not need to calculate and sort every photo manually.
The adjustment follows a source-preserving order:
- If the requested enlargement fits, it runs without changing the source dimensions or requested factor.
- If 4× would exceed the limit, the plugin evaluates the corresponding 2× operation and switches when that preserves more original source information.
- If even 2× would exceed the limit, it proportionally reduces the source just enough for the 2× operation to fit. This preliminary resize uses Photoshop’s Bicubic interpolation.
Consequently, selecting Firefly Upscaler 4x does not guarantee that every exported photo will measure four times its original dimensions. The purpose of the automatic handling is to keep mixed-size batches within Firefly’s constraints while retaining as much source resolution as possible.
5. Decide Which Sources to Skip and Whether to Sharpen
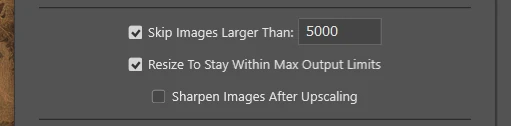
A folder of hundreds of photos may include images that are already large enough. Skip Images Larger Than lets you exclude those sources instead of spending processing time and Generative Credits enlarging them.
Enter a source-size threshold in pixels. With a threshold of 5000, a 4000 × 3000 image remains eligible, while a 6000 × 4000 image is skipped. The setting checks whether either original dimension exceeds the threshold; it is not a target output size.
This is separate from Firefly’s automatic output-limit handling. Skipping means “do not upscale this source.” Automatic limit handling means “process this source, but adjust the operation so Firefly can accept it.”
You can also enable Sharpen Images After Upscaling. This applies Photoshop’s Unsharp Mask after enlargement and before export, using the configured Amount, Radius, and Threshold.
Sharpening is off by default. Leave it off for your first representative test unless you already have suitable settings. If you enable it, judge the exported result at full size before applying the same sharpening pass to hundreds of photos, particularly around high-contrast edges and fine textures.
6. Work Through a 300-Photo Travel Archive Example
Suppose you are preparing 300 travel photographs for a larger digital portfolio. The collection mixes small older exports with more recent, higher-resolution images. You request Firefly Upscaler 4x and set Skip Images Larger Than to 5000 pixels.
Four representative source sizes illustrate what that single batch configuration can produce:
- A 1200 × 800 photo fits at 4× and exports at 4800 × 3200.
- A 2000 × 1500 photo would reach 8000 × 6000 at 4×, exceeding Firefly’s width limit. Switching to 2× allows a 4000 × 3000 output without shrinking the source first.
- A 4000 × 3000 photo is eligible under the skip threshold, but even 2× would exceed Firefly’s limit. Reducing the working source to 3072 × 2304 allows a 2× result of 6144 × 4608.
- A 6000 × 4000 photo exceeds the 5000-pixel source threshold and is skipped rather than upscaled.
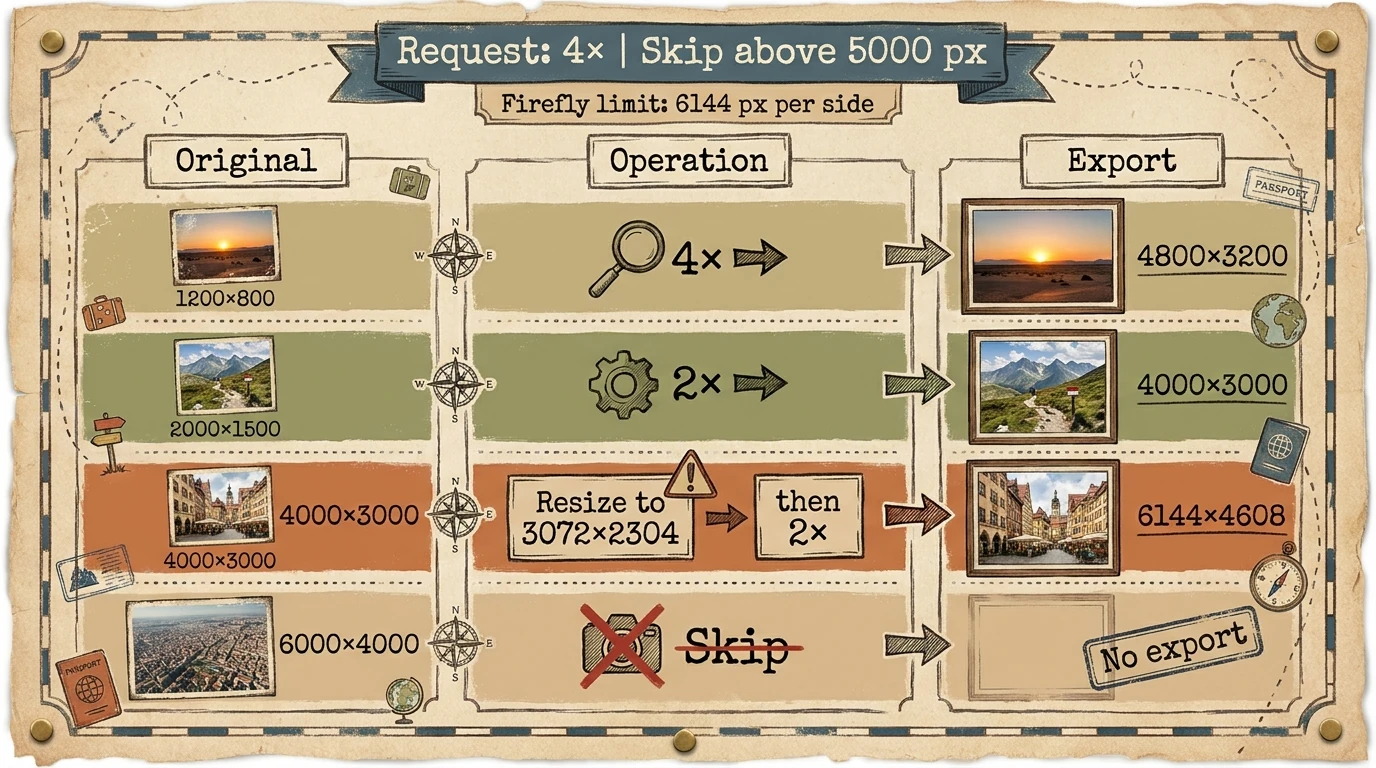
This is why a mixed collection does not need to be separated into a different folder for every source dimension. The batch applies your chosen workflow, while the limit resolver adapts individual images where necessary.
It also explains why the final delivery should not be described simply as “300 photos enlarged four times.” Some sources may be skipped, and some may use an adjusted operation. Actual output dimensions are the useful measure of what you received.
7. Choose Export Settings and Informative Filenames
Click Export Folder To Use and choose the destination. A separate, clearly named output folder makes it easier to distinguish the enlarged files from the original collection and review the batch afterward. Outputs are saved directly into the selected export folder.
Choose the format required for your delivery. JPEG is the default and provides an adjustable Quality value from 0–100. PNG is available when you need lossless output; its Quality control changes compression rather than making PNG lossy. Other supported destinations include TIFF, PSD, PSB, PDF, GIF, and WebP.
With Firefly selected, DPI remains fixed to AUTO. Plan this workflow around the required pixel dimensions rather than looking for a custom DPI entry in the AI settings.
For a large mixed-size batch, build filenames that include the source name, actual scale factor, and final dimensions. Using the filename builder, add these components in order:
- {image-filename}
- {scale-factor}
- {width}x{height}
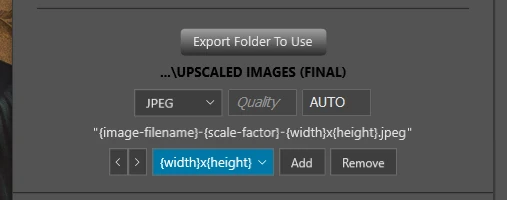
The components are joined with hyphens, and the selected export format supplies the extension. A result might be named coast-014-2.0x-6144x4608.jpg.
Those values describe the actual operation and exported dimensions. If a requested 4× operation changes to 2×, the filename reflects 2.0x. If the source was reduced first, that 2.0x describes the AI multiplier applied to the adjusted source, not a doubling of the original file’s dimensions.
Existing output names receive numbered suffixes instead of being unintentionally overwritten. Including the original filename and final dimensions still makes a large delivery much easier to navigate.
8. Save the Configuration Before You Need It Again
Once the folders, Firefly variant, skip threshold, sharpening, export settings, and filename components are configured, enter an Operation Name and click Save.
A descriptive name such as Travel Portfolio — Firefly 4x — JPEG makes the saved operation easier to recognize. The saved configuration includes the relevant processing settings, filename components, and source and export folder selections.
For the next job, select that operation and click Load rather than reconstructing every decision. You can then change the folders or adjust any settings that differ for the new collection.
If you reuse the same input folder for successive deliveries, remember that the plugin reads its current contents when a run starts. Remove files you do not want processed again before launching the next batch.
Saved folder access is restored where possible. If a folder has moved, been renamed, or can no longer be accessed, the plugin asks you to select it again.
9. Acknowledge Generative Credits and Start the Batch
Click Upscale My Images when the configuration is ready. The plugin validates the operation, including the selected folders, supported source files, method, export settings, and any enabled optional controls.
Before a Firefly batch begins, it displays Confirm Before Proceeding. You must actively select the acknowledgement checkbox before Confirm will allow processing to start.
The acknowledgement explains that the operation uses Generative Credits and that usage can depend on the operation settings, AI model, and number of images. Review Adobe’s current Generative Credits policies and your available balance before committing a large collection. A folder containing hundreds of photos warrants more planning than a single-image test.
Choose Cancel Operation if you need to revise the batch. Cancelling at this confirmation stage prevents the batch from beginning.
For a first large job, the sensible sequence is to complete a representative test, inspect its exports, and then use the verified settings for the full folder.
10. Let the Plugin Handle Each Photo Without Saving Over the Source
During the run, Bulk Image Upscaler carries out the repetitive document work for each supported source:
- Open the image and inspect its dimensions.
- Skip it if it exceeds your enabled source-size threshold.
- Resolve Firefly’s output limit if necessary, then perform the AI upscale.
- Apply Unsharp Mask if post-upscale sharpening is enabled.
- Export using the chosen format, quality, and filename pattern.
- Close the source document without saving changes and continue to the next image.
The enlarged files are separate exports. Even when the working document needs a preliminary resize to fit Firefly’s limit, the plugin does not save that adjustment back into the original source file.
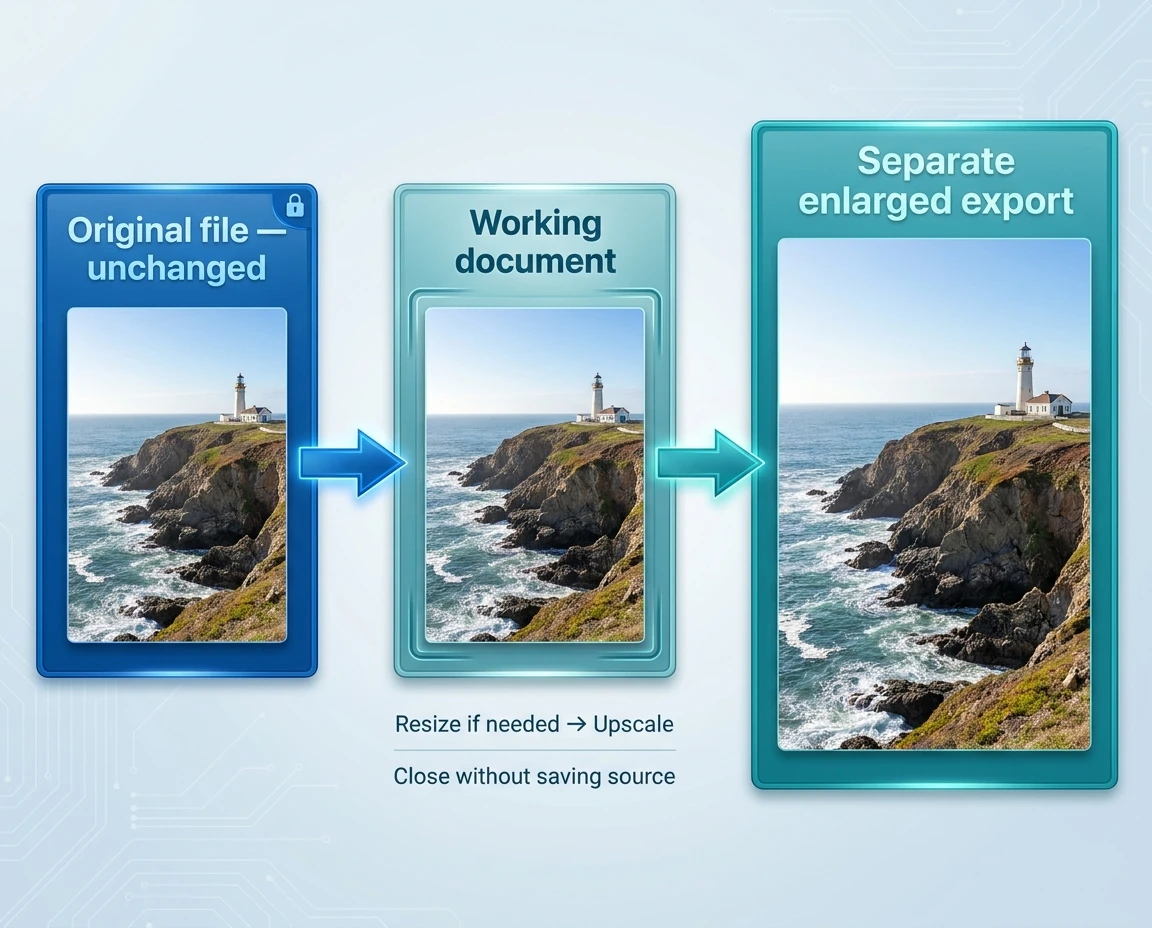
This is the practical difference between a manual Firefly session and a configured batch: you no longer have to return after every photo to export it, name it, close it, and open the next one. The generative processing still takes time, but the surrounding document handling is automated.
11. Follow Progress and Cancel When Necessary
The progress modal is titled Upscaling Your Images... and includes status text, a progress bar, a completed-image count, and an area for important operation updates. A counter such as 3 / 20 images upscaled... helps you follow the batch.
Use Cancel Operation to stop the active operation, or press Escape. Cancellation is checked between major processing stages.
During an AI command, Photoshop can temporarily block normal plugin interaction while generative processing is executing. A cancellation request therefore should not be treated as an instantaneous interruption of an in-flight Firefly command.
Do not plan a delivery around an assumed number of seconds per image. AI processing can be more time-consuming and externally dependent than a conventional resize. The workflow’s main advantage is reducing repeated hands-on work, not guaranteeing a particular processing speed.
12. Review the Finished Exports Before Delivery
After the batch finishes, check both the file set and the image quality. A folder full of new files confirms that exports were created; it does not replace a visual review.
- Compare the outputs with the supported source images, accounting for anything deliberately excluded by the skip threshold.
- Inspect representative small, medium, and large sources so you cover unchanged 4× operations, 2× adjustments, and any source pre-resizing.
- Check actual pixel dimensions rather than assuming every result matches the originally requested multiplier.
- Look closely at faces, fine textures, detailed objects, and high-contrast edges, especially if sharpening was enabled.
- Confirm that the format, filenames, and destination folder match the intended delivery.
If an image exports at 6144 pixels on its longest edge rather than four times its original size, revisit the source dimensions before treating that as a failure. It may be the expected result of Firefly’s output ceiling and the plugin’s automatic handling.
For recurring large jobs, the strongest workflow is straightforward: test representative photos, save the configuration, run the folder, and review the exported results. Bulk Image Upscaler makes Photoshop’s Firefly Upscaler practical for hundreds of photos by automating the repetitive steps while preserving your original files and adapting oversized requests to the model’s limits.