How To Generate Mockups In Bulk Without Tiered Software Pricing Restrictions
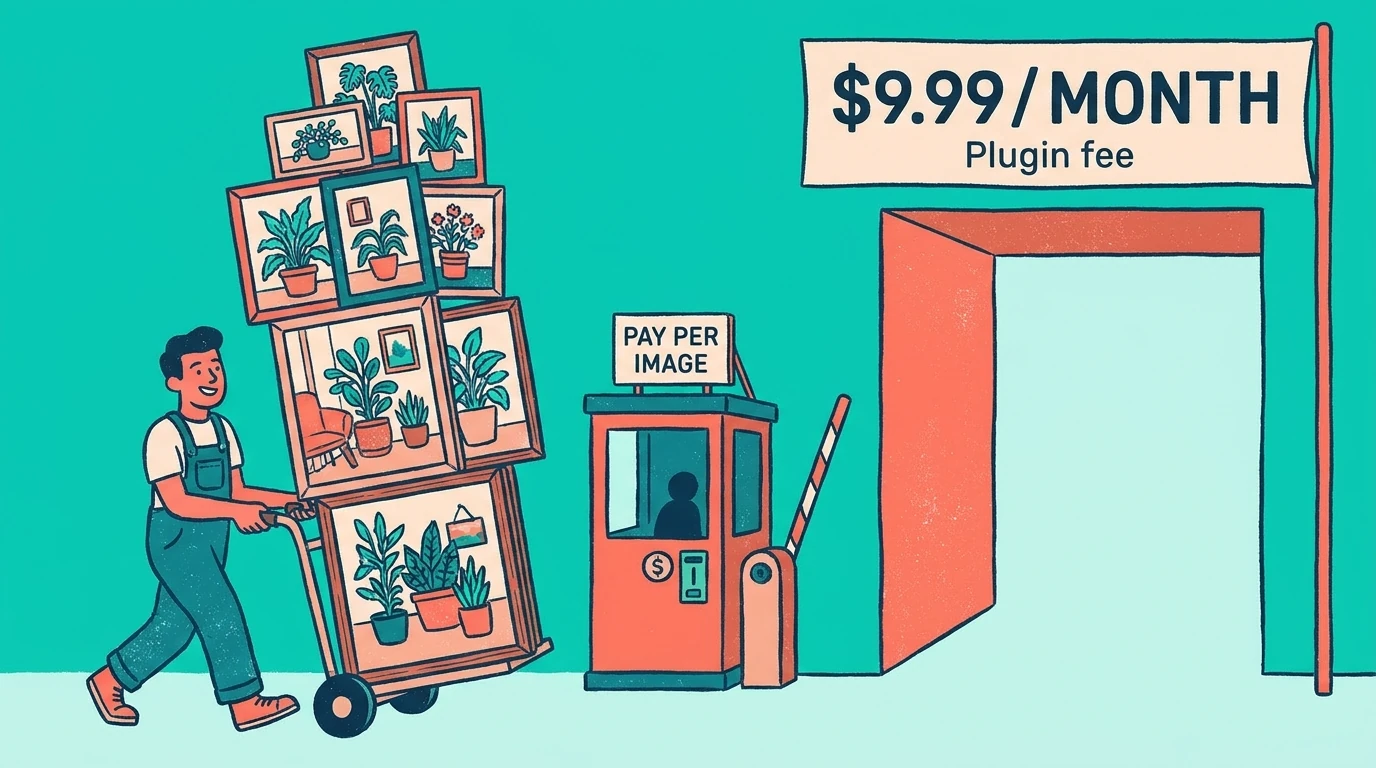

A catalog with hundreds of designs can require thousands of mockup images. If your production software limits monthly exports or charges for credits, adding more designs also means finding room in your image allowance—or paying to expand it.
Batch-Replace Smart Objects: Mockups In Bulk offers a different approach. This Photoshop plugin costs a flat $9.99 per month, with no monthly mockup limit and no credits to purchase. You supply Smart Object-based mockup templates and a folder of artwork, then automate the combinations.
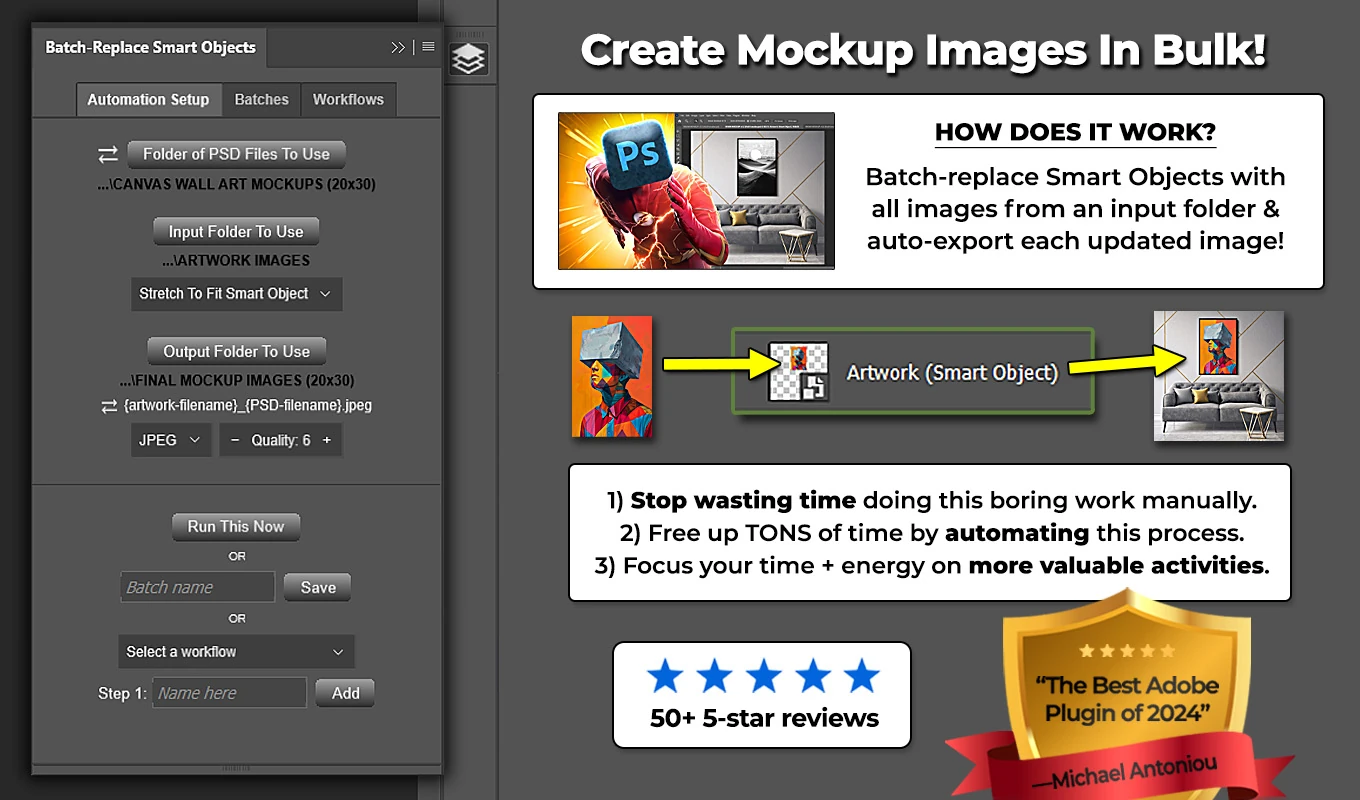
The important part is building a workflow that takes advantage of that pricing: calculate your output volume, prepare reliable templates, configure a batch, and reuse the setup as your catalog grows.
1. Replace output allowances with a flat monthly plugin fee
There are two separate restrictions to watch for when budgeting bulk mockup production: how many images you are allowed to generate, and how much generating additional images costs.
A fixed monthly allowance can interrupt production when you reach the limit. A credit-based arrangement makes additional output dependent on purchasing enough credits. Either way, the number of finished images becomes a billing consideration.
With Batch-Replace Smart Objects, the plugin subscription is $9.99 per month regardless of how many mockup images you produce during that month. There are no monthly output caps, no credit packs, and no need to move into a more expensive plugin tier to generate additional images.
Producing 500 mockups, 5,000 mockups, or tens of thousands does not increase that monthly plugin fee. This makes the subscription component of your production budget predictable even when your image requirements change substantially.
2. Calculate mockup volume before planning the batch
Your artwork count is not your finished-image count. Bulk mockup production normally follows this relationship:
Number of artwork files × number of mockup templates = number of finished mockup outputs.
For example, 250 designs applied to eight mockup scenes produce 2,000 artwork-and-template combinations. That is the volume you should plan for—not merely the 250 files in your artwork folder.
Batch-Replace Smart Objects supports both sides of this calculation. You can process an artwork folder through one PSD/PSB template, or select a folder of PSD/PSB templates and process the complete artwork folder through each template.
Multiple selected Smart Objects inside a template do not multiply the output count. If a scene contains three selected product placements, the plugin inserts the same current artwork into all three, then exports one completed scene. Your 2,000-output project does not become 6,000 outputs simply because each scene contains three replacement targets.
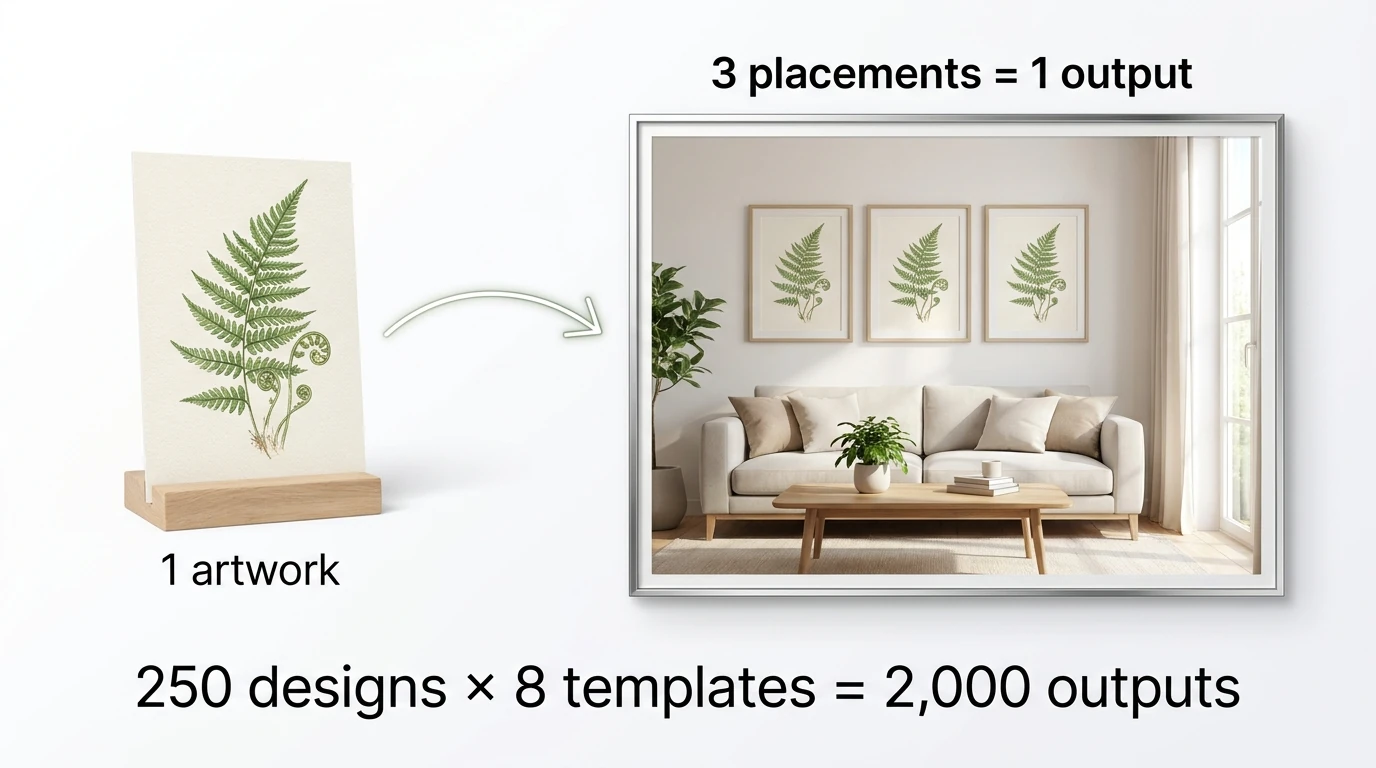
Knowing this expected count helps you plan disk space, check whether the finished collection is complete, and understand how much manual work the batch replaces.
3. Distinguish unlimited image generation from unlimited computing capacity
Unlimited output is a pricing policy, not a promise that every project finishes immediately. Photoshop still has to open documents, replace Smart Object contents, process artwork, and save finished files.
A large, complex mockup and a lightweight template do not necessarily take the same time to process. Artwork dimensions, document complexity, export settings, available memory, and storage performance can all affect production.
The useful distinction is that increasing your workload does not require purchasing more output capacity from the plugin. You still need enough computer time and disk space to complete the job.
You also need Adobe Photoshop and valid PSD/PSB mockup templates containing suitable Smart Objects. The $9.99 subscription is the plugin fee, not the total cost of Photoshop access, artwork, templates, and your production environment.
4. Prepare reusable Smart Object templates before scaling up
The plugin automates replacement inside an existing Photoshop mockup. It does not generate a mockup scene from an ordinary photograph or repair an incorrectly constructed template.
Start with a PSD or PSB containing the Smart Object region where your artwork belongs. If the template has exactly one Smart Object, the plugin targets it automatically. If it has several, select the intended Smart Object layer or layers in Photoshop.
For multi-Smart-Object templates, save the file with those targets selected. This is particularly helpful when processing a folder of templates or reopening the setup through a Saved Batch or Workflow.
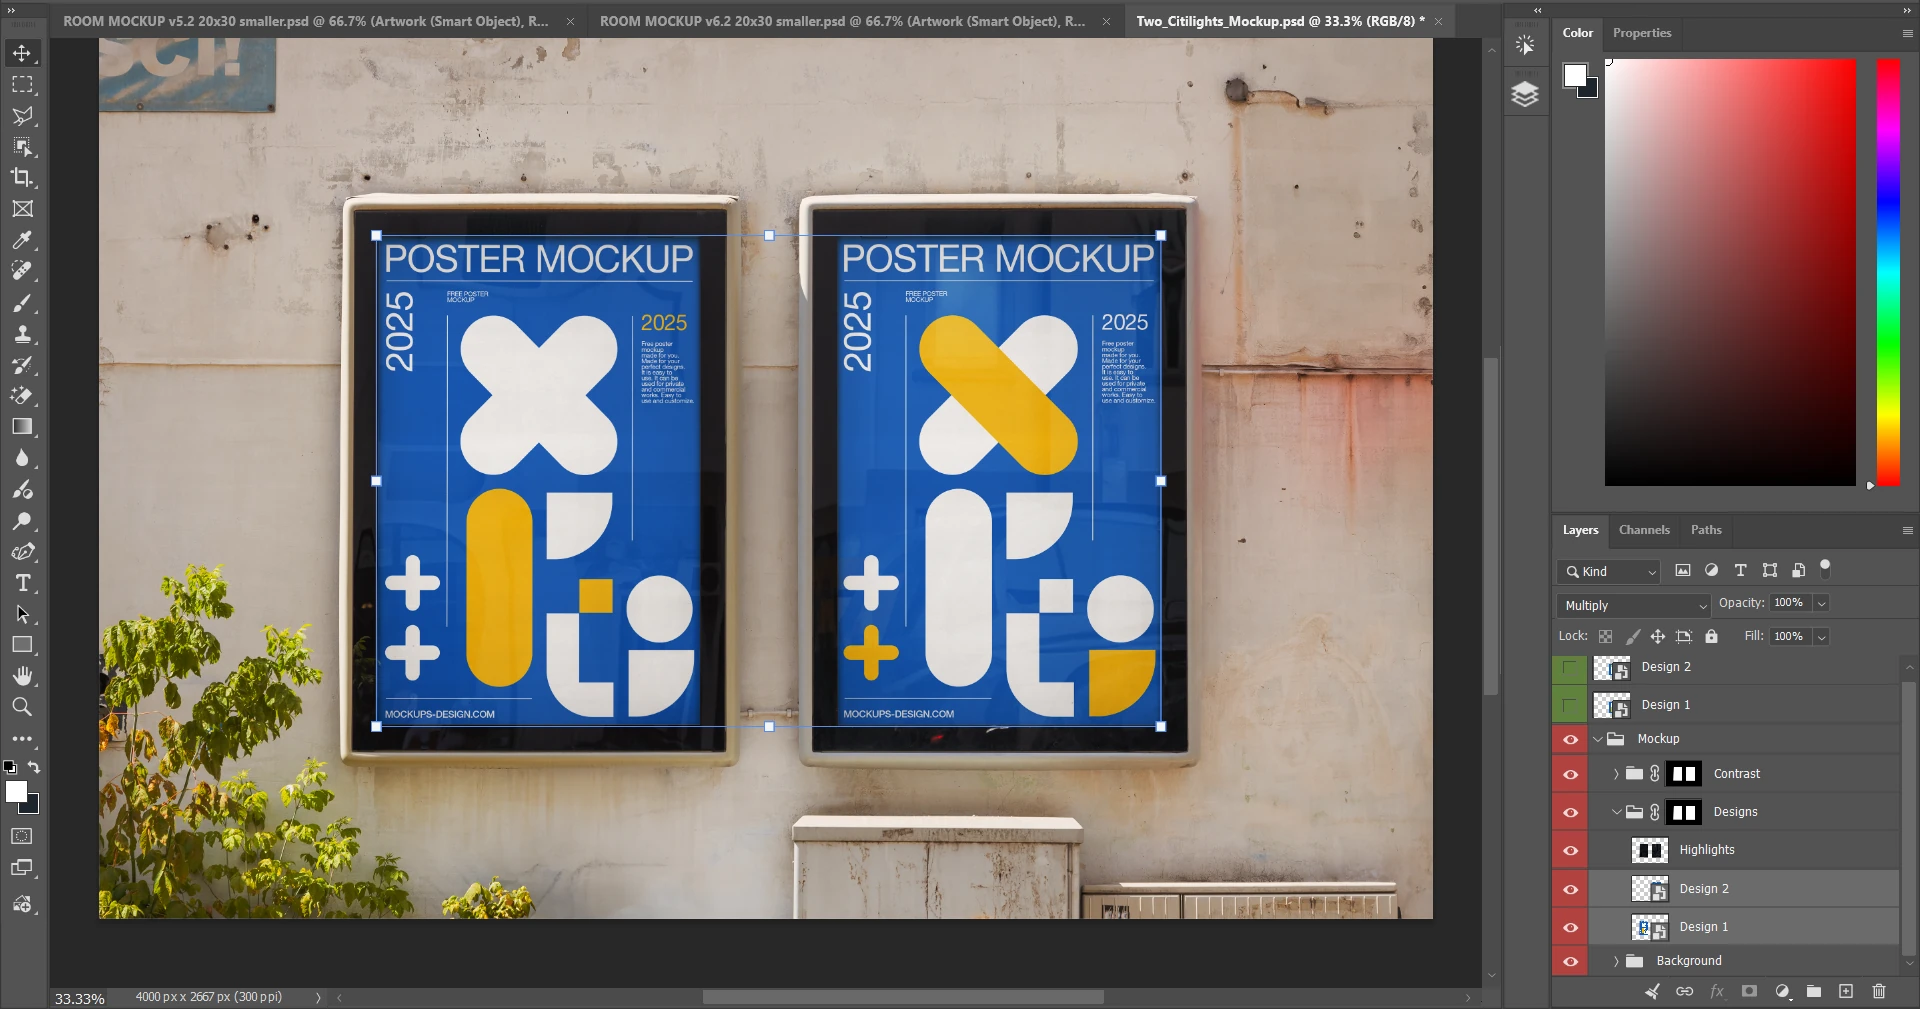
Also inspect the Smart Object’s internal content. Its existing dimensions and resolution provide the placement reference. An oversized internal canvas or unnecessary transparent space can produce unexpected artwork sizing even when the outer mockup looks reasonable.
Perspective and distortion need the correct construction order: convert the design layer into a Smart Object first, then apply the outer mockup transformation. Replacement artwork can then inherit that transformed appearance. Transforming an ordinary layer before converting it can bake the appearance into the inner content instead.
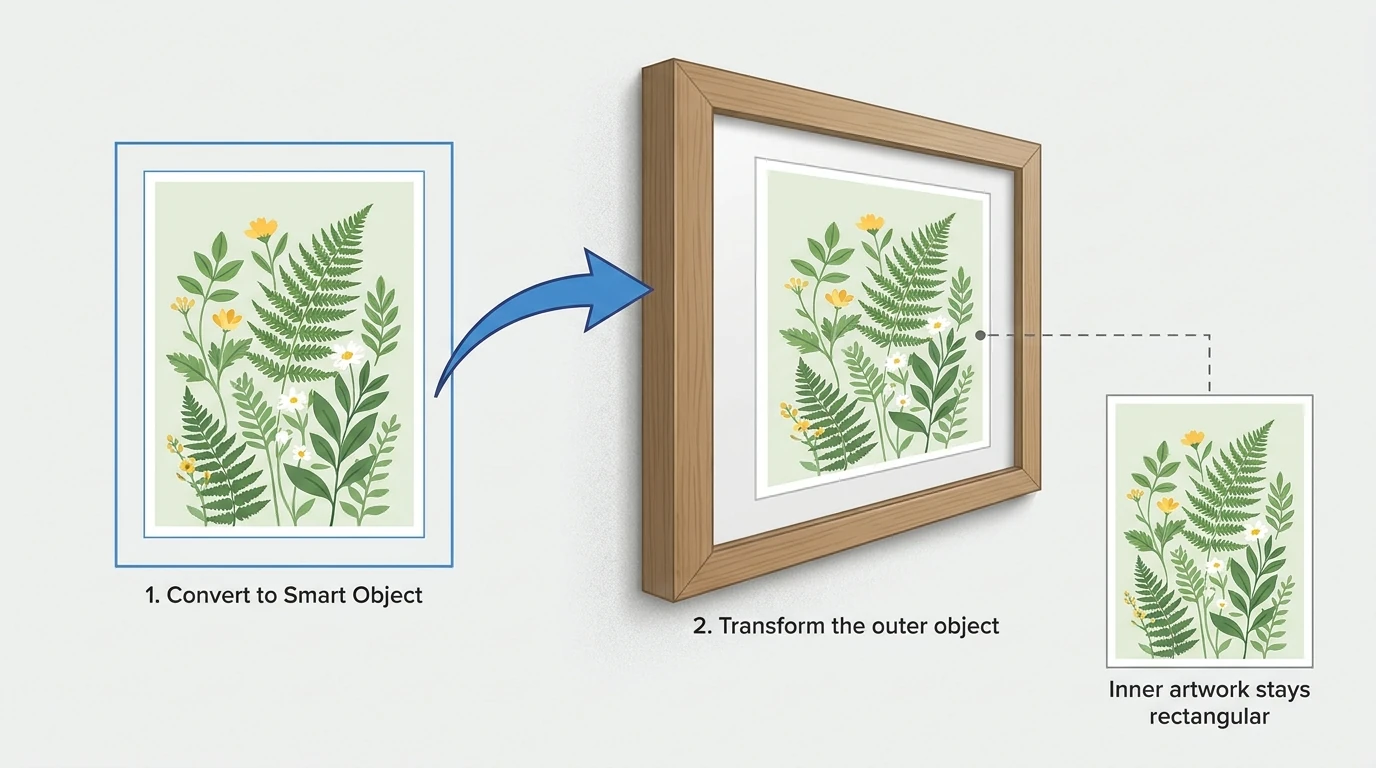
A reliable template is worth preparing once because every subsequent design will pass through that same structure.
5. Configure the artwork-and-template batch in Photoshop
Install Batch-Replace Smart Objects: Mockups In Bulk through Adobe Exchange or Adobe’s Creative Cloud plugin marketplace, then open it from Photoshop’s Plugins menu.
In Automation Setup, establish the three resources the operation needs:
- Choose the template-source mode. Use Photoshop Document To Use for one PSD/PSB, or switch to Folder of PSD Files To Use for multiple templates.
- Select the template file or template folder. Folder mode processes valid PSD and PSB files directly inside the selected folder.
- Select Input Folder To Use. This contains the artwork that should appear in your mockups.
- Select Output Folder To Use. This is where the generated files will be saved.
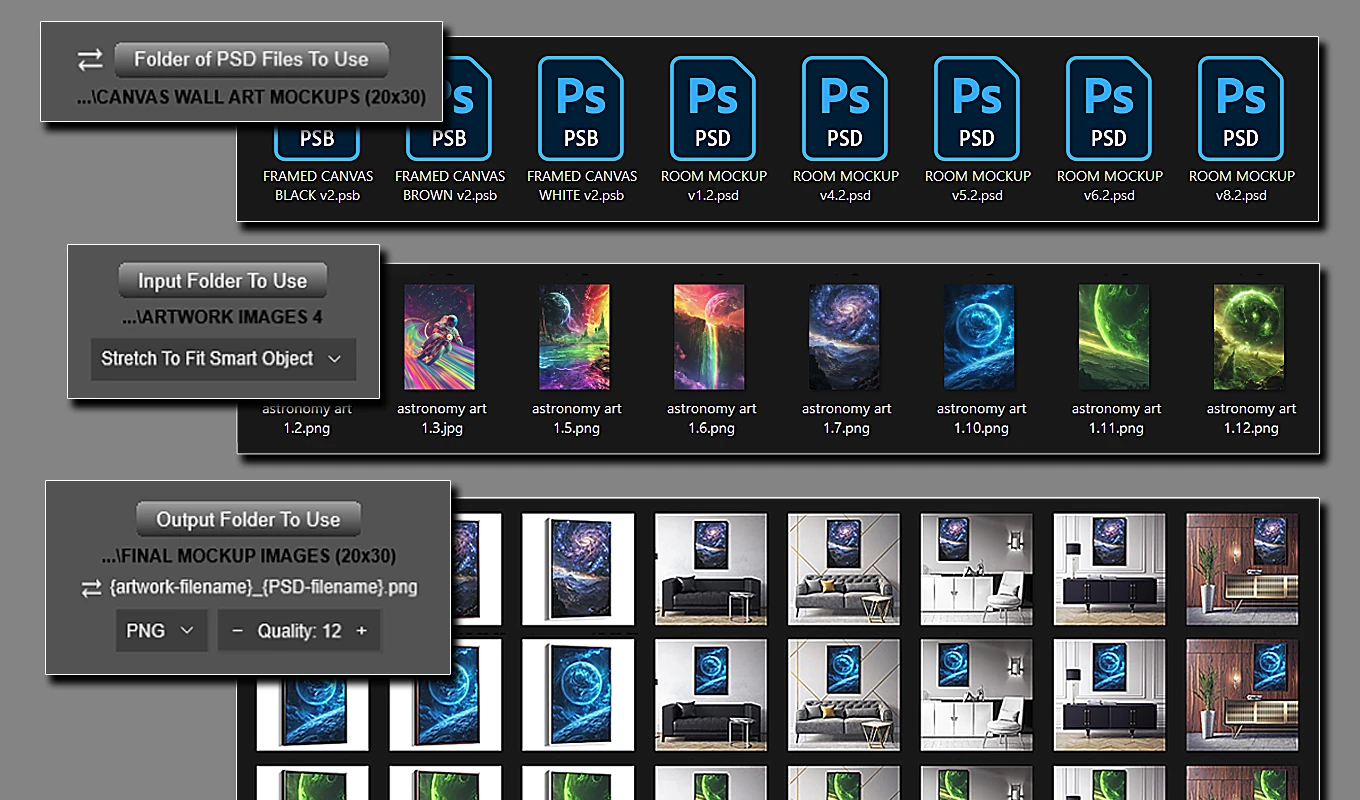
For the 250-design, eight-scene example, place the eight prepared templates in the selected template folder and the 250 artwork files in the input folder. One folder-mode operation can process the resulting 2,000 combinations.
Common supported artwork inputs include JPG, PNG, TIFF, PDF, PSD, and PSB, along with other supported formats. Unsupported files are ignored. Keep the files you want processed directly inside the selected input folder: the plugin does not recursively gather artwork from nested subfolders.
The input directory is read when the operation runs, so its current contents—not a permanently cached list from when you first selected it—determine the artwork batch.
6. Choose placement and export settings that suit the deliverables
Removing image quotas does not remove the need for consistent artwork placement. Before running a large batch, choose how each source image should fit the target Smart Object.
- Stretch To Fit Smart Object matches the target’s internal width, height, and resolution. It fills the area with the complete source image but can change its proportions.
- Place Original Image uses the artwork at its existing dimensions and resolution without intermediate resizing. It is appropriate when your files are already prepared to the template’s requirements.
- Contain Inside Smart Object preserves proportions and keeps the complete artwork visible. Different aspect ratios can leave unused space.
- Fill Smart Object & Crop preserves proportions while covering the entire target area. Overflow is cropped.
For artwork where losing an edge would be unacceptable, Contain is often the appropriate starting point. For a full-coverage image where cropping is acceptable, Fill may be more suitable. Stretch is useful when exact coverage matters and changing proportions is acceptable.
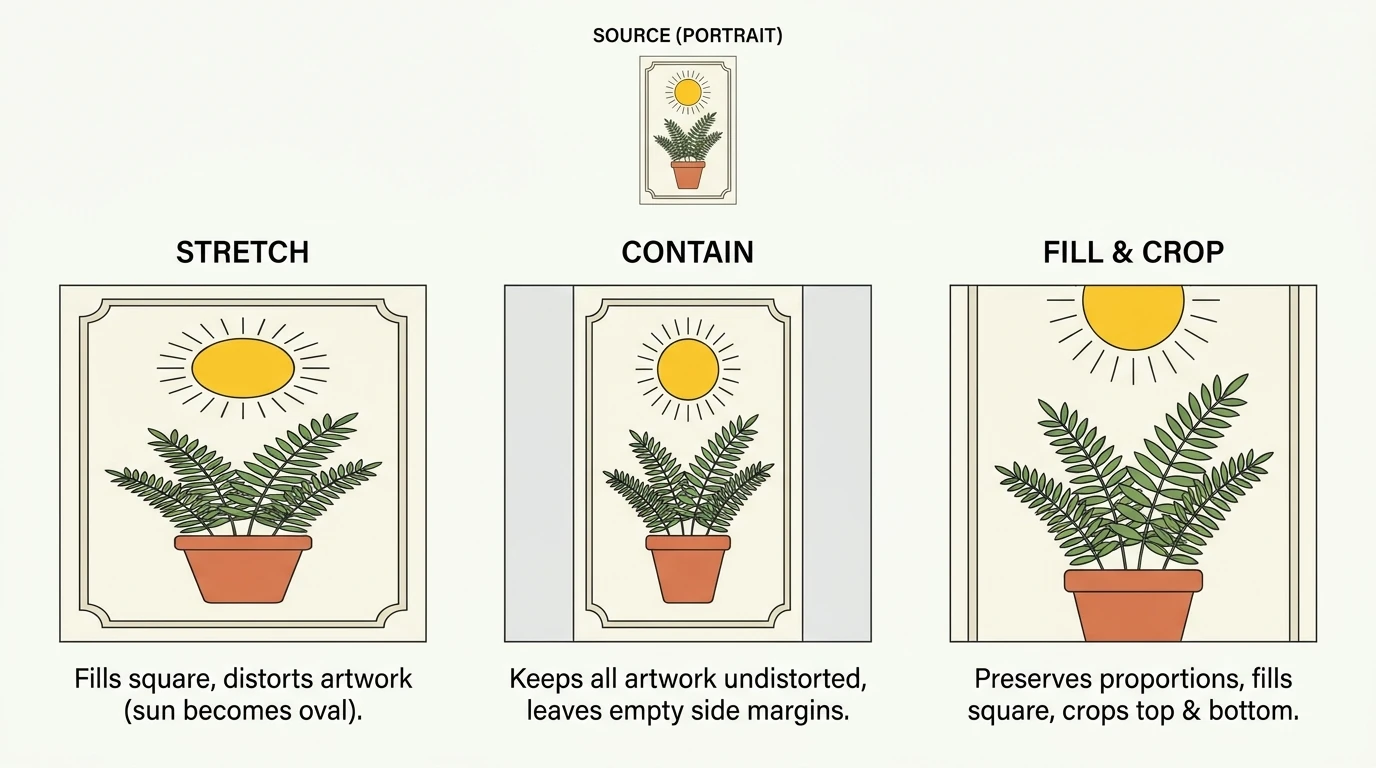
Contain and Fill offer nine placement positions, with Center / Center as the default. Position controls where contained artwork sits or which part of oversized artwork survives cropping. The position control is not used for Stretch or Place Original.
Next, choose the export format. JPEG is a practical option for many finished product previews. Its Quality setting uses Photoshop’s 0–12 scale. PNG is also available and remains lossless; its Quality setting controls compression rather than introducing JPEG-style degradation.
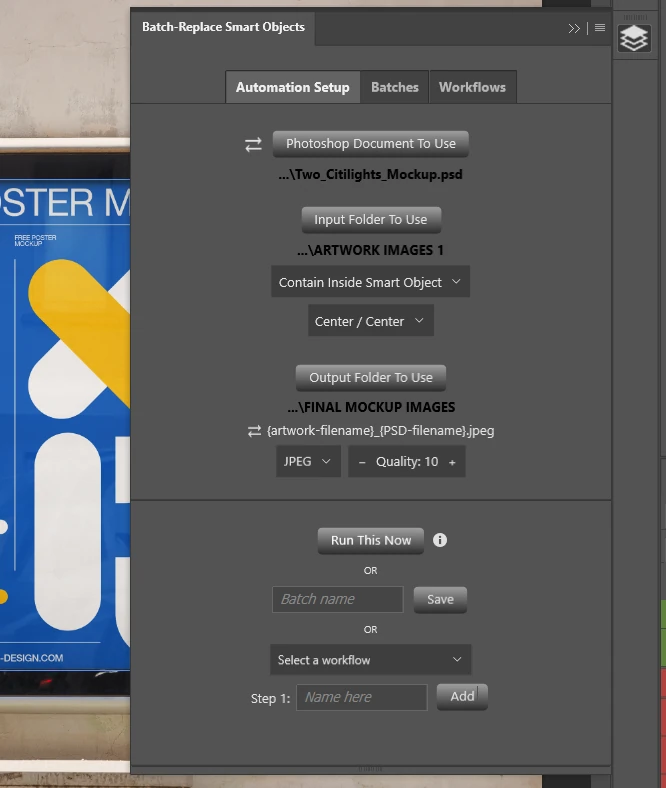
Choose settings around the files you actually need to deliver. Unlimited generation is most useful when the outputs are consistently usable.
7. Prove the setup with a small sample before the full run
Test because processing time matters—not because you need to conserve paid image credits.
Create a temporary input folder containing a few representative designs. Include the kinds of files most likely to expose placement problems: perhaps a wide illustration, a portrait design, and artwork with important details near its edges.
- Select the sample input folder and a separate proof-output folder.
- Use the intended template or template folder and production settings.
- Click Run This Now.
- Inspect coverage, cropping, perspective, repeated placements, and export quality.
- After approval, select the full artwork folder and final output location, then run the production batch.
This is an ordinary small batch, not a special preview mode. It gives you actual exported files to evaluate.
If a design appears unexpectedly small, inspect the Smart Object’s internal canvas. If perspective does not carry over correctly, inspect the template construction. Resolve those issues before applying the same setup to thousands of combinations.
8. Make the output library easy to identify and safe to rerun
Bulk generation creates a file-management problem unless each output clearly identifies both the design and the scene. Batch-Replace Smart Objects combines those source names automatically.
With artwork named fern-study.png and a template named living-room-frame.psd, the default JPEG filename is fern-study_living-room-frame.jpg.
You can reverse the order to living-room-frame_fern-study.jpg. Artwork-first naming is useful when reviewing every scene for a particular design. Template-first naming is useful when reviewing all designs rendered in one scene.
Existing filenames are handled with numbered alternatives, such as fern-study_living-room-frame (1).jpg. A rerun therefore does not blindly overwrite the previous output with the same intended name.
That protection also means a full rerun can leave multiple versions in your output directory. Use clearly separated proof, production, and revision destinations when that makes review easier. The source mockup itself is not automatically overwritten with each replacement; the operation exports derivative files.
9. Save recurring batches and chain different production setups
A flat subscription is especially useful when the same production system serves new artwork throughout the month. Saved Batches let you retain an individual operation instead of repeatedly rebuilding it.
After configuring the template source, artwork folder, placement, output folder, filename order, export type, and Quality, enter a Batch name and save it. You can later run that configuration from the Batches tab.
Use Workflows when production requires several distinct operations. For example, one step could process framed-art templates with Contain, while another handles a different template group with Fill and a different output destination.
Each Workflow step stores its own complete configuration. Configure the operation first, then add the named step. Run Full Workflow executes those steps sequentially.
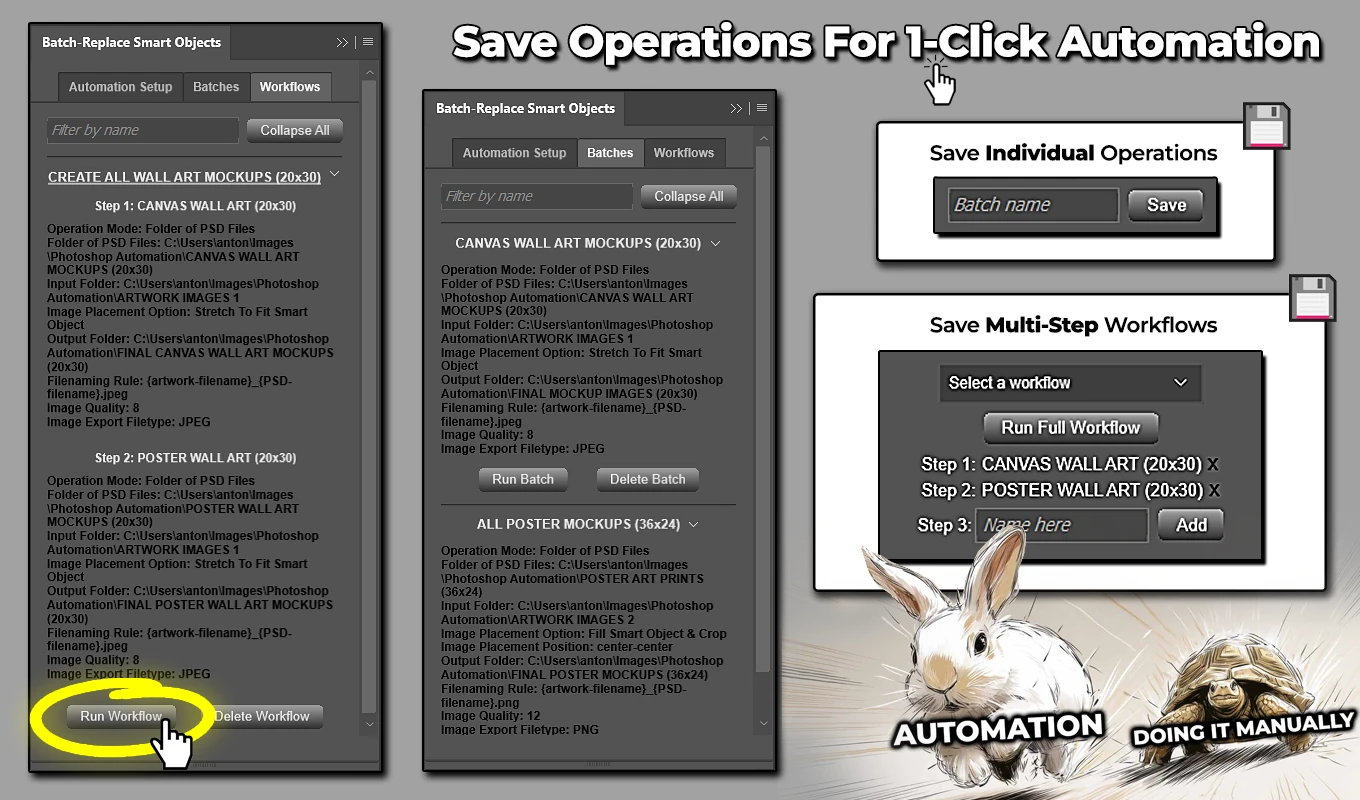
The distinction is straightforward: folder mode applies one operation configuration across multiple templates; a Workflow chains multiple configurations. A Workflow step can itself use folder mode.
Keep referenced files and folders accessible so saved operations can find them again. Persistent references simplify repeat production, but they cannot restore resources that have been moved, deleted, or disconnected.
10. Calculate the manual work removed across the entire batch
Pricing restrictions are only one cost of bulk production. Repetitive handling also becomes expensive as the combination count grows.
Suppose the manual replacement, naming, and export sequence requires 30 seconds of active handling per finished image. This is an illustrative assumption, not a measured plugin benchmark.
Across 2,000 outputs, that becomes:
2,000 × 30 seconds = 60,000 seconds, or 16 hours and 40 minutes of repetitive handling.
Automation does not eliminate template preparation, configuration, inspection, or Photoshop’s processing time. It removes the need to manually carry out the replacement-and-export sequence for every combination.
For your own calculation, time a representative manual cycle and multiply it by your expected output count. Then account for the setup and review work you will still perform. This gives you a more useful productivity estimate than assuming an unsupported number of images per minute.
The financial benefit has two parts: the plugin fee does not rise with image count, and you are not personally repeating the same production actions thousands of times.
11. Handle revisions without reserving credits for mistakes
Real catalog work rarely ends with the first export. A design changes, a crop needs adjustment, a new colorway arrives, or a product scene needs replacing.
With no per-image plugin charge, those revisions do not require a separate credit budget. Generating another set during the same paid month does not increase the subscription fee.
You should still control what you rerender. If only 20 of your 250 designs changed, copy those revised files into a separate input folder and configure an operation using that folder. Across eight templates, that means 160 revised outputs rather than rerunning all 2,000 combinations.
Selecting the complete original input folder means processing its supported contents again; it is not a request to detect only changed designs.
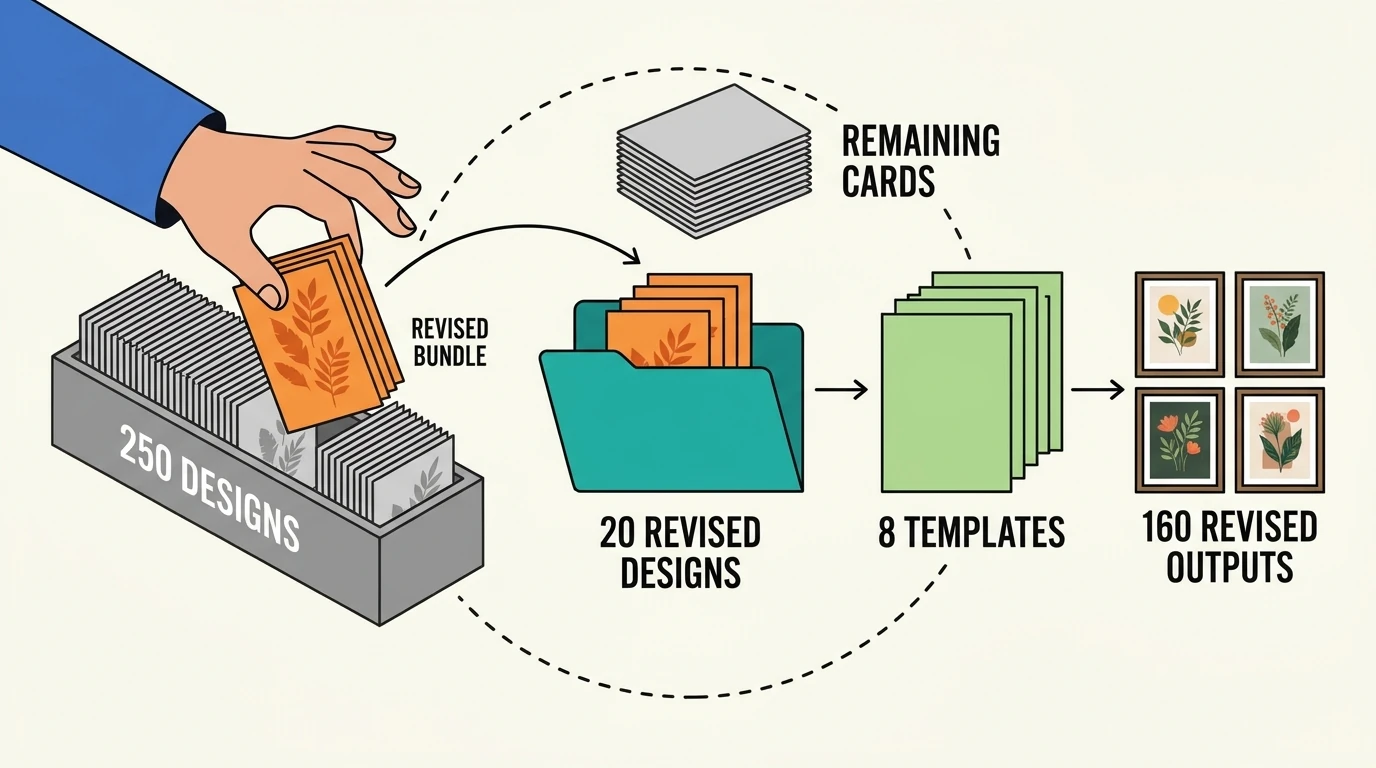
This is an important distinction: unlimited output gives you billing freedom, while selecting the right input set gives you production efficiency. You do not need to ration images, but you also do not need to spend computer time generating files you already have.
12. Make larger catalog projects practical without a larger output tier
Once generating more images no longer increases the plugin fee, larger production plans become easier to evaluate on their actual merits.
A print-on-demand catalog containing 2,000 designs and 12 mockup scenes represents 24,000 finished images. That is a substantial processing and review task, but it does not require a higher-priced Batch-Replace Smart Objects output tier.
This can make projects such as these more practical:
- Giving each appropriate product a consistent set of listing views rather than limiting images to preserve an allowance.
- Refreshing an existing catalog with newly prepared mockup scenes.
- Preparing additional presentation images for selected campaigns or product categories.
The point is not to generate every possible combination indiscriminately. A design may be unsuitable for some scenes, and additional files still need storage and quality control.
Instead, you can decide whether an image is useful without treating it as another credit purchase. Organize suitable artwork and template groups, then run the combinations your catalog actually needs.
13. Use the free trial to test a real production requirement
A one-month free trial is available through Adobe Exchange using coupon code TRIAL. Use that period to evaluate your actual templates and artwork rather than only a simplified demonstration.
Begin with the small proof batch, then run a representative production set after the results look correct. Check whether the placement behavior suits your artwork, the filenames support your delivery process, and your computer can process the workload within your schedule.
Also save a Batch or build a short Workflow if recurring production is important to you. The value is not just whether one image exports successfully, but whether the setup can support the way you repeatedly produce mockups.
Record the output count, processing duration, and review time for your own project. Those observations provide a practical basis for deciding how to schedule larger runs under the flat monthly subscription.
14. Budget by subscription months, not by mockup count
The clearest way to budget this workflow is to separate the fixed plugin subscription from the other resources production requires.
At $9.99 per paid month, one month of plugin access costs $9.99; three paid months cost $29.97 for the plugin subscription. The relevant subscription variable is the number of paid months, not the number of mockup images generated within them.
Account separately for required Photoshop access, any artwork or template licensing costs, storage, and your preparation and review time. Unlimited plugin output does not make those resources free, and a project that spans additional paid months still has additional subscription cost.
What it removes is the need to buy permission for each additional set of mockups. Prepare the templates, prove the placement, run the artwork-and-template combinations, and save the configuration for repeat use.
If monthly image allowances or credit purchases are getting in the way of your catalog, try Batch-Replace Smart Objects with code TRIAL on Adobe Exchange. Its flat $9.99 monthly pricing lets you plan around the mockups your business needs—not an output tier you are trying to stay beneath.