How To Generate Multiple Room Mockups For Every Artwork File

To generate several room mockups for every artwork file, you need a collection of Photoshop room templates and a folder of artwork. Each template supplies the room, wall, frame, or canvas presentation; the artwork folder supplies the prints or photographs that should appear in those scenes.
Batch-Replace Smart Objects: Mockups In Bulk automates those combinations. Its Folder of PSD Files mode processes every supported artwork file against every PSD or PSB template directly inside your selected template folder. If particular rooms need different placement or export settings, you can organize those operations into a multi-step Workflow instead.
For a wall-art seller, the practical goal is straightforward: each design should leave the process with a complete set of room images, ready to review and use in product listings. Here is how to build that workflow without replacing and exporting the artwork manually in every scene.
1. Change the workload from individual room renders to one configured operation
Manually producing room mockups means repeating the same sequence: open a room PSD, replace its wall-art Smart Object, check the fit, export the result, name the file, and move to the next artwork. Then repeat the entire collection in the next room.
With 40 artwork files and six room scenes, that is 240 artwork-and-room combinations. Selecting two wall-art Smart Objects in a scene can add more replacement work, even though you still need only one finished image of that room for each design.
With Batch-Replace Smart Objects, you configure the template source, artwork folder, placement behavior, destination, and export settings. The plugin then performs the replacements and exports across the collection.
You still choose suitable rooms and review the finished images. What changes is the repetitive production work between those decisions: you no longer have to perform each replacement, export, and filename entry yourself.
2. Collect room templates that represent the wall art you sell
Start with existing PSD or PSB room mockups built around replaceable Smart Objects. A photograph of an empty wall is not enough by itself; the template needs a Smart Object that holds the artwork and places it into the scene.
Choose a room collection that makes sense for your product. A photographer selling framed prints might use a living room, bedroom, home office, and hallway. A canvas seller should select scenes that present canvas wall art rather than relying entirely on framed-poster templates.
Check three things before adding a template to the collection:
- The artwork area has an orientation and aspect ratio appropriate for the print you are showing.
- The frame, mat, canvas treatment, or poster presentation is suitable for the product.
- The artwork remains large enough in the finished composition for customers to see the design.
Place the approved templates directly inside one clearly named folder, such as “Portrait Print Room Templates.” Folder of PSD Files mode reads PSD and PSB files in that selected folder; it does not recursively collect templates from nested room folders.
Give each template a descriptive filename, such as living-room-oak-frame.psd. That name will become part of every exported image filename.
3. Prepare the Smart Object’s internal canvas before batching
The plugin’s placement reference is the existing content inside the target Smart Object, including its internal width, height, and resolution. It is not simply the size of the visible frame on the wall in the outer room document.
Open the wall-art Smart Object and check that its canvas represents the intended artwork area. Unnecessary transparent space can make replacement artwork appear unexpectedly small because the plugin uses the full internal dimensions as its reference.
This is especially important with room mockups that show a print at an angle. For replacements to inherit the intended perspective or distortion, the design layer should have been converted to a Smart Object before the outer transformation was applied.
The correct construction sequence is:
- Create or place the artwork layer.
- Convert it to a Smart Object.
- Apply the room’s perspective, scaling, rotation, or distortion to that Smart Object.
If an ordinary layer was transformed first and converted afterward, the transformation can be baked into its internal content. New artwork may not inherit the expected room perspective. The plugin automates replacement; it does not reconstruct an incorrectly built mockup.
4. Select the wall-art targets in every room template
If a template contains exactly one Smart Object, Batch-Replace Smart Objects automatically targets it. You do not need to select that layer manually.
If the template contains several Smart Objects, select the wall-art Smart Object layer or layers you want to replace in Photoshop’s layer stack. A room template might also contain Smart Objects for decorative elements or other scene components, so selecting the intended targets matters.
Save each PSD or PSB with those target layers selected before using the template folder. That saved selection is especially useful when the plugin opens the rooms later through a folder operation, Saved Batch, or Workflow.
For a room containing two framed prints, you can select both artwork Smart Objects. The plugin inserts the same current artwork into both, then exports one finished room image. It obtains the internal sizing information for each selected target independently.
That does not create separate outputs for the two frames, nor does it assign different artwork files to them during the same iteration. This setup is appropriate when you want one design repeated in several locations in the room.
5. Organize the artwork folder around the print collection
Put the artwork files you want to process directly inside one Input Folder. For example, a photographer could create a folder containing the 40 images in a new wall-art release.
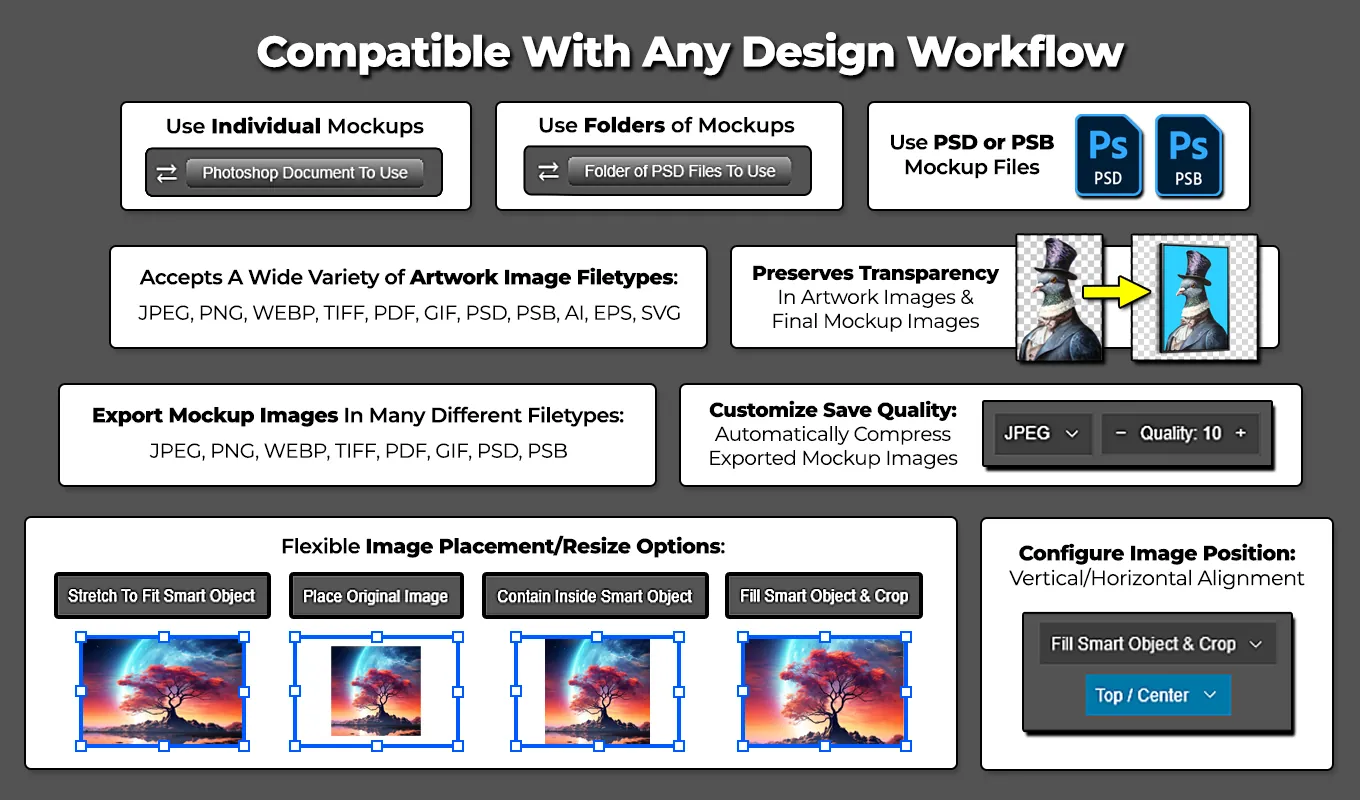
Supported artwork formats include JPEG/JPG, PNG, PDF, TIFF/TIF, PSD, PSB, GIF, AI, EPS, SVG, and WebP. Unsupported files are ignored, and nested artwork subfolders are not automatically searched.
Use descriptive artwork filenames before running the batch. A name such as river-light.png produces more useful output names than image-final-7.png because the artwork name is carried into each finished mockup filename.
The plugin reads the folder contents when the operation runs rather than permanently caching the file list when you first select it. This lets a recurring setup process new artwork added to the same folder later.
Keep test artwork and production artwork in separate folders while you establish the workflow. That gives you a simple way to test a few files without accidentally processing the entire collection.
6. Choose a template-folder run or a room-specific Workflow
The right configuration depends on whether your room scenes can share one operation setup.
Use Folder of PSD Files when the rooms share settings
If every room can use the same artwork folder, placement mode, alignment, output folder, and export settings, use Folder of PSD Files. It is the most direct way to generate all the room scenes for every artwork in one operation.
The Smart Objects do not have to share identical pixel dimensions. Resize-based placement uses the relevant internal dimensions of each target.
Use a Workflow when rooms need different settings
A Workflow is useful when one scene needs centered containment, another needs a different crop position, or different groups of rooms need different output folders or export formats. Each step stores its own complete operation configuration, and the steps run sequentially.
A step can use one room PSD or an entire folder of room templates. You can therefore combine several groups of scenes without forcing every room to use the same settings.
Separate collections when the product proportions differ
If you sell portrait, landscape, and square prints, consider separate artwork and template groups for those formats. A template-folder operation generates every artwork-and-template combination; it does not route each image only to rooms with a matching orientation.
Grouping compatible artwork and room templates prevents you from unintentionally cropping a landscape photograph into a portrait print presentation or leaving unsuitable empty space around it.
7. Choose placement based on what customers should see
The placement mode controls how each artwork fits the Smart Object’s internal area. For wall-art product images, the choice affects whether the complete composition appears, whether borders remain visible, and whether the mockup accurately represents the print.
Contain Inside Smart Object: preserve the complete artwork
Contain preserves aspect ratio and scales the entire artwork to fit inside the target boundaries. Nothing is cropped, but mismatched proportions can leave unused space.
For example, a 2400 × 3600 artwork placed inside a 2400 × 3000 target is proportionally resized to 2000 × 3000. With centered placement, the remaining width leaves 200 pixels of unused space on each side.
This is useful when the whole photograph, illustration, signature, or designed border must remain visible. However, unused space is not automatically a realistic frame mat. Check how it appears in the template.
Fill Smart Object & Crop: cover the area without distortion
Fill preserves aspect ratio but scales the artwork enough to cover the entire target, cropping any overflow. In the same example, the artwork covers the 2400 × 3000 area at 2400 × 3600, requiring 600 pixels of vertical content to be cropped.
Use this when full coverage is appropriate and the cropped composition accurately represents the product you intend to sell. Avoid treating cropping as harmless when important artwork sits near the edges.
Stretch To Fit Smart Object: match the target exactly
Stretch To Fit is the default. It matches the Smart Object’s internal width, height, and resolution, but it can change the artwork’s aspect ratio.
If the proportions already match, this can be straightforward. If they differ, stretching can alter a photograph or illustration, so inspect the result before using it for a wall-art listing.
Place Original Image: use already-prepared artwork
Place Original Image performs no intermediate resizing. It is appropriate when your artwork already has the dimensions and resolution expected by the template. It is also the fastest placement option because it skips the resizing stage.
If source sizes vary, their occupied area can vary too; this mode does not automatically normalize them.
Contain and Fill also expose Image Placement Position. The nine positions combine top, center, or bottom with left, center, or right. Center / Center is the default. With Contain, position distributes unused space; with Fill, it determines which part of the oversized artwork remains visible.
8. Connect the room and artwork folders in Automation Setup
Install Batch-Replace Smart Objects: Mockups In Bulk through Adobe Exchange or Adobe’s Creative Cloud plugin marketplace, then launch it from Photoshop’s Plugins menu.
In Automation Setup, configure the folder-based operation:
- Switch the template-source control from Photoshop Document To Use to Folder of PSD Files To Use.
- Select the folder containing your prepared room PSD and PSB templates.
- Set Input Folder To Use to your artwork collection.
- Choose the Image Placement mode.
- If using Contain or Fill, choose Image Placement Position.
- Set Output Folder To Use to the destination for the finished room images.
The template source, artwork folder, and output folder are required. Before execution, the plugin checks that the input and output locations remain accessible and that the selected folders contain valid files.
Use a separate output destination rather than mixing finished mockups into your artwork folder. It keeps source images and generated room previews easy to distinguish.
9. Export room images with traceable filenames
JPEG is a practical starting point for photographic room scenes. The plugin’s Quality control runs from 0 to 12; for JPEG, that corresponds directly to Photoshop’s JPEG quality scale. Quality 10 is one possible starting setting to evaluate, not a requirement for every listing.
PNG is also available when you want lossless output. Its Quality setting controls compression rather than introducing JPEG-style image degradation. Check the finished image dimensions, appearance, and file size against the requirements of wherever you will publish it.
By default, output names combine the artwork name and room-template name, without their original extensions:
river-light_living-room-oak-frame.jpg
You can reverse the order with the filename-order toggle:
living-room-oak-frame_river-light.jpg
Artwork-first names make a design’s room set easy to find when sorting by filename. Template-first names make it easier to review all designs rendered in one room.
If an output name already exists, the plugin creates a numbered alternative rather than blindly overwriting it. The source room PSD or PSB is not automatically saved over with each artwork replacement, so it remains a reusable template.
10. Test representative artwork across every room before scaling up
Create a small test Input Folder with two or three representative files. Include artwork with important edge details, any designed borders, and examples of the proportions used in your production collection.
Run that folder through the complete room-template set. Testing only one room can miss a different target selection, internal canvas size, or transformation setup in another PSD.
Review each room for these specific issues:
- The intended wall-art Smart Objects were replaced, while unrelated scene elements stayed unchanged.
- The composition is not stretched, unintentionally cropped, or surrounded by unsuitable empty space.
- The replacement follows the room template’s intended perspective and placement.
- The frame or canvas presentation matches the product, and the artwork is sufficiently visible.
- The filenames correctly identify both the artwork and the room.
If artwork appears unexpectedly small, inspect the Smart Object’s internal canvas for excess transparent space. If perspective is missing, check how the Smart Object was constructed. If a crop removes important content, reconsider the placement mode or position rather than assuming the same setting will work for the entire collection.
Once the test results are right, switch Input Folder To Use back to the production artwork folder. If you need to interrupt an ongoing operation, the plugin’s guidance is to press Esc several times in succession; the interruption point depends on what Photoshop is doing.
11. Run the full collection: 40 artworks across six rooms
Suppose you have 40 artworks prepared for a portrait 4:5 print collection and six compatible room templates:
- living-room-oak-frame.psd
- bedroom-white-frame.psd
- home-office-black-frame.psd
- dining-room-walnut-frame.psd
- hallway-gallery-frame.psd
- reading-corner-light-frame.psd
After testing, your operation could use Folder of PSD Files, the 40-file artwork folder, Contain Inside Smart Object, Center / Center, JPEG Quality 10, and artwork-first filenames. With matching artwork and target proportions, containment does not introduce the aspect-ratio mismatch described earlier.
Click Run This Now. The plugin opens each valid room template in sequence and processes the complete artwork folder against it. For each artwork, it replaces all selected targets before exporting one finished room image.
The expected output is 40 × 6 = 240 finished mockups. Each artwork has six room presentations, identifiable through the filenames. A room with two selected frames still contributes one finished room image per artwork, not two.
This gives you a complete room set to review for each print without manually rerunning the artwork collection against every scene.
12. Save the room collection as a reusable Batch
If the room set will be used for future releases, give the configured operation a Batch name and click Save. Save it after switching back from the test folder to your intended production Input Folder.
A Saved Batch retains the template mode and resource, artwork and output folders, placement mode and position, filename order, export type, and Quality. Later, open the Batches tab and use Run Batch to execute the stored configuration.
Because artwork folder contents are read at run time, you can place the next release’s files in the referenced input location without rebuilding the room setup. Keep only the artwork you want included in that run; otherwise, previously used files still in the folder will also be processed.
The referenced templates and folders must remain accessible. Saving the operation does not restore files that have been moved, deleted, or disconnected.
13. Build a Workflow for rooms that need their own settings
When your room collection cannot share one configuration, save it as a Workflow instead. For example, you might want framed-print room images in one output folder and canvas room images in another, or one scene might need a different placement position.
Build the sequence in Automation Setup:
- Choose + Create New Workflow, enter a unique Workflow name, and click Save.
- Configure the first operation, including its room template or template folder, artwork folder, placement, output destination, filename order, export type, and Quality.
- Enter a descriptive step name and click Add.
- Configure the next operation with its own settings, then name and add that step.
- Repeat until the required room configurations are included.
- Select Run Full Workflow to execute the saved sequence.
Configure each operation before adding its step. A step captures the current settings; its name alone does not define what it will do.
You can mix individual room templates and template folders within the same Workflow. For instance, one step could process four framed-print rooms and another could process two canvas rooms. With the same 40-file artwork collection in both steps, that still produces 240 artwork-and-room combinations, while allowing the two groups to use different settings.
The saved sequence is also available from the Workflows tab through Run Workflow. Unlike a Batch, which stores one operation, a Workflow runs several complete operations in order.
Start with compatible room templates, correctly prepared wall-art Smart Objects, and a small verified test set. Once those foundations are in place, Batch-Replace Smart Objects turns your artwork folder into a repeatable collection of room mockups—giving every print its own set of interior scenes without rebuilding the manual replacement-and-export process for every design.