How To Make Photoshop Generate One AI Prompt After Another Automatically

To make Photoshop generate one AI prompt after another automatically, give it a prompt queue and use a workflow that handles the transitions between prompts: generate, wait, export the results, clear the completed variations, and submit the next prompt.
Bulk AI Image Creator: Batch Generative Fill provides that workflow inside Photoshop. You select a CSV containing your prompts, configure the generation and export settings, and click Generate My Images. After you acknowledge Generative Credits usage, the plugin processes the valid prompts sequentially through Photoshop’s own Generative Fill functionality.
Here is how to prepare that queue, control what gets saved, and turn repeated prompt entry into a batch operation.
1. Remove the steps that keep bringing you back to Photoshop
The repetitive part of generating a large image collection is not just writing prompts. It is having to intervene after every generation.
A manual prompt-by-prompt workflow can involve:
- Enter a text prompt and run Generative Fill.
- Wait for Photoshop to finish.
- Inspect the available generated variations.
- Select and export the results you want to keep.
- Name the exported files.
- Prepare for the next prompt and repeat.
With a long prompt list, finishing one generation merely creates another task for you: start the next one. Even when the prompts are already written, the queue cannot advance without those repeated interactions.
Bulk AI Image Creator automates those transitions. Its value is not a promise that Photoshop’s underlying AI model will generate faster. It is that you no longer need to manually submit, export, and move on after every prompt.
2. Install and open Bulk AI Image Creator in Photoshop
Bulk AI Image Creator: Batch Generative Fill is a third-party Photoshop plugin distributed through Adobe Exchange and Adobe’s Creative Cloud plugin marketplace.
- Find the plugin in Adobe Exchange or the Creative Cloud Plugins Marketplace.
- Acquire or purchase it and allow Creative Cloud to install it.
- Open or restart Photoshop if required.
- Access the installed plugin through Photoshop’s Plugins menu.
The exact installation screens can change as Adobe updates its applications. Once the plugin is open, the main setup begins with CSV File of Text Prompts To Use.
The plugin automates Photoshop’s generative system. It does not generate images through a separate external AI-image API account.
3. Put the prompt queue in Column A of a CSV
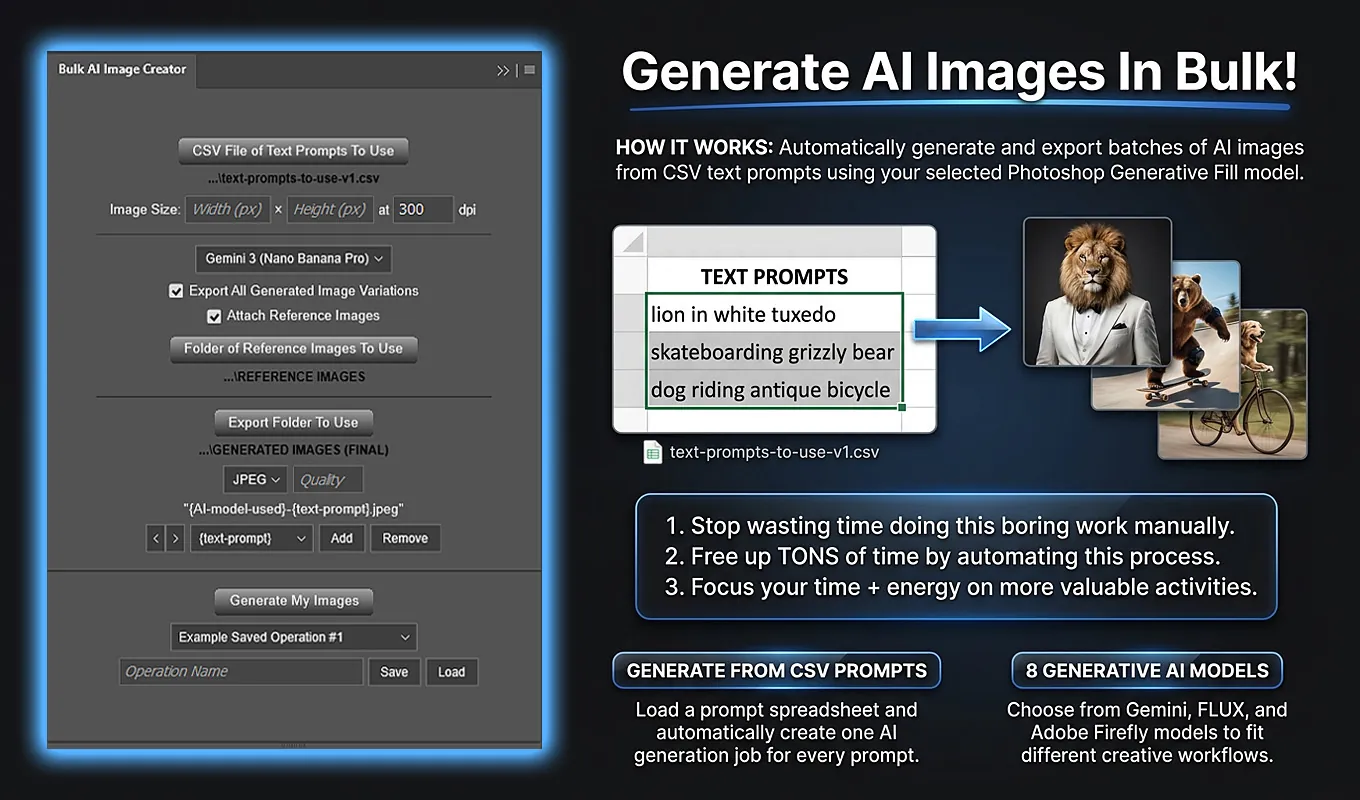
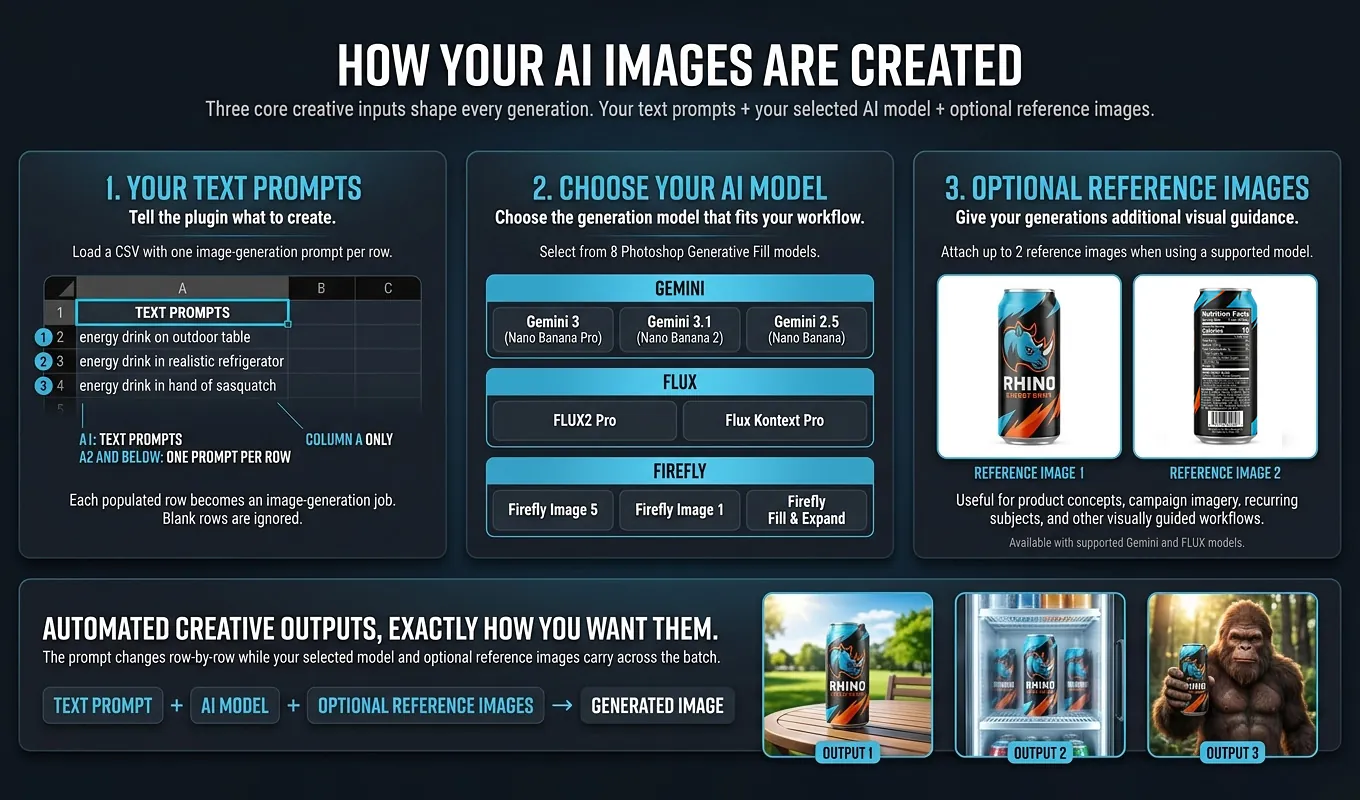
The CSV structure is intentionally simple. Cell A1 must contain the heading TEXT PROMPTS. Your first image-generation prompt goes in A2, with additional prompts continuing downward in Column A.
For example, your cells could contain:
- A1: TEXT PROMPTS
- A2: A red ceramic mug on a white background
- A3: A blue ceramic mug on a pale gray background
- A4: A green ceramic mug on a wooden tabletop
This creates three prompt-generation jobs. Save the file as a CSV, then select it using CSV File of Text Prompts To Use.
Only Column A is used. Do not add model names, image dimensions, reference-image paths, or export instructions in additional columns. Unexpected non-empty data outside Column A causes validation to fail.
Blank rows beneath the header are allowed and ignored. A usable prompt must contain at least one letter or number; a row containing only punctuation is not valid.
4. Keep commas and quotation marks inside the prompt field
Image prompts often contain commas, so correct CSV formatting matters. A comma must remain part of the prompt rather than accidentally creating another column.
If you are writing the CSV manually, a prompt containing a comma should be enclosed in quotation marks. For example, this is one quoted field:
"A red mug, photographed on a white background"
The plugin supports quoted CSV fields and doubled quotation marks for quotes inside a quoted field. If you are exporting from a spreadsheet, check that each complete prompt still occupies one cell in Column A before saving.
An unclosed quoted field causes parsing to fail. If the queue will not validate, check punctuation-heavy prompts for broken CSV quoting before changing the generation settings.
5. Understand the generate–export–next sequence
Each valid, non-empty prompt becomes one sequential generation cycle. The plugin does not submit the entire CSV as one combined prompt or generate all rows simultaneously.
For each prompt, it:
- Submits the text through Photoshop’s Generative Fill functionality using the selected model and batch settings.
- Waits for Photoshop to complete the generation.
- Determines how many variations Photoshop actually produced.
- Exports the first variation or all generated variations, depending on your selection.
- Clears that prompt’s completed variations.
- Moves on to the next valid prompt.
This is what makes “one prompt after another” automatic. Completion of the current prompt leads into exporting its results and then processing the next prompt, without requiring you to re-enter the next instruction.
The CSV supplies the text inputs. The selected export folder receives the resulting image files. Your batch settings govern how every prompt is generated and saved.
6. Choose one model and image size for the whole queue
Before starting, enter Image Width, Image Height, and DPI, then select an AI image-generation model. The plugin currently provides eight model choices, with Gemini 3 (Nano Banana Pro) selected by default.
A straightforward starting configuration for a square image batch might be:
- Width: 2048 pixels
- Height: 2048 pixels
- DPI: 300
- AI model: Gemini 3 (Nano Banana Pro)
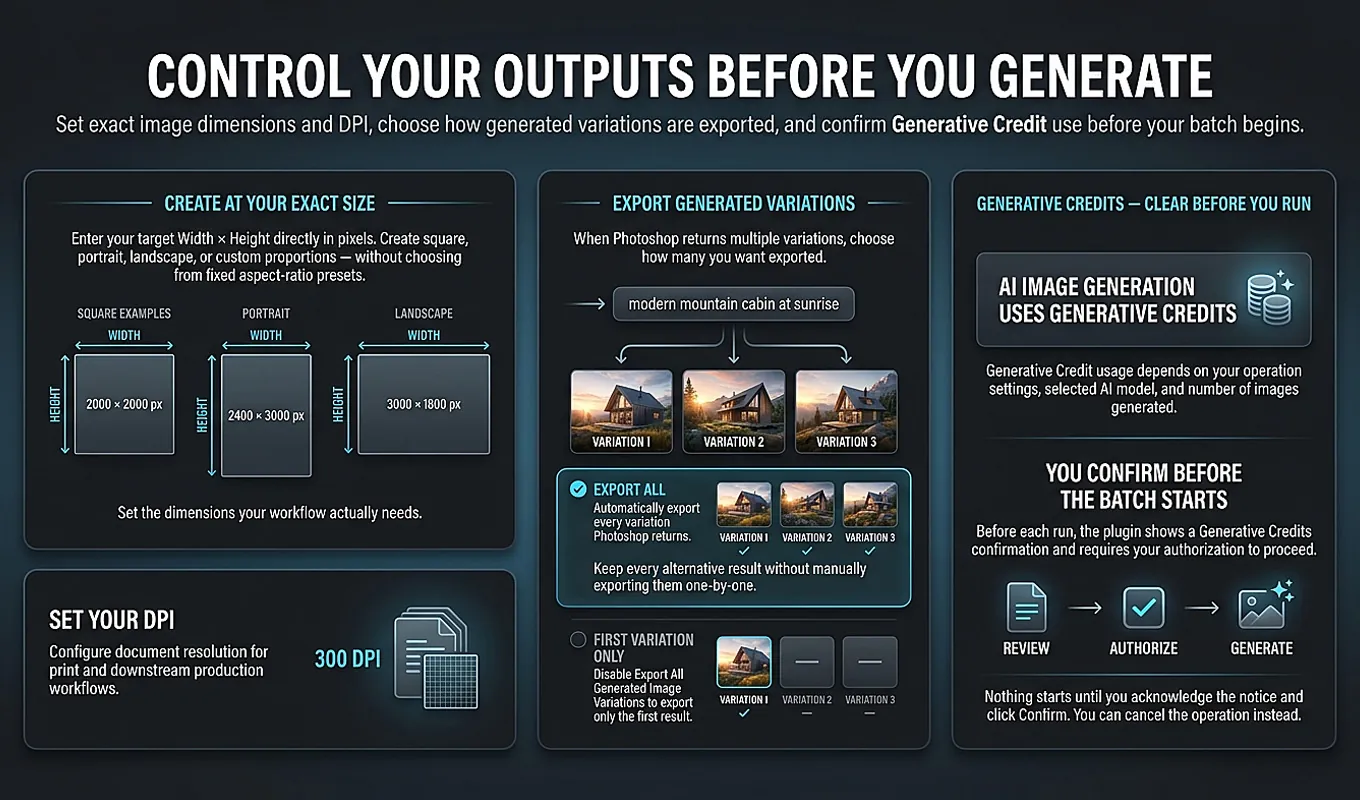
Width and height set the pixel dimensions. DPI is a separate document-resolution setting; choosing 300 DPI does not turn a 2048 × 2048 image into a larger pixel image.
These settings apply to every prompt in the operation. The prompt text changes from row to row, but the model, dimensions, and DPI do not.
If some prompts need square outputs and others need landscape outputs, organize them into separate operations rather than adding dimension columns to the CSV. Likewise, comparing the same prompts across models requires separate runs with different selected models.
Choose dimensions appropriate for your project and test them with your selected model. Photoshop and individual models can impose practical generation restrictions that the plugin does not override.
7. Attach shared reference images when the queue needs visual guidance
If your prompts should share visual guidance, enable Attach Reference Images and choose Folder of Reference Images To Use. The folder must contain one or two supported reference-image files.
The plugin’s reference-image workflow is available with:
- Gemini 3 (Nano Banana Pro)
- Gemini 3.1 (Nano Banana 2)
- Gemini 2.5 (Nano Banana)
- FLUX2 Pro
- Flux Kontext Pro
The current Firefly choices do not use this reference-image workflow.
For a simple setup, place one or two reference files, such as JPG or PNG images, in a dedicated folder. A folder containing more than two supported reference images fails validation; the plugin does not simply pick two and ignore the rest.
The same references are supplied with every prompt in the queue. This removes the need to attach the same imagery again for each generation. How those references influence the results depends on Photoshop and the selected model.
8. Decide whether each prompt should export one result or every variation
Export All Generated Image Variations is enabled by default. When it is enabled, the plugin saves every variation Photoshop returns for each prompt.
If you disable it, the plugin exports only the first generated variation. That is useful when you want one exported file per successful prompt and need to keep the output volume manageable.
These are export choices, not guarantees about how many variations Photoshop creates internally. First-variation-only export also does not mean the plugin selects the best result; it saves the first available variation.
For example, a queue of 12 successful prompts would produce 12 exported files with first-variation-only export. If Photoshop returned three variations for every prompt and you exported all of them, the same queue would produce 36 files. Three is only an example—the plugin detects the actual variation count after each generation.
Choose all variations when you want to make your selections later. Choose the first variation when a single initial result per prompt is sufficient.
9. Give the batch an export destination and useful filenames
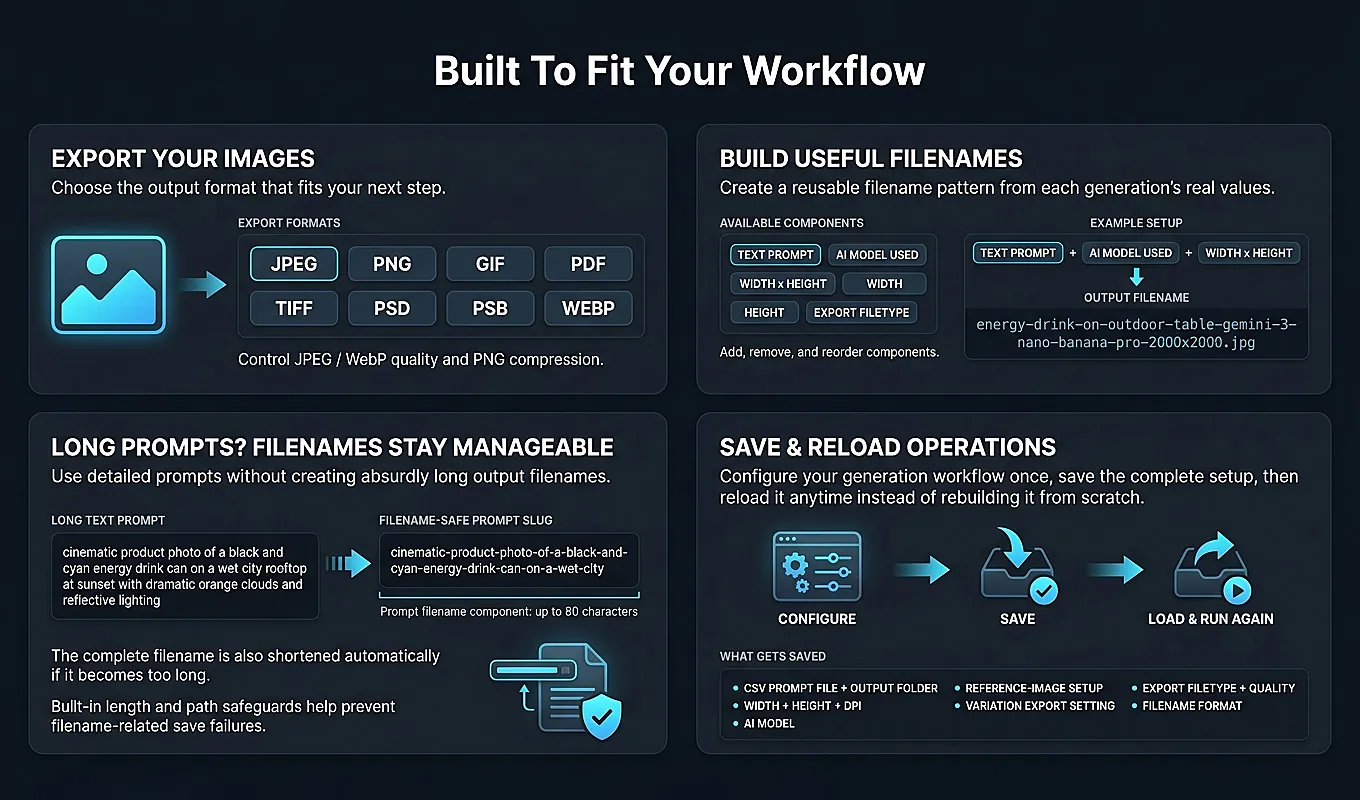
Select Export Folder To Use, choose your output filetype, and set the applicable Quality value. JPEG is the default export format. For a JPEG batch, a setting such as Quality 90 is a concrete starting point you can assess during a test run.
If you choose PNG, its Quality control affects compression; PNG remains lossless.
The default filename structure combines the prompt and model:
{text-prompt}-{AI-model-used}
For the prompt A red ceramic mug on a white background, a JPEG filename using the default model could look like this:
a-red-ceramic-mug-on-a-white-background-gemini-3-nano-banana-pro.jpg
The prompt portion is normalized, sanitized, and shortened when necessary. It is an identifying filename, not a verbatim archive of the complete original prompt.
You can also include dimensions through components such as {width}x{height}. When multiple variations share the same filename components, the plugin creates duplicate-safe numbered names, such as names ending in (2) and (3), rather than overwriting earlier outputs.
This naming step is particularly valuable when the queue finishes with dozens of files: the saved results already carry useful context about what generated them.
10. Start the sequence and approve Generative Credits usage
Before committing to a long queue, run a short CSV containing two or three representative prompts with your intended settings. Check that the dimensions, reference guidance, export format, and filenames meet your needs. This is an ordinary generation batch, so test generations can also consume Generative Credits.
When you are ready to run the operation, click Generate My Images. The plugin validates the CSV and required settings before generation begins.
It then displays Confirm Before Proceeding. You must check the Generative Credits acknowledgement and click Confirm. Clicking Confirm without accepting the acknowledgement does not start generation.
The plugin uses your applicable Adobe / Photoshop Generative Credits; it does not provide an independent credit pool. Actual consumption depends on Adobe’s current policies, the selected model, and the generation operation. The confirmation is not an exact advance quote for the batch’s credit cost.
After confirmation, the plugin starts processing the queue. You do not need to approve each prompt separately.
11. Read the progress counter correctly and know how to stop
During processing, the progress interface displays Generating Your Images..., status text, a progress bar, and a completed-generation counter.
A counter such as 4 / 12 images generated... refers to completed CSV prompt operations out of the 12 valid prompts. It does not count every exported variation. If you are exporting all variations, the export folder can contain more files than the counter suggests.
To request cancellation, use Cancel Operation. The Escape key can also trigger cancellation while the progress interface is active.
Photoshop may temporarily control the application while an active Generative Fill request completes. Cancellation is therefore most reliably handled between generative operations, rather than as an instantaneous interruption of whatever Photoshop is generating.
When every prompt finishes successfully and the operation has not been cancelled, the plugin displays Image Generations Completed! with the message This operation is completely finished.
12. Evaluate the exported images as a collection
Once the batch finishes, review the exported files in your chosen folder. You can now evaluate the results together instead of interrupting generation to make a decision after every prompt.
If you exported all variations, first compare the alternatives for each prompt. Then look across the broader collection:
- Which prompts produced images that best match the requested subject and composition?
- Which variations are worth keeping for the project?
- Which results contain unwanted text, visual artifacts, or missing details?
- Which prompts need clearer wording before another generation pass?
- If references were used, how effectively did the results reflect that guidance?
Prompt-based filenames help connect each group of outputs to its original request. The shared filename base and numbered duplicates also make variations easier to recognize.
If only a few concepts need another attempt, put those revised prompts in a new CSV and run another batch. You do not need to regenerate the entire original collection just to revisit a small subset.
13. If the queue will not start, check these setup problems
A batch that fails validation needs its setup corrected before Photoshop can begin processing prompts. Check these items first:
- CSV structure: A1 contains TEXT PROMPTS, prompts are in Column A, and no additional columns contain unexpected data.
- Prompt contents: usable rows contain at least one letter or number, and quoted fields are properly closed.
- Generation settings: width, height, DPI, and the selected model are valid.
- Reference configuration: the model supports references, the folder is accessible, and it contains one or two supported image files.
- Export configuration: an accessible output folder is selected, the format is supported, and Quality is a valid integer from 0 through 100.
- Filename configuration: at least one filename component remains.
If the output folder is deeply nested, a path-length safeguard can also stop the operation. Select a less deeply nested folder or shorten folder names when prompted.
Distinguish a setup-validation problem from a generation problem. A valid CSV does not override Photoshop service conditions, model availability, or model-specific generation restrictions.
14. Save the setup for the next prompt queue
For recurring work, use Saved Operations rather than rebuilding the configuration each time. Enter a non-empty Operation Name and click Save.
A saved operation can preserve the selected CSV reference, output folder, dimensions, DPI, model, reference-image settings, variation-export choice, filename components, export filetype, and Quality.
For your next job, select the saved operation and click Load. If the new job has a different prompt list, select its CSV after loading. Review the restored settings, then start the new batch and acknowledge Generative Credits usage.
The saved operation stores a reference to the CSV, not an embedded copy of its complete contents. If a saved file or folder has moved or become unavailable, you may need to select it again.
If your goal is to stop returning to Photoshop after every AI prompt, Bulk AI Image Creator provides a practical workflow: prepare the CSV queue, configure the batch, approve generation, and let the plugin generate, export, and advance automatically. Find Bulk AI Image Creator: Batch Generative Fill through Adobe Exchange to put that workflow into your Photoshop production process.