How To Position Off-Center Designs Correctly Inside Photoshop Mockups
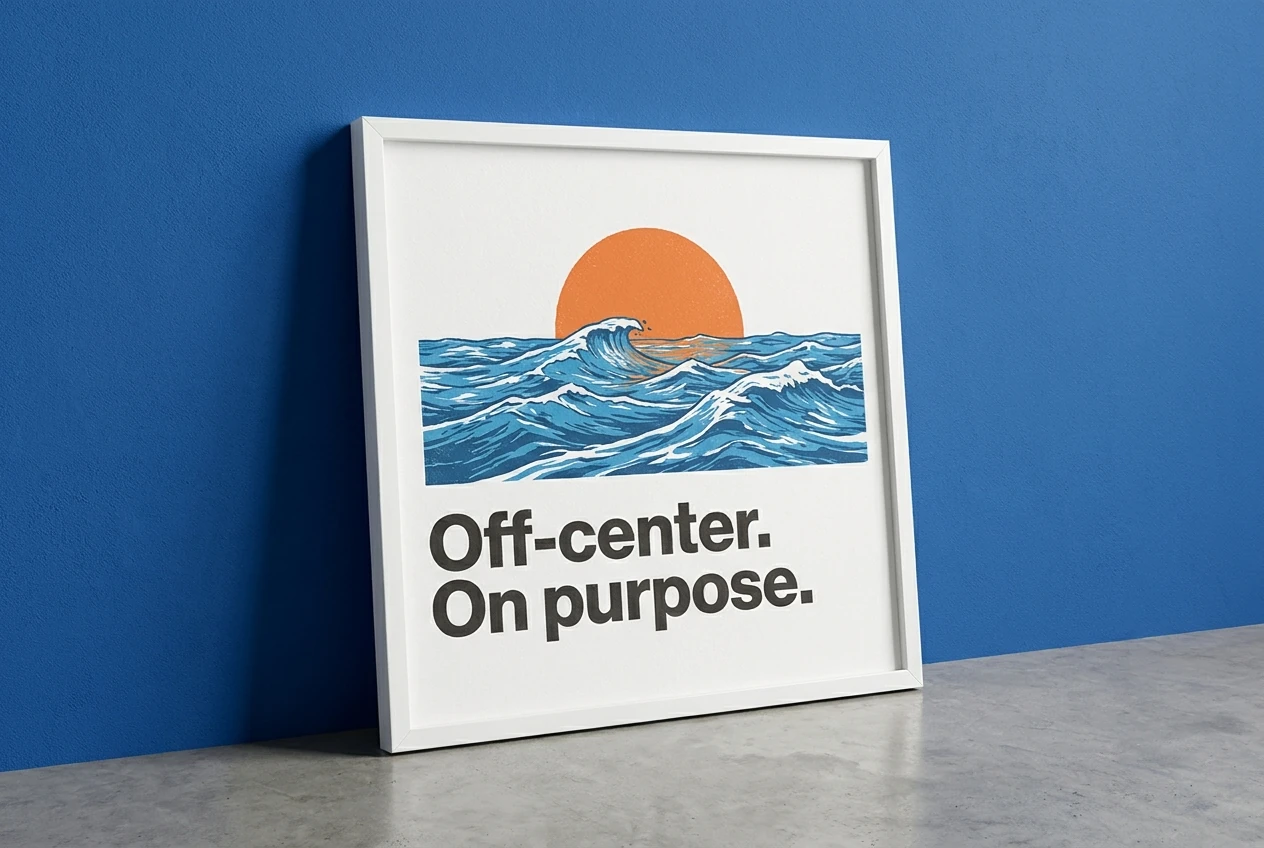

Correct off-center placement starts with choosing what should move: the complete artwork inside an available area, or the crop window over an image that extends beyond that area. Those are different operations, and they require different placement settings.
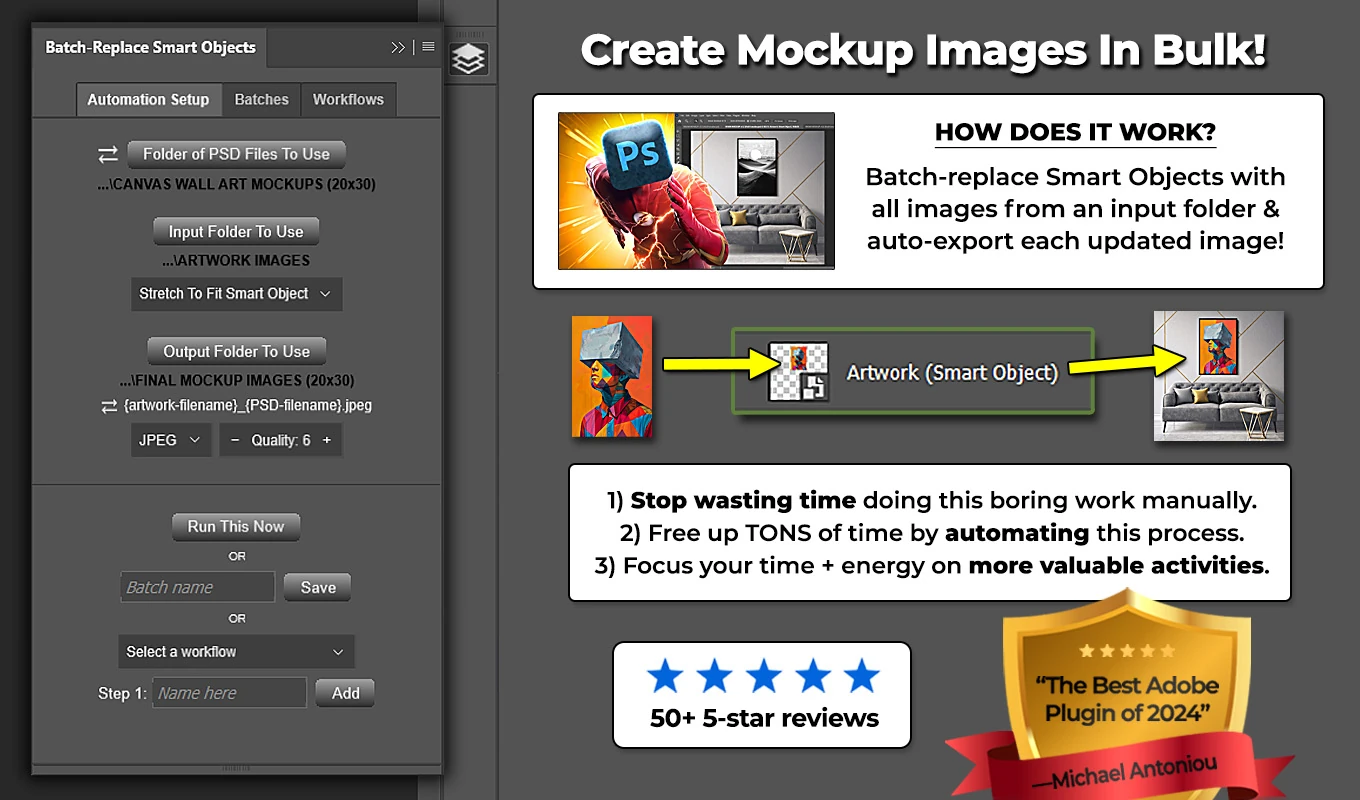
In Batch-Replace Smart Objects: Mockups In Bulk, use Contain Inside Smart Object when the entire design must remain visible, or Fill Smart Object & Crop when the mockup area must be completely covered. Then choose one of the nine Image Placement Position anchors to control the alignment. The important part is understanding what those anchors position—and what they do not.
1. Align Inside the Smart Object, Not Against the Whole Mockup
A design can look off-center on your screen while being correctly positioned inside its mockup surface. A frame photographed at an angle, for example, will not necessarily sit symmetrically within the overall Photoshop document.
The relevant reference is the target Smart Object’s internal content area. Batch-Replace Smart Objects uses the existing content’s width, height, and resolution as its placement reference—not the Smart Object’s apparent size after perspective, rotation, or scaling in the outer mockup.
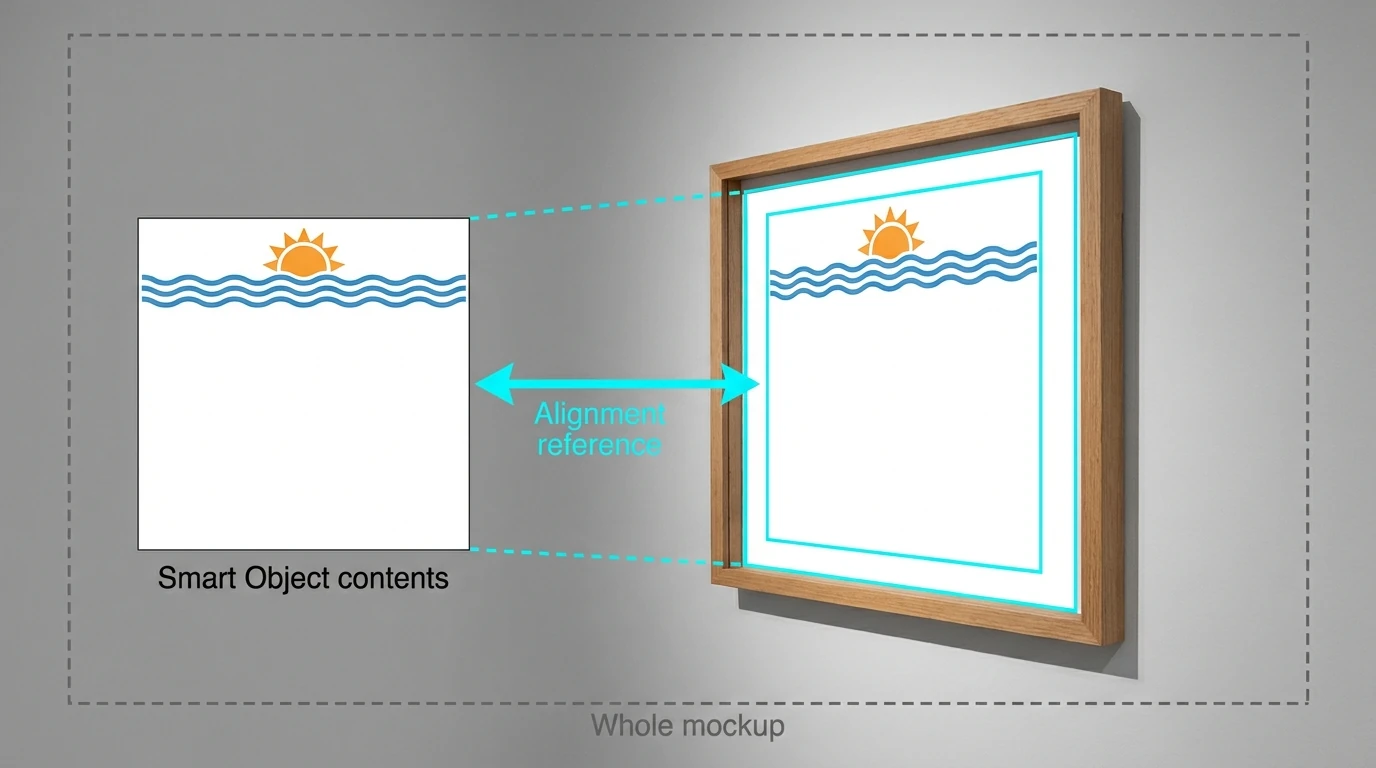
Before adjusting placement, open the target Smart Object and inspect its contents. Confirm that its dimensions describe the intended artwork area. A square placeholder and a tall poster placeholder will produce different fitting and cropping behavior, even if their transformed appearances in the outer scene look similar.
For a one-off manual correction, you can open the Smart Object contents, proportionally scale and move the artwork inside that document, save it, and return to the parent mockup. Avoid dragging the outer Smart Object merely to reposition the design within its surface: that moves the mockup element itself rather than adjusting the artwork inside it.
2. Choose Between Full-Design Placement and Full-Area Coverage
The placement mode determines whether there is room to reposition the artwork or excess image area to crop. Choose the mode before choosing the anchor.
- Contain Inside Smart Object preserves proportions and keeps the complete artwork visible. When aspect ratios differ, unused space remains. The position setting determines where the artwork sits within that space.
- Fill Smart Object & Crop preserves proportions and covers the complete target area. When aspect ratios differ, some artwork extends beyond the target. The position setting determines which portion remains visible.
- Stretch To Fit Smart Object matches the target’s internal width, height, and resolution exactly. It can distort the artwork’s proportions and does not offer the position dropdown.
- Place Original Image uses the source file’s existing dimensions and resolution without an intermediate resize. It also does not offer the position dropdown.
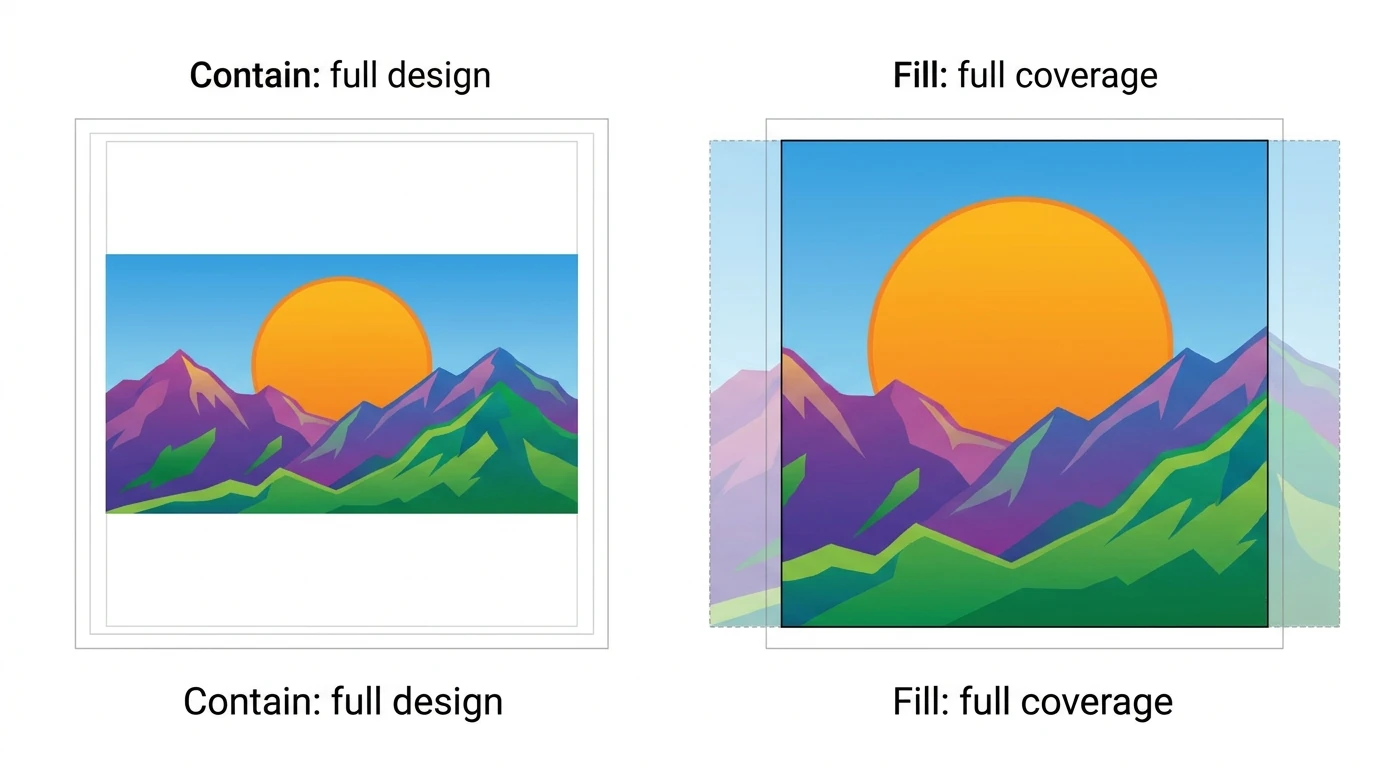
For an entire logo that should sit against a lower edge, start with Contain. For a photograph whose right-side subject must survive a square crop, start with Fill. Choosing the wrong mode cannot usually be corrected by changing the anchor alone.
3. Read the Nine Anchors as Vertical Position Followed by Horizontal Position
The Image Placement Position dropdown appears when Contain Inside Smart Object or Fill Smart Object & Crop is selected. Its nine choices combine three vertical positions with three horizontal positions:
- Top row: Top / Left, Top / Center, Top / Right.
- Middle row: Center / Left, Center / Center, Center / Right.
- Bottom row: Bottom / Left, Bottom / Center, Bottom / Right.
The default is Center / Center. To favor the right side while remaining vertically centered, choose Center / Right.
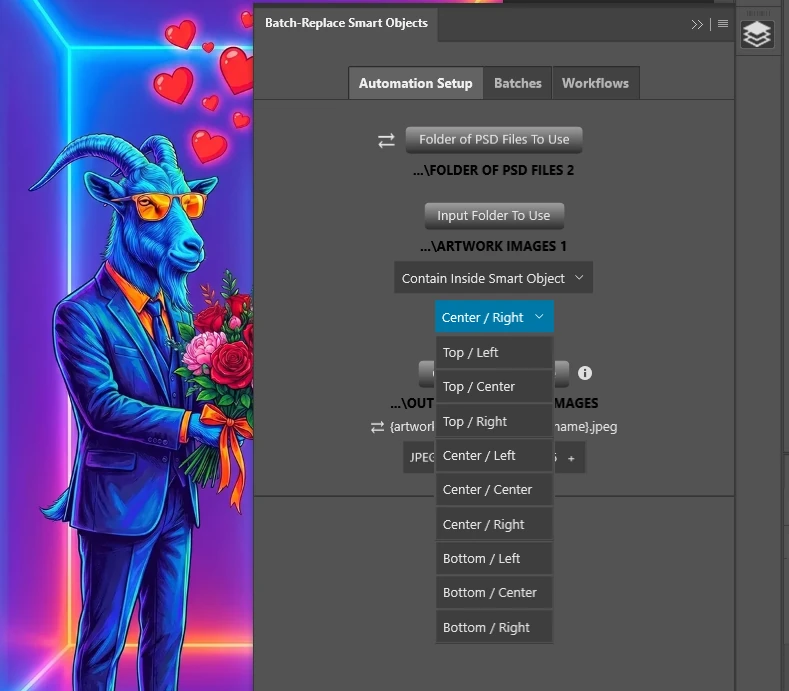
Not every anchor change will produce a visible difference. With Contain, positioning only changes an axis that has unused space. With Fill, positioning only changes an axis that has overflow to crop.
If a contained image already spans the full target width, Left, Center, and Right cannot change its horizontal position. If an image and target have identical aspect ratios and fit exactly, switching anchors will not create an offset. There is no spare area or overflow for the anchor to redistribute.
4. Place a Complete Design at the Top of a Mockup
Suppose your Smart Object is 1000 × 1000 pixels, while the artwork is 2000 × 1000 pixels. You want the complete design visible, with any unused space below it.
Choose Contain Inside Smart Object and Top / Center. The artwork scales proportionally to 1000 × 500 pixels and sits against the top of the square target. The remaining 500 pixels of space sit beneath it.
With Center / Center, that same artwork would have 250 pixels of space above and below. With Bottom / Center, all 500 pixels of space would appear above it.
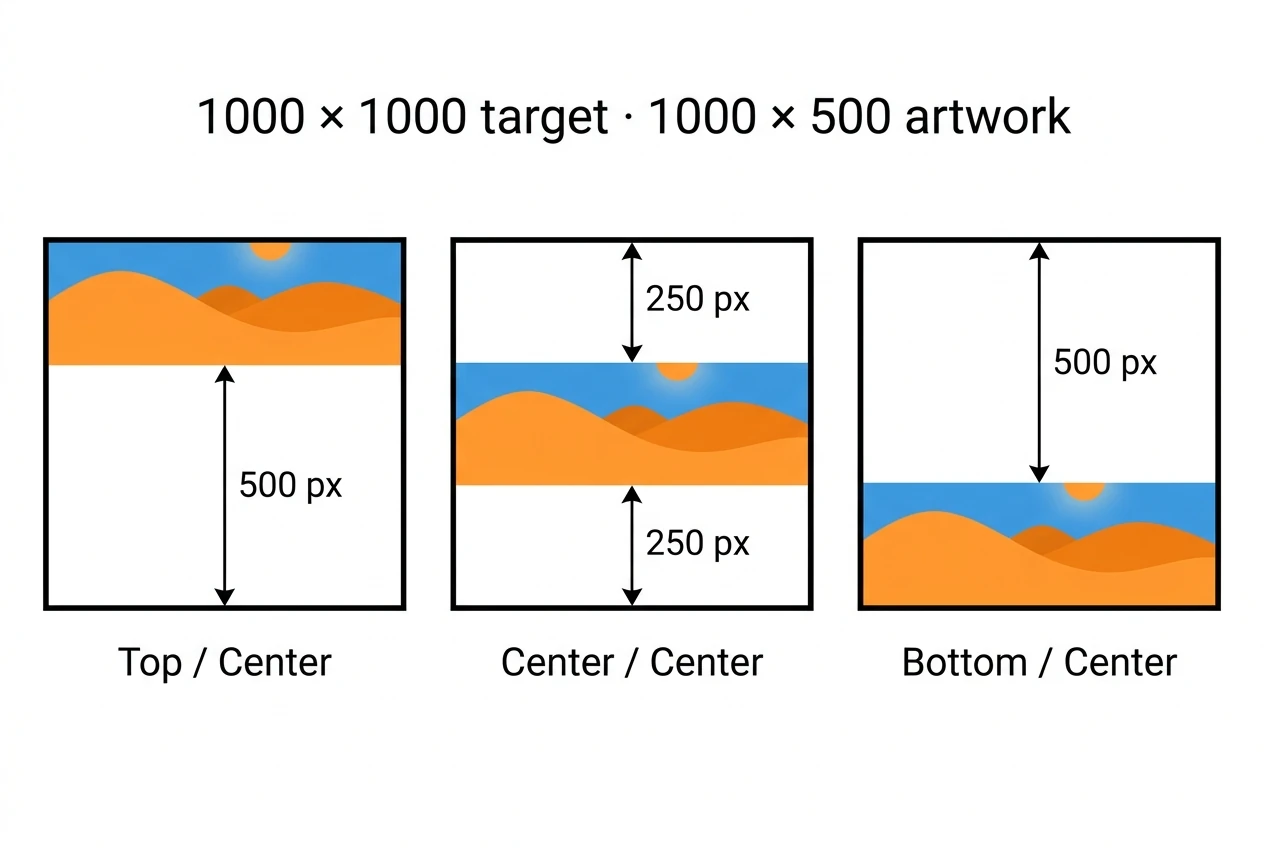
This is useful when the composition should begin near an upper edge rather than float in the middle. Notice that Top / Left and Top / Right would produce the same result in this example: the fitted artwork already occupies the complete target width.
5. Separate Canvas Alignment From Visible-Subject Alignment
An anchor positions the artwork’s full rectangular canvas. It does not identify a logo, face, illustration, or other visible subject and align that element independently.
For example, a PNG might have a 1000-pixel-wide canvas while its visible logo occupies only the central 400 pixels. Aligning that PNG to the right aligns its canvas boundary to the right. Transparent pixels between the logo and the canvas edge remain part of the file, so the logo itself can still look inset.
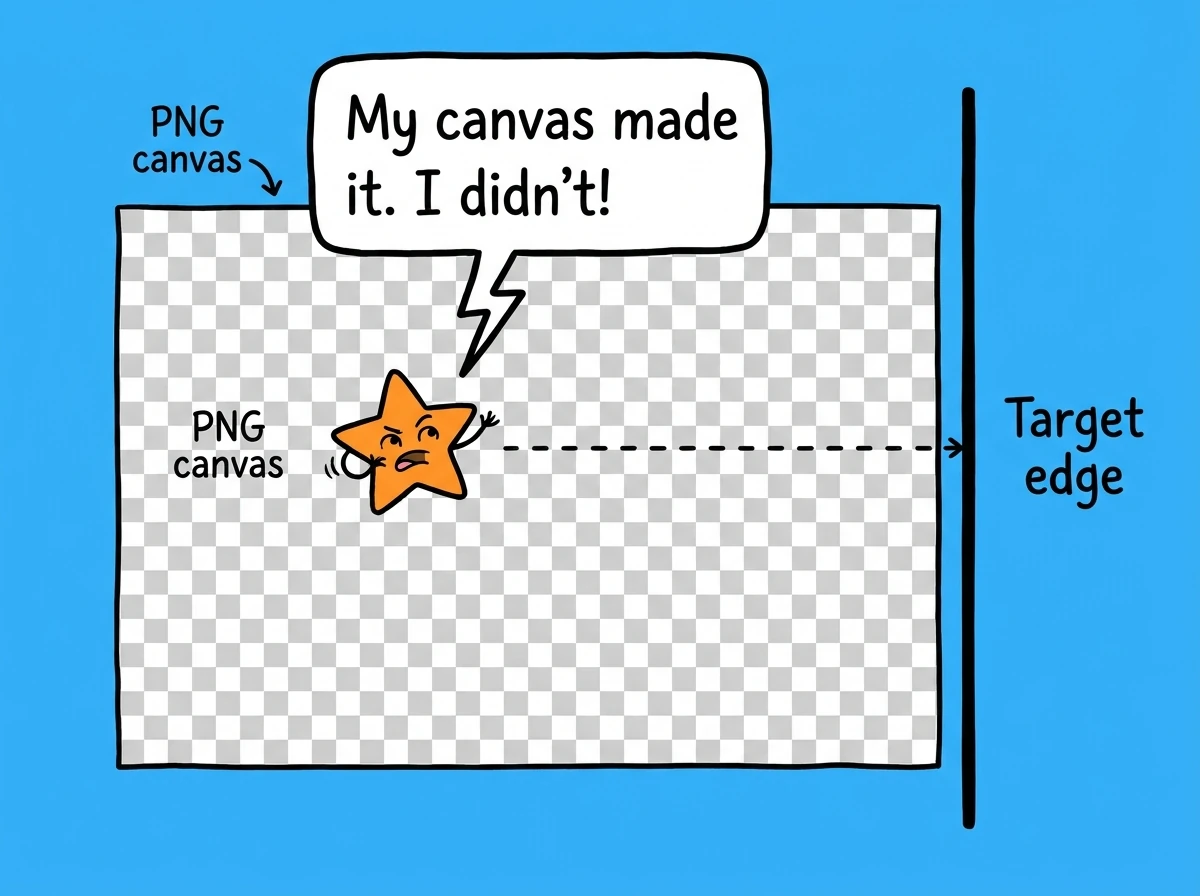
The same distinction applies to photographs. An anchor can favor the right portion of a photograph during cropping, but it does not move the person inside the photograph independently of the background.
Inspect both sides of the replacement process when alignment looks wrong:
- The source artwork may include transparent margins or deliberately offset content.
- The target Smart Object may contain unnecessary surrounding canvas that makes its sizing reference larger than expected.
Remove accidental padding when you want visible artwork to align directly with an edge. Keep deliberate padding when it represents a margin you actually want. The goal is not to eliminate all whitespace; it is to make that whitespace intentional.
6. Preserve a Right-Side Subject When Cropping to a Square
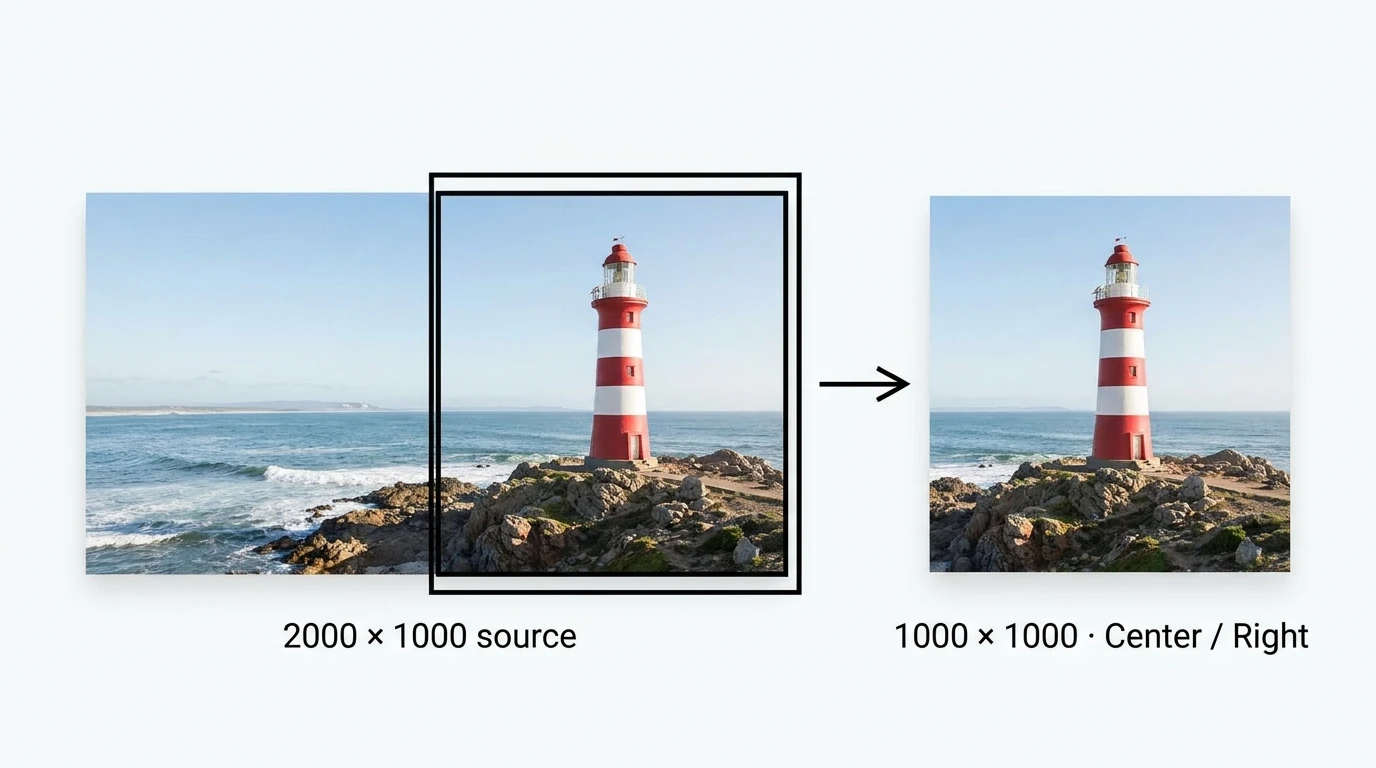
Now consider a 2000 × 1000 photograph going into a 1000 × 1000 Smart Object. The important subject sits near the photograph’s right edge, and the mockup must have complete image coverage.
Choose Fill Smart Object & Crop and Center / Right. In this example, the photograph already has enough height to cover the target, so the square crop uses the rightmost 1000-pixel-wide portion.
The horizontal crop choices would retain these portions of the source:
- Center / Left retains approximately the left half.
- Center / Center retains the central 1000-pixel-wide region.
- Center / Right retains approximately the right half.
A central crop could cut through a subject near the right edge. The right anchor shifts the retained region toward that subject without stretching the photograph.
For a tall image being cropped into a wider target, the equivalent decision is vertical: use Top, Center, or Bottom to control which portion survives. Always check the whole important subject, not just its center point, before committing to the crop.
7. Set Up an Off-Center Placement Batch From Start to Finish
Once you know the required fitting mode and anchor, Batch-Replace Smart Objects can apply that placement rule across an artwork folder instead of requiring repeated manual scaling, positioning, and exporting.
- Prepare the PSD or PSB mockup. Check the target Smart Object’s internal dimensions and resolution. If the document has several Smart Objects, select the intended target layer or layers and save the template in that state. If it has exactly one Smart Object, the plugin targets it automatically.
- Open the plugin’s Automation Setup tab. Under Photoshop Document To Use, select the mockup file.
- Select Input Folder To Use. For the first test, choose a small folder containing representative supported artwork files, such as PNG or JPEG images. The operation reads supported files directly inside the selected folder.
- Choose Image Placement. Select Contain Inside Smart Object to preserve the complete design, or Fill Smart Object & Crop to cover the target area.
- Choose Image Placement Position. Select the anchor that matches the intended composition, such as Top / Center or Center / Right.
- Select Output Folder To Use and an export filetype. Choose a format appropriate for the finished mockups.
- Click Run This Now. Inspect the exported test results before switching to the full artwork folder.
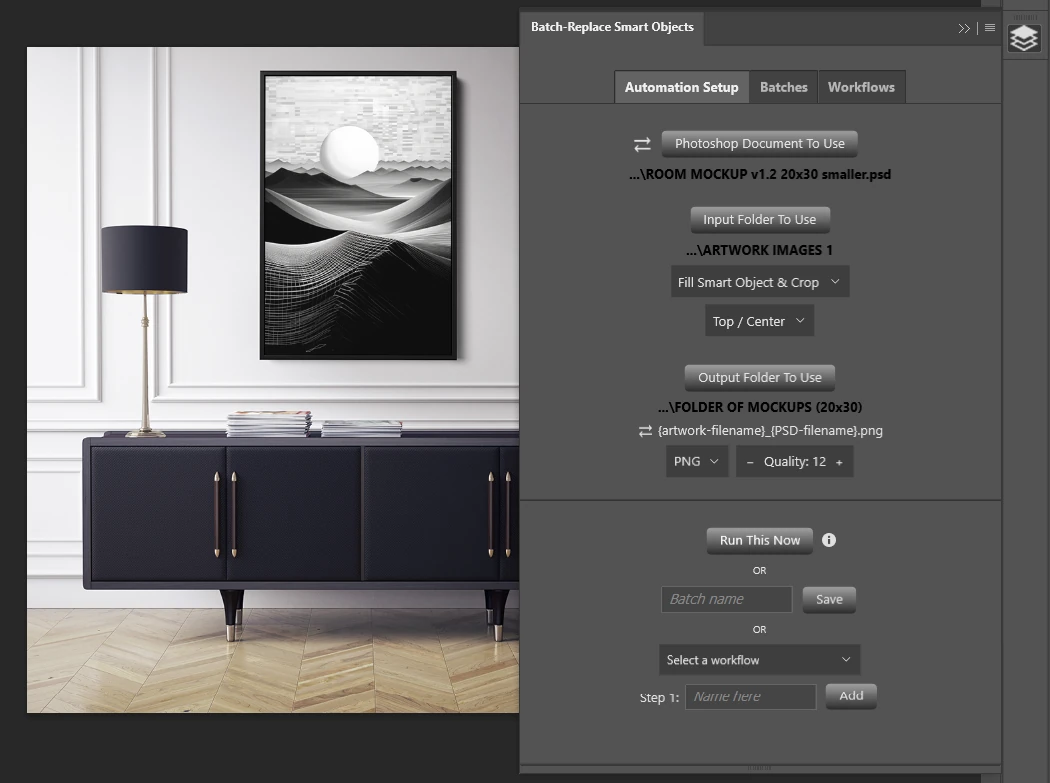
For each artwork file, the plugin prepares the image according to the selected placement behavior, replaces the target Smart Object contents, and exports the finished mockup. You make the placement decision once for that operation rather than repeating it for every design.
8. Keep Mixed Artwork Files From Producing Inconsistent Placement
A shared anchor produces a shared rule, not necessarily an identical-looking composition across unrelated files.
Different pixel dimensions are not automatically a problem: Contain and Fill calculate a proportional fit for each artwork. More consequential differences include aspect ratio, transparent margins, and the location of important content within each source image.
For example, Center / Right may protect the subject in a right-heavy landscape photograph but crop important information from a left-heavy one. Likewise, Bottom / Center can align the bottoms of two PNG canvases while their visible logos sit at different heights because one PNG has extra transparent padding.
Before a larger run:
- Standardize unintended transparent margins when visible-edge alignment matters.
- Separate artwork that needs different crop directions into different input folders.
- Test the widest and tallest source images, not only an average-looking file.
- Review files with text or subjects close to an edge, because those elements are especially sensitive to cropping.
Apply one placement rule to a group whose compositions suit that rule. A folder of left-heavy designs and a folder of right-heavy designs can use different operations rather than forcing both through the same crop position.
9. Build Exact Insets Into the Artwork When an Anchor Is Not Enough
Nine-point placement is useful for edge and center alignment, but it is not a numerical X/Y offset control. “Bottom / Right” and “80 pixels from the right, 60 pixels from the bottom” are different requirements.
For an exact inset, prepare the artwork canvas to carry that positioning. Suppose the Smart Object’s internal content is 1000 × 1000 pixels. You could create a matching canvas in Photoshop and place the visible logo with the required right and bottom margins before saving the artwork.
When that prepared file matches the target’s internal width, height, and resolution, Place Original Image avoids an additional fit calculation. The placement is encoded in the source file rather than supplied by the position dropdown.
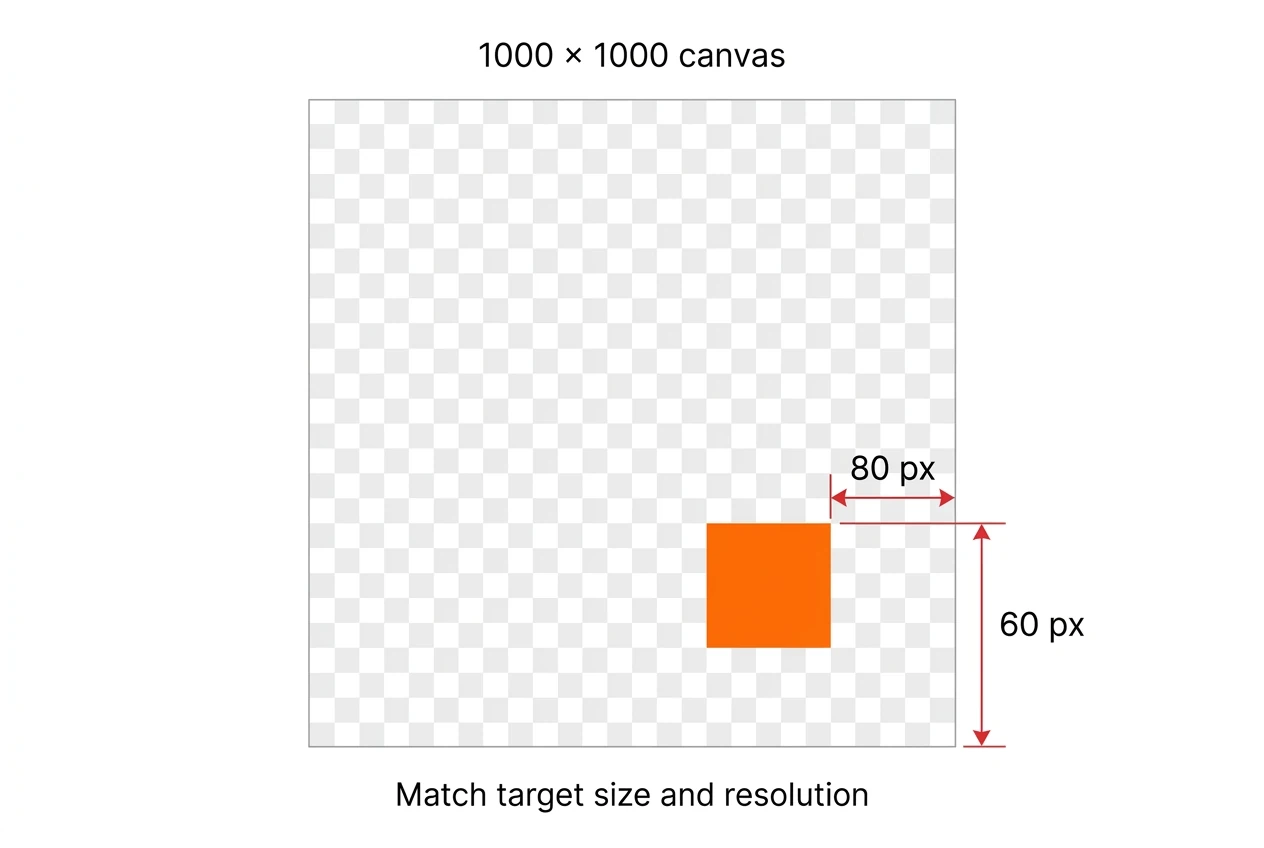
This is also useful when the source and target already have matching aspect ratios. Changing an anchor will not move an image that fits the target exactly, but repositioning the visible design within a deliberately prepared canvas can create the required offset.
Use anchors for repeatable boundary-based placement. Use a prepared canvas when the requirement is a specific inset or a carefully art-directed position.
10. Check Off-Center Placement in Every Selected Smart Object
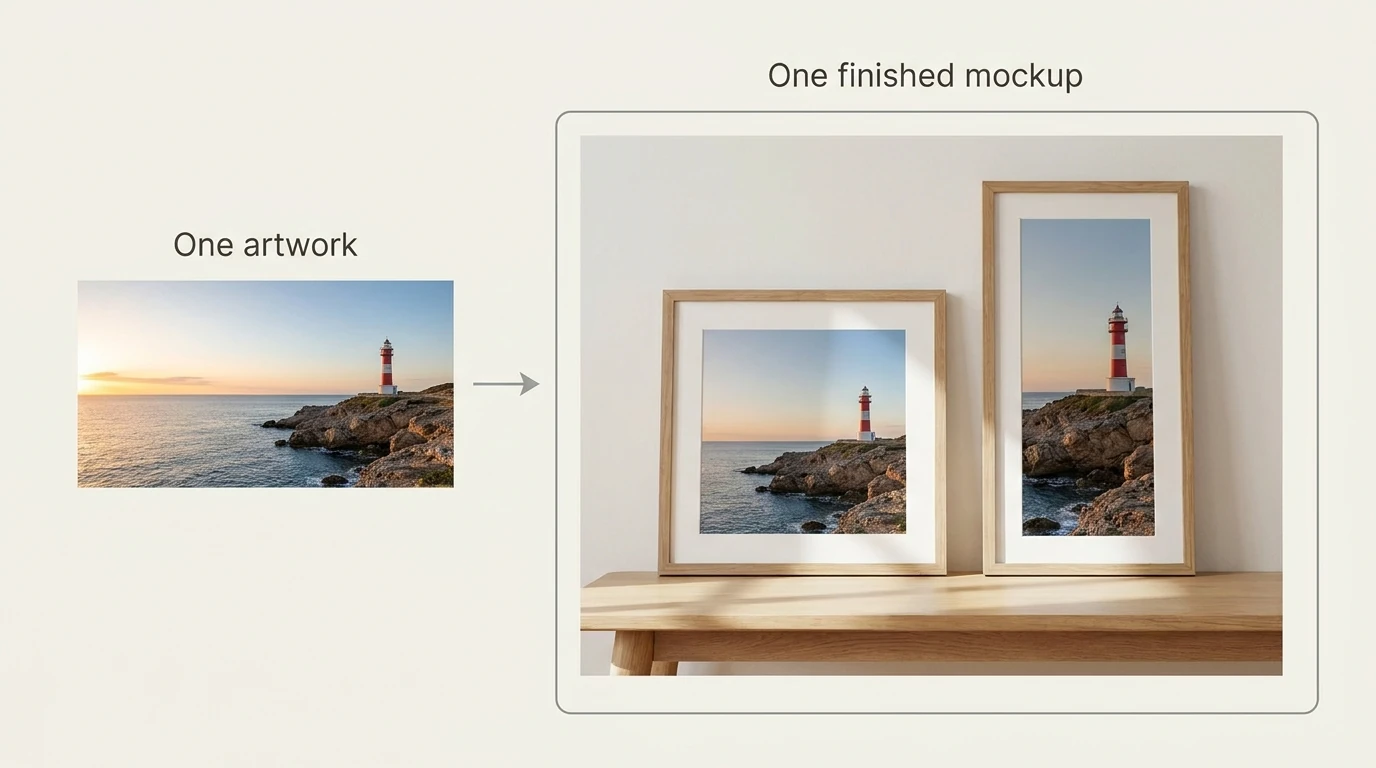
Some mockups contain several locations for the same design: two frames, multiple product instances, or several package faces. Batch-Replace Smart Objects can replace multiple selected Smart Objects before exporting one completed mockup.
The plugin uses the same current artwork in every selected target. It obtains the internal sizing information for each target independently, so the targets do not need identical dimensions or resolutions.
However, different target shapes can make the same placement rule look different. A wide target might crop a tall artwork vertically, while a square target crops it differently. An anchor that protects the composition in one region deserves a separate visual check in the other.
Select all intended targets in Photoshop’s layer stack, save the template with that selection, and inspect every replaced region in the test export. Selecting three Smart Objects does not produce three separate outputs per artwork; it produces one mockup containing the replacements in all three selected regions.
11. Give Different Mockup Shapes Their Own Placement Rules
The same artwork does not always need the same treatment in every scene. A square product image might need a right-biased crop, while a tall poster mockup should show the entire design against its upper edge.
Use Folder of PSD Files To Use when one operation configuration suits a collection of PSD/PSB templates. The plugin processes each valid template directly inside the selected folder against the artwork folder.
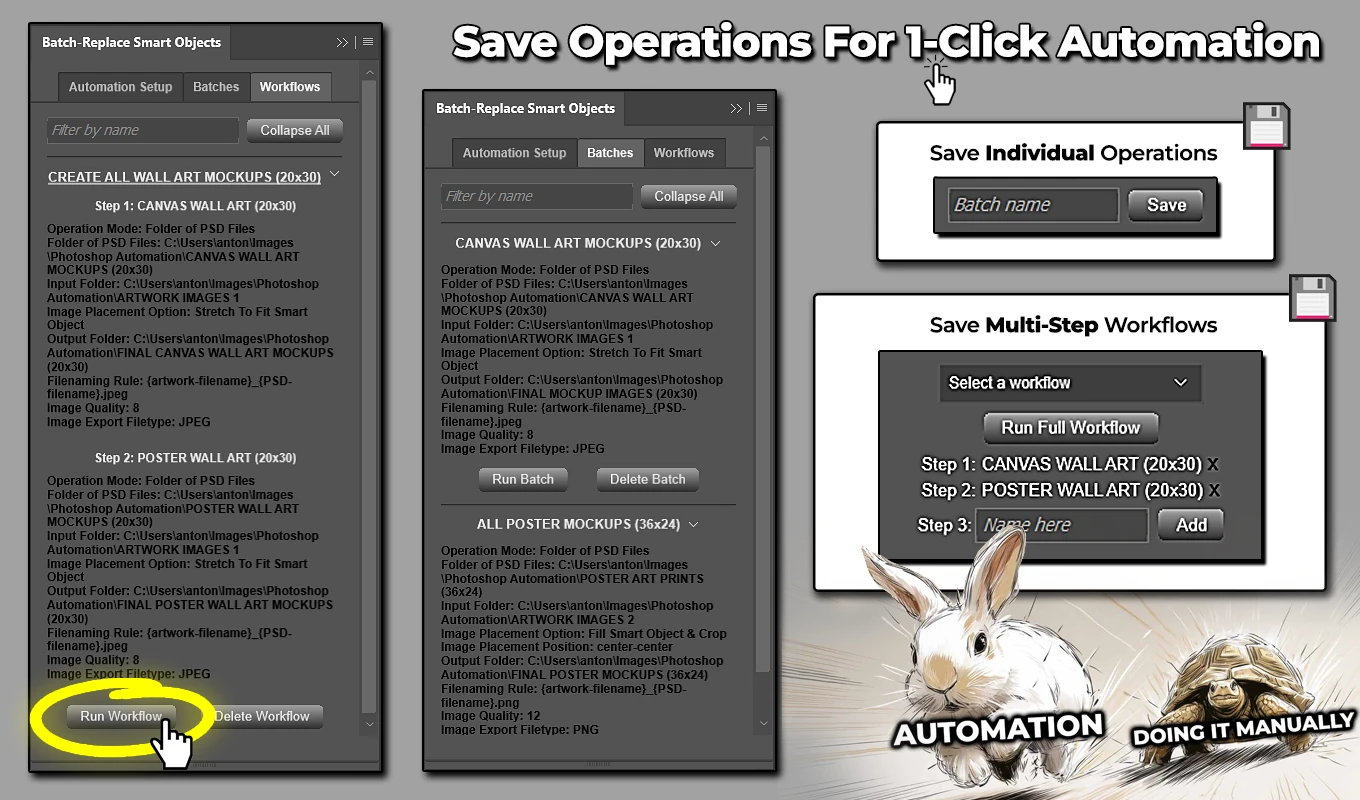
When scenes need different fitting modes or anchors, use separate Workflow steps. For example:
- Step 1: Square mockup, Fill Smart Object & Crop, Center / Right.
- Step 2: Poster mockup, Contain Inside Smart Object, Top / Center.
Each step stores its own complete operation configuration. Configure the settings first, then add the named step to the Workflow. Running the full Workflow executes those operations sequentially, allowing each scene to use the placement rule that fits its geometry rather than imposing one rule everywhere.
12. Judge the Finished Result by Edges, Crops, and Perspective
A correct result is not simply “not centered.” The visible design should occupy the intended location, retain the content that matters, and remain convincingly attached to the mockup surface.
Check the first exports against these criteria:
- Edge relationship: Does the visible design sit against the intended edge, or is hidden source padding creating an unexpected gap?
- Content preservation: With Contain, is the complete design visible? With Fill, has the crop retained the important subject, text, or logo?
- Space distribution: Is unused space on the intended side rather than accidentally split above and below or left and right?
- Mockup geometry: Does the replacement follow the expected perspective, rotation, or distortion?
- Representative variation: Do the rule and anchor still work for the other artwork shapes in the batch?
If perspective disappears after replacement, inspect the template construction rather than changing anchors. For reliable inheritance of the outer mockup transformation, the design layer should be converted to a Smart Object before that perspective or distortion is applied. The plugin automates replacement; it does not reconstruct an incorrectly built mockup.
13. Save the Off-Center Setup You Want to Reuse
After the test looks right, save the configuration as a Batch. A saved Batch retains the template resource, artwork and output folders, placement mode, placement position, and export settings.
Use a name that identifies the actual composition rule, such as “Square Scene — Fill — Right” or “Poster — Contain — Top.” That is more useful than a vague name when you later need to distinguish several placement setups.
The input folder is read when the operation runs, so newly added artwork can be processed through the saved setup without rebuilding the configuration. Check that new files still suit the saved crop direction and padding assumptions.
Batch-Replace Smart Objects: Mockups In Bulk is available through Adobe Exchange and Adobe’s Creative Cloud plugin marketplace. For repeated off-center placement, its practical advantage is straightforward: establish the correct relationship between artwork, Smart Object, and anchor once, then reuse that rule across the designs and mockup scenes that need it.