How To Prepare Transparent Subject Cutouts For Photoshop Compositing In Bulk
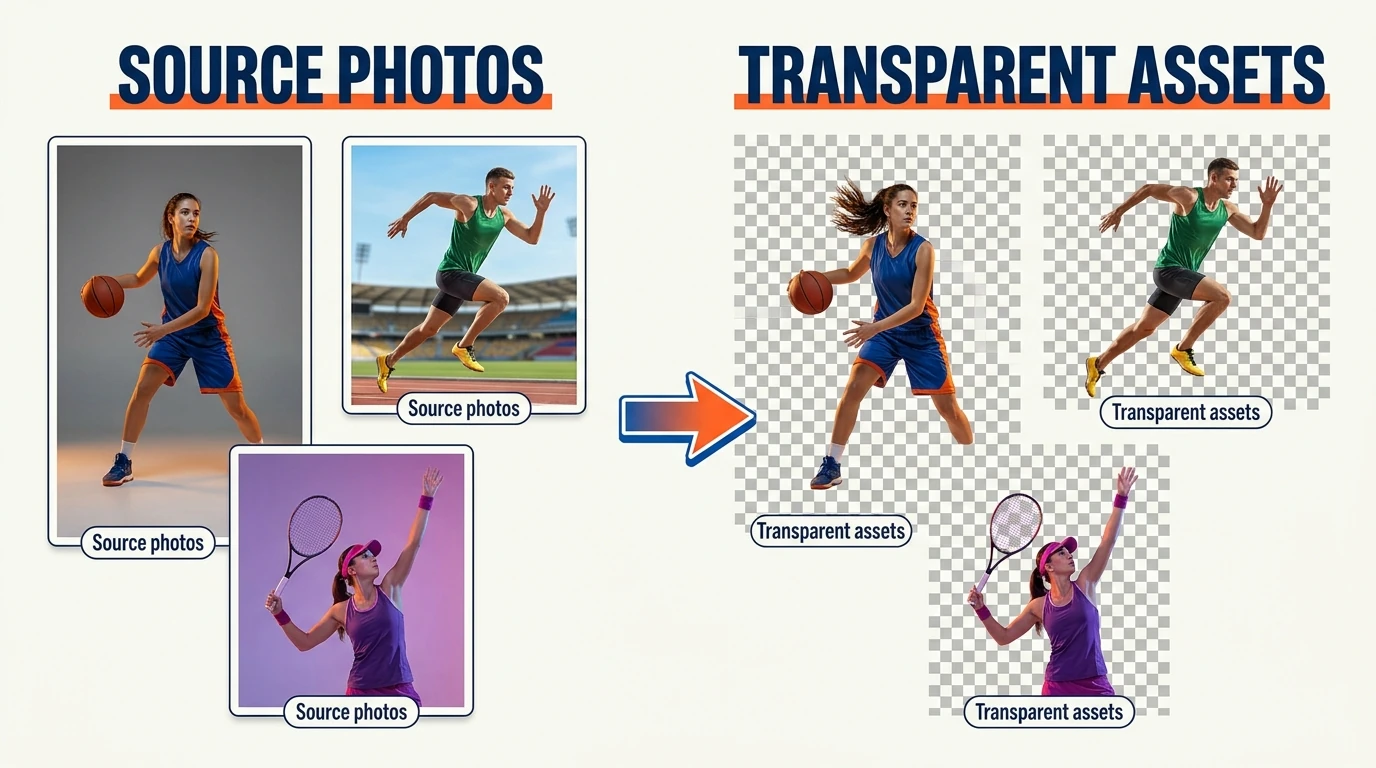

Preparing a folder of subjects for Photoshop compositing involves more than removing their backgrounds. You also need usable edges, enough image detail for the final scene, sensible canvas boundaries, and files that are easy to identify and place. Repeating those steps manually for every person, product, or photographed object quickly becomes tedious.
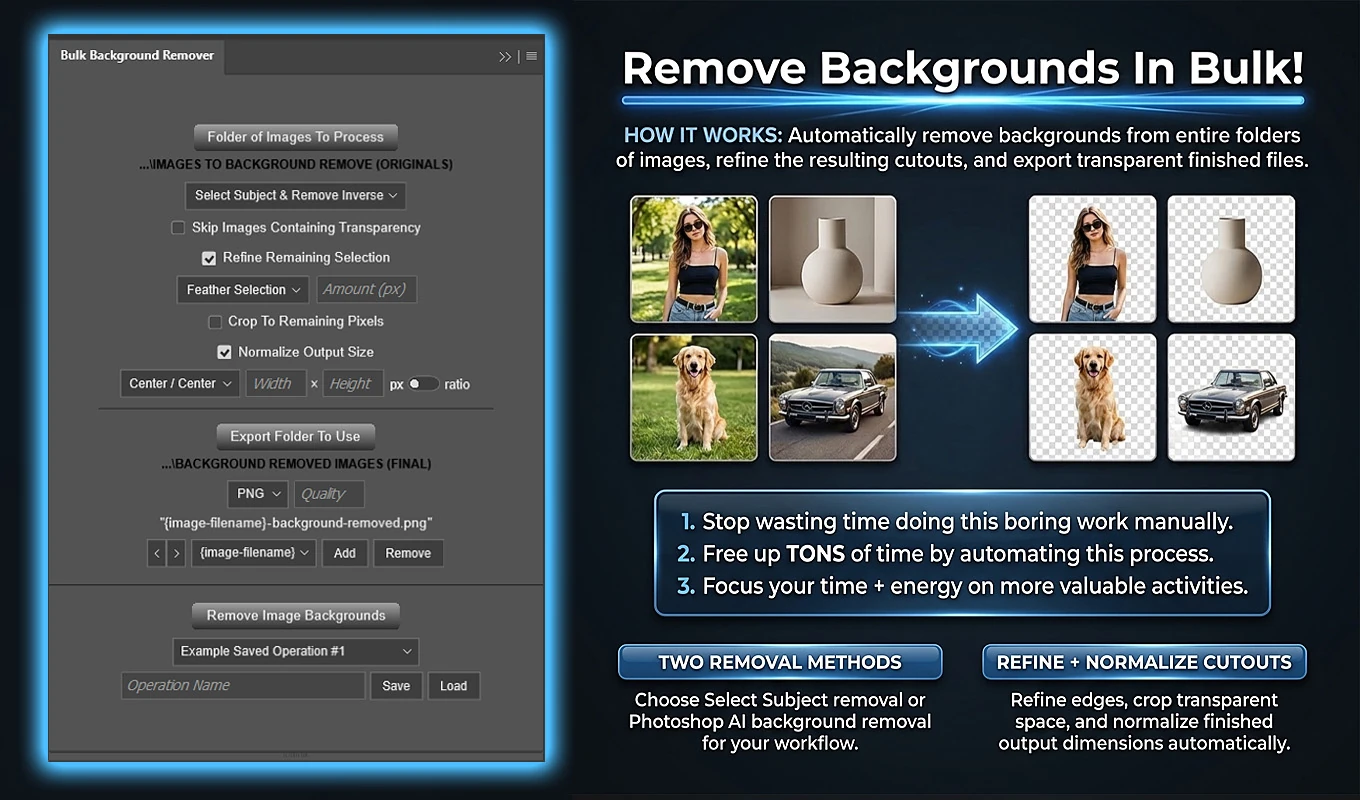
Bulk Background Remover: Automated Cutouts automates that preparation inside Photoshop. You can apply a Photoshop-native background-removal method across a folder, optionally refine the resulting masks, trim transparent margins or standardize canvases, and export separate assets without saving changes over the originals. The practical approach is to automate the repeatable preparation, then review the cutouts and handle scene-specific compositing decisions yourself.
1. Define What Your Composite Needs From Each Cutout
A transparent image is not necessarily a compositing-ready image. A useful cutout must retain the right subject details and remain large enough for its intended position in the finished composition.
Before configuring a batch, establish these requirements:
- Subject coverage: Should the asset include the entire person, their equipment, loose clothing, or a photographed prop?
- Edge treatment: Does the subject need crisp boundaries, delicate hair detail, or a slightly softer transition?
- Pixel dimensions: How large might the subject appear in the final Photoshop document?
- Canvas treatment: Do you want tightly bounded assets or consistent canvases for a repeated layout?
- Editability: Will a transparent PNG be sufficient, or will you need to adjust the processed mask later?
These choices affect the batch configuration. For example, a tightly trimmed, full-resolution cutout is often useful when building a scene with subjects at different scales. A standardized canvas can be more convenient when placing individual portraits into the same poster template.
The goal is to prepare reusable subject assets—not to assume that background removal also finishes their lighting, perspective, color, or relationship to the new scene.
2. Prepare Source Folders Before Starting the Batch
Organize sources according to the treatment they need. One folder of consistently photographed portraits is easier to process predictably than a mixture of portraits, reflective products, fine foliage, and previously edited transparent images.
You do not need a separate folder for every subject. Separate files when they need materially different settings, such as a gentle contraction for solid product edges versus no global refinement for flyaway hair.
- Put the images to be processed directly inside the selected source folder. The plugin does not recursively process nested subfolders.
- Choose a separate destination for derivatives so originals and prepared assets remain easy to distinguish.
- Check that the intended subject is visible in the source document. Visible source layers are merged during preparation.
- Create a small test folder containing representative difficult images, not just the easiest example.
For a portrait batch, a useful test might include loose hair, dark clothing against a dark background, and a hand holding a thin object. These reveal different masking problems.
Keep the original photographs available as masters. Bulk Background Remover closes opened source documents without saving, so its normal workflow preserves those originals while producing separate processed files.
3. Choose the Photoshop-Native Removal Method
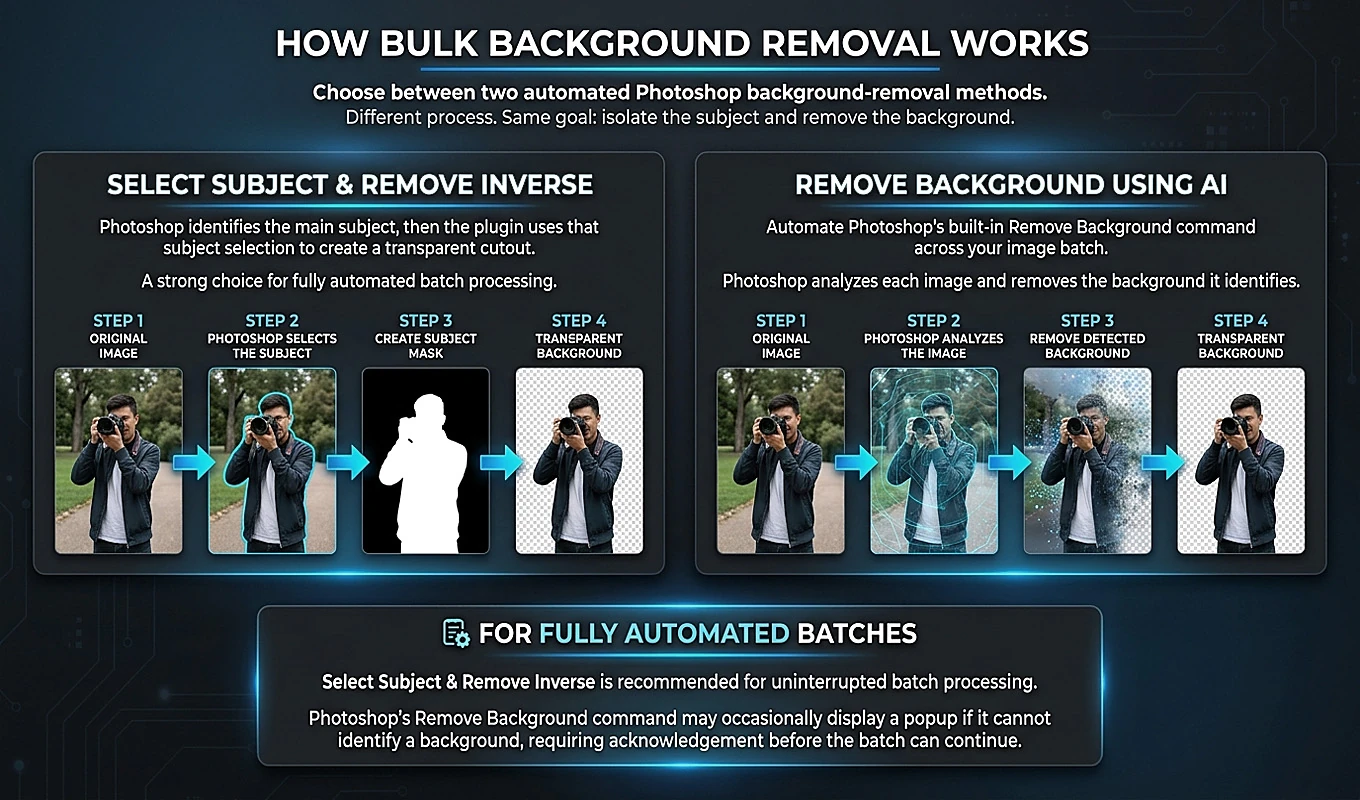
Bulk Background Remover offers two methods: Select Subject & Remove Inverse and Remove Background Using AI. Both automate native Photoshop functionality; the plugin does not use its own proprietary segmentation model.
Select Subject & Remove Inverse
This is the default method and the recommended starting point when unattended processing matters. The plugin runs Photoshop Select Subject and checks that Photoshop created a meaningful selection. It then creates a Reveal Selection layer mask, leaving the selected subject visible and hiding the surrounding background.
Despite the method’s name, this is a mask-based cutout rather than a destructive deletion of every inverse pixel. That matters when you want to refine the boundary or keep the processed mask available in a Photoshop-format output.
Remove Background Using AI
This method invokes Photoshop’s native Remove Background command. Before the batch starts, the plugin displays a warning because Photoshop can show an operation-pausing popup if it cannot identify a background to remove. That Photoshop-controlled message may require manual acknowledgment.
Use this option when you prefer that Photoshop pathway and can accommodate possible intervention. For the greatest practical unattended reliability, start with Select Subject & Remove Inverse.
The plugin does not automatically switch methods when the selected method fails. Whichever method you choose remains the method for that batch.
4. Decide Whether Already-Transparent Images Should Be Excluded
Skip Images Containing Transparency is useful when your source folder mixes unfinished photographs with assets that have already been cut out. The plugin checks the prepared working image for transparency before attempting background removal.
However, this setting performs a complete skip. An image identified as already containing transparency is not refined, cropped, normalized, or exported. Its source document is closed without saving, and processing moves on.
Enable it when transparent images genuinely should be left alone. Leave it disabled when you need every input to produce a newly prepared derivative.
This distinction is especially important for compositing libraries. An image with a transparent corner may still have an unwanted background around the subject. Transparency detection is not an assessment of whether the existing cutout is finished or suitable for your scene.
5. Set Up and Run the Folder Operation
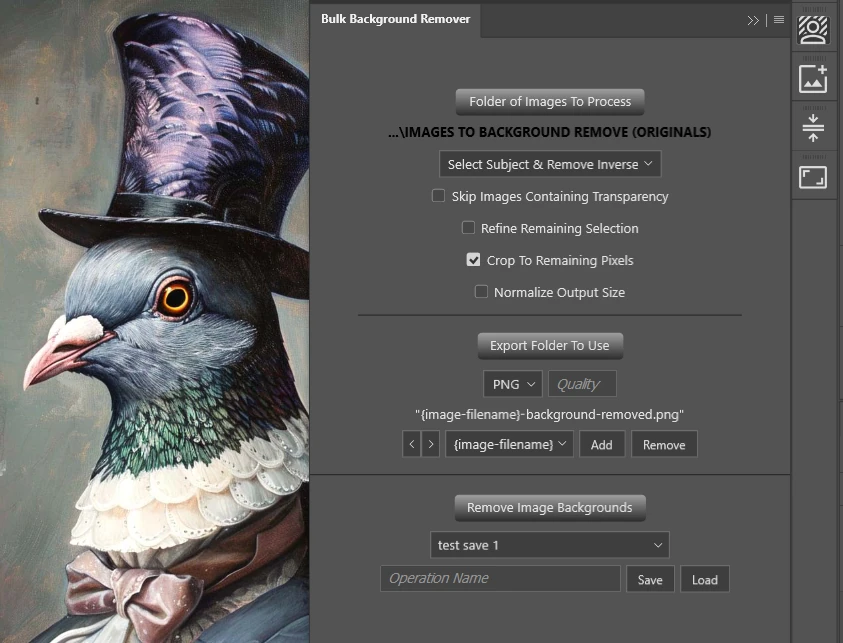
Install Bulk Background Remover: Automated Cutouts through Adobe Exchange or Adobe’s Creative Cloud plugin marketplace, then open it through Photoshop’s Plugins menu. For a straightforward first test, use this sequence:
- Select Folder of Images To Process and choose your test folder.
- Choose Select Subject & Remove Inverse as the Background Removal Method.
- Set Skip Images Containing Transparency according to whether those files should be excluded entirely.
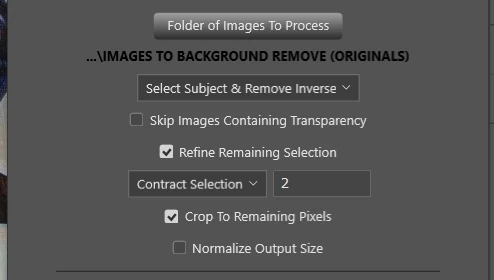
- Leave Refine Remaining Selection disabled for the first test unless you already know which edge correction is needed.
- Enable Crop To Remaining Pixels for tightly bounded assets, or choose Normalize Output Size when the destination layout requires standardized canvases.
- Select Export Folder To Use and choose PNG or PSD according to your editing needs.
- Build a filename format that includes the original image name.
- Click Remove Image Backgrounds.
For a successful cutout, the plugin prepares the working layer, runs the selected removal method, applies any enabled refinement, performs the chosen canvas operation, and exports the result. The source document is then closed without saving.
The progress window tracks the operation and includes Cancel Operation. Escape can also cancel while that window is displayed.
Review the test outputs before processing the full source folder. The following settings determine whether the assets will behave well once placed into a composite.
6. Use Edge-Refinement Values to Solve Specific Mask Problems
Refine Remaining Selection changes the subject mask after successful background removal. The plugin loads the existing mask as a selection, applies the selected refinement operation, and replaces the mask with the refined result.
The Amount field is a whole-number pixel value from 1 through 10,000. It is an actual Photoshop selection-operation amount, not a percentage or an abstract strength control. The same number can have very different practical consequences on a large solid object and on a thin strand of hair.
Contract Selection for unwanted outer edging
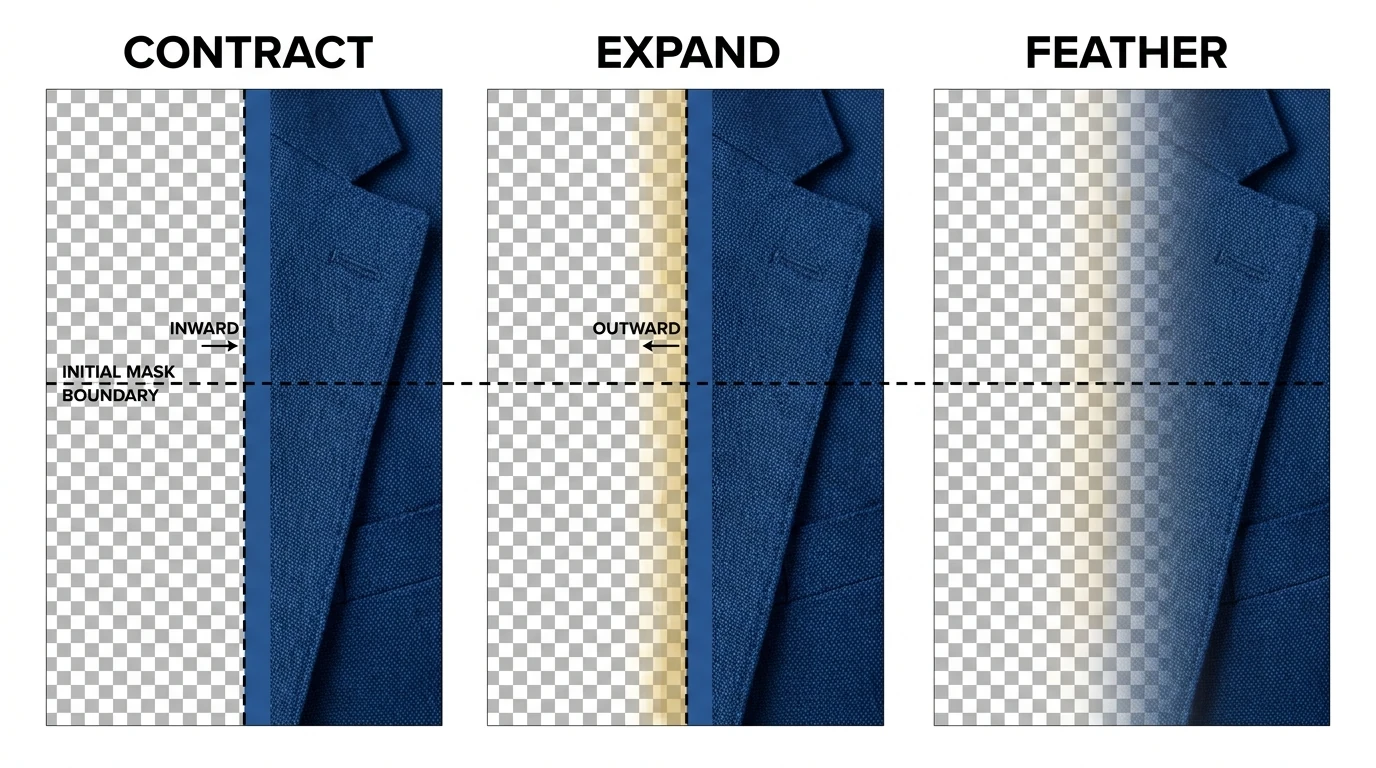
Contract Selection moves the revealed subject boundary inward. It can help remove a narrow band of background contamination around a solid contour.
Start conservatively. A small contraction may improve the edge of a jacket or product housing while also eroding fingers, jewelry, hair, or narrow straps. Test the value against the smallest important subject detail.
Expand Selection for an overly aggressive boundary
Expand Selection reveals more pixels around the selected subject boundary. This can help when the initial mask cuts too far into the subject.
Expansion can also reveal unwanted background pixels. It is not a way to reconstruct detail that was never present in the photograph, and it should be checked against the intended composite background.
Feather Selection for softer transitions
Feather Selection softens the transition between visible subject pixels and transparency. It can reduce a harsh cutout edge, but excessive feathering creates a soft fringe that may look unnatural against a sharp scene.
Feathering is not a substitute for removing a colored halo. If the boundary contains the old background’s color, softening it can make the contamination less defined without actually solving it.
Apply one refinement treatment to a batch only when the subjects share that need. When edge problems differ substantially, separate the sources into smaller groups rather than forcing one setting onto every image.
7. Choose Tight Cutouts or Standardized Canvases
The right canvas depends on how you plan to assemble the composite. Compact assets and standardized canvases solve different placement problems.
Tight cutouts for flexible scene building
Crop To Remaining Pixels trims fully transparent outer canvas from all four sides. It does not resize the subject, add padding, force an aspect ratio, or crop through visible subject pixels.
This is often the most useful choice for an asset library. The file boundaries closely surround the subject, making each cutout easier to inspect and position without large empty margins.
Standardized canvases for repeatable layouts
Normalize Output Size is more appropriate when multiple assets need a common canvas size or shape. For example, repeated promotional layouts may benefit from every subject arriving on a square canvas with consistent bottom alignment.
The tradeoff is that a standardized canvas can contain substantial transparent space. That space may be intentional and useful for layout consistency, but it does not represent additional subject detail.
The two controls are mutually exclusive in the interface. Turning on one turns off the other because normalization already begins by trimming the cutout to its remaining non-transparent bounds.
For freeform compositing, start with tight cutouts. Choose normalization when a specific placement system or delivery requirement makes the extra canvas useful.
8. Normalize Without Stretching or Unnecessarily Enlarging Subjects
Normalization provides two distinct ways to standardize assets. Understanding the difference prevents accidental resolution loss or incorrect assumptions about subject scale.
Pixel mode creates an exact canvas
In px mode, Width and Height specify the final canvas dimensions. The plugin first trims transparent margins, then proportionally reduces the cutout if it is too large to fit. Smaller cutouts are not enlarged.
For example, a trimmed 3000 × 1500 cutout normalized to 1000 × 1000 becomes approximately 1000 × 500 inside the final square canvas. A trimmed 800 × 600 cutout normalized to 2000 × 2000 stays 800 × 600, with transparent canvas added around it.
This preserves proportions and avoids unnecessary upscaling, but it does not make every subject equally large. Identical output dimensions do not guarantee identical apparent subject size.
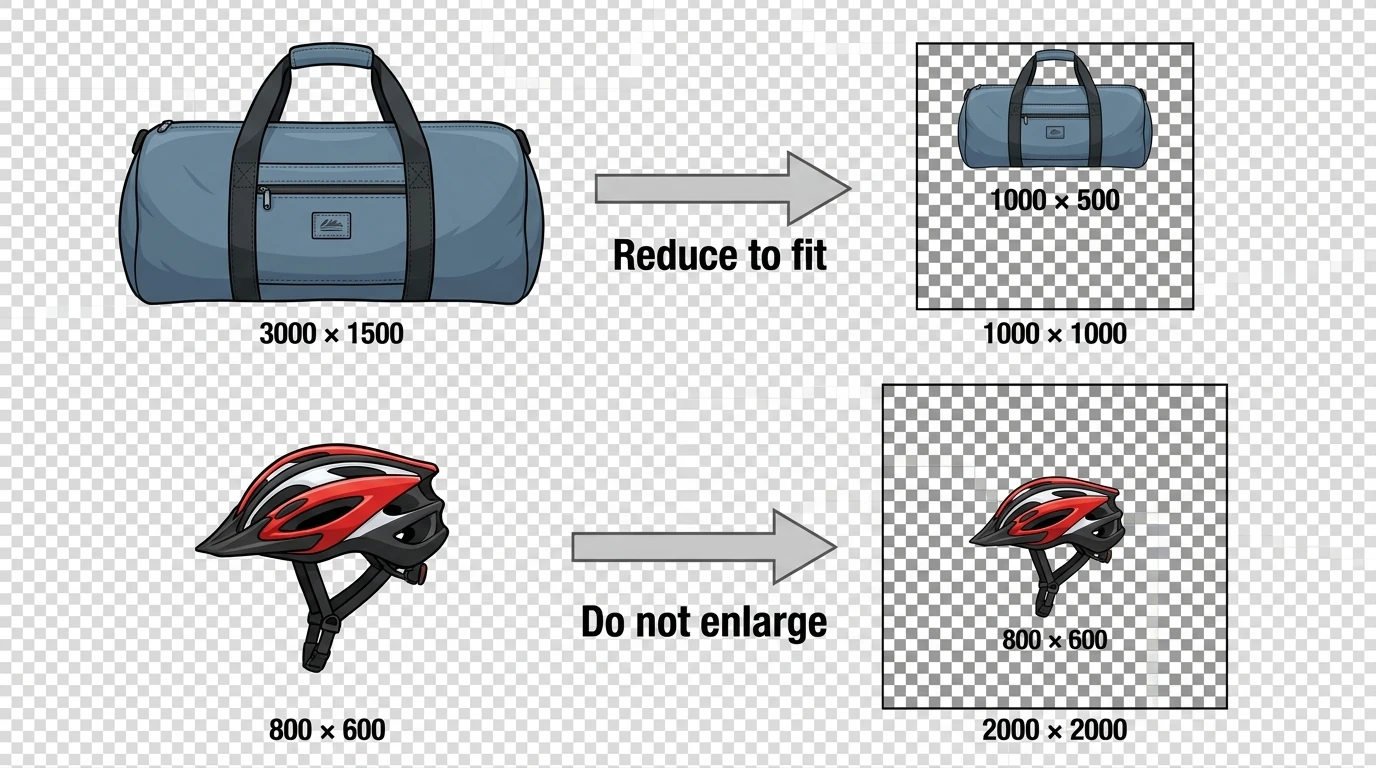
For compositing, choose a target large enough for the intended use. A 1000-pixel-tall subject placed prominently into a much larger scene does not gain missing detail simply because its canvas is larger. If future compositions may need more pixels, keep a tightly cropped, full-resolution master as well.
Ratio mode changes canvas shape without resizing the cutout
In ratio mode, values such as 4 and 5 mean a 4:5 aspect ratio, not a 4 × 5-pixel image. The plugin expands whichever canvas dimension is needed to contain the cutout at the requested ratio. It does not crop the subject or resize it merely to achieve that shape.
For example, a trimmed 1200 × 1800 subject needs a 1440 × 1800 canvas to reach 4:5. The subject remains at its existing size.
Alignment determines where the subject sits
Normalization provides nine predefined alignments, combining left, center, or right with top, center, or bottom. Center / Bottom can be useful for full-body figures or objects that need a consistent lower boundary. Center / Center is useful for more symmetrical placement.

These positions align subject bounds within the canvas. They do not detect a person’s eye line, match photographed camera distance, or establish perspective for the final composite.
9. Export PNG for Placement or PSD for Continued Mask Editing
PNG and PSD are particularly useful choices for Photoshop compositing, but they serve different roles.
Choose PNG when you want a transparent asset that is straightforward to place into another document. PNG is lossless, and its transparency can carry the cutout’s soft edge transitions. The plugin’s PNG Quality control changes compression behavior rather than introducing JPEG-style lossy degradation; it is not a mask-quality setting.
Choose PSD when you want to continue working with the processed Photoshop result, including its layer mask. This is helpful for subjects likely to need local corrections after you see them against the actual scene.
Do not confuse a processed PSD with a preservation copy of the original source’s layer structure. Visible source layers are merged before background removal. The exported file represents the prepared working result, not the original multilayer composition.
PSB is also available for large-document workflows. For most cutout libraries, the immediate decision is whether you need a convenient transparent placement asset, an editable processed master, or separate runs producing both.
10. Name Outputs So You Can Identify the Right Asset Later
A folder of transparent subjects becomes difficult to use if the filenames lose their connection to the originals. Keep the source filename in the output name, then add only metadata that helps your workflow.
Bulk Background Remover’s filename builder can include the original image name, removal method, a background-removed label, final dimensions, export format, and Quality. Components are joined with hyphens.
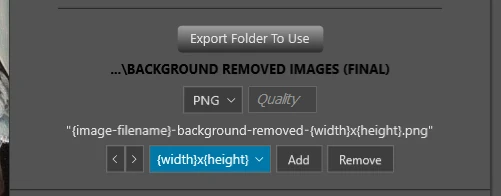
For a compositing library, a useful combination is the original image name, background-removed, and the final width × height. A resulting filename might be athlete-07-background-removed-1800x3200.psd.
The dimensions are taken after cropping or normalization, so they describe the actual exported document. Remember that normalized canvas dimensions may be larger than the subject itself.
The plugin also adds a numbered suffix when an output name already exists. That protects existing derivatives, but it makes deliberate folder organization important when comparing multiple mask treatments. Use separate output folders for meaningful versions such as a clean baseline and a contracted-edge test.
11. Example: Prepare a Team of Athlete Cutouts for a Poster
Suppose you have 24 full-body athlete photographs, one person per image, for a layered team poster. The photographs have opaque studio backgrounds, and the final composition will place people at different sizes and depths.
A practical first-pass configuration would be:
- Background Removal Method: Select Subject & Remove Inverse.
- Skip Images Containing Transparency: disabled if every photograph needs a prepared output.
- Refine Remaining Selection: disabled initially, pending inspection of hair, hands, and uniform edges.
- Crop To Remaining Pixels: enabled.
- Normalize Output Size: disabled to avoid reducing source detail for an arbitrary template size.
- Export filetype: PSD for continued mask editing.
- Filename components: original image name, background-removed, and final dimensions.
Test a few representative athletes first: one with loose hair, one holding equipment, and one whose uniform resembles the studio background. If solid uniform edges consistently retain a narrow background fringe, test a small Contract Selection amount on that group. Do not assume the same contraction will suit hair or a thin equipment handle.
After processing the full folder, review the exported masks and place approved subjects into the poster. Their relative scale, overlap, floor contact, lighting, and color can then be adjusted in the composition.
The batch has handled the repeated preparation work while leaving the important artistic relationships under your control.
12. Inspect Cutouts Against More Than the Transparency Grid
Photoshop’s transparency checkerboard confirms that an area is transparent, but it is not enough for judging edge quality. A fringe that disappears into the checkerboard may become obvious against a dark poster background or a saturated scene.
Place temporary light, dark, and contrasting-color layers behind representative cutouts. Then inspect them against the actual destination scene when available.
- Look for halos or old-background color around shoulders, clothing, and hair.
- Check that fingers, straps, equipment, and other narrow details remain intact.
- Inspect gaps between arms and bodies and other enclosed spaces.
- Look for disconnected fragments that should not remain visible.
- Check whether edges are appropriately sharp at the intended display size.
- Confirm that no essential subject area was excluded by detection.
Inspect both close up and at the size the subject will occupy in the finished composite. A very soft edge may look acceptable in isolation but appear inconsistent beside sharply focused scene elements.
Also check unexpectedly large cropped canvases. Because trimming follows remaining non-transparent pixels, a stray fragment can keep the document wider or taller than expected.
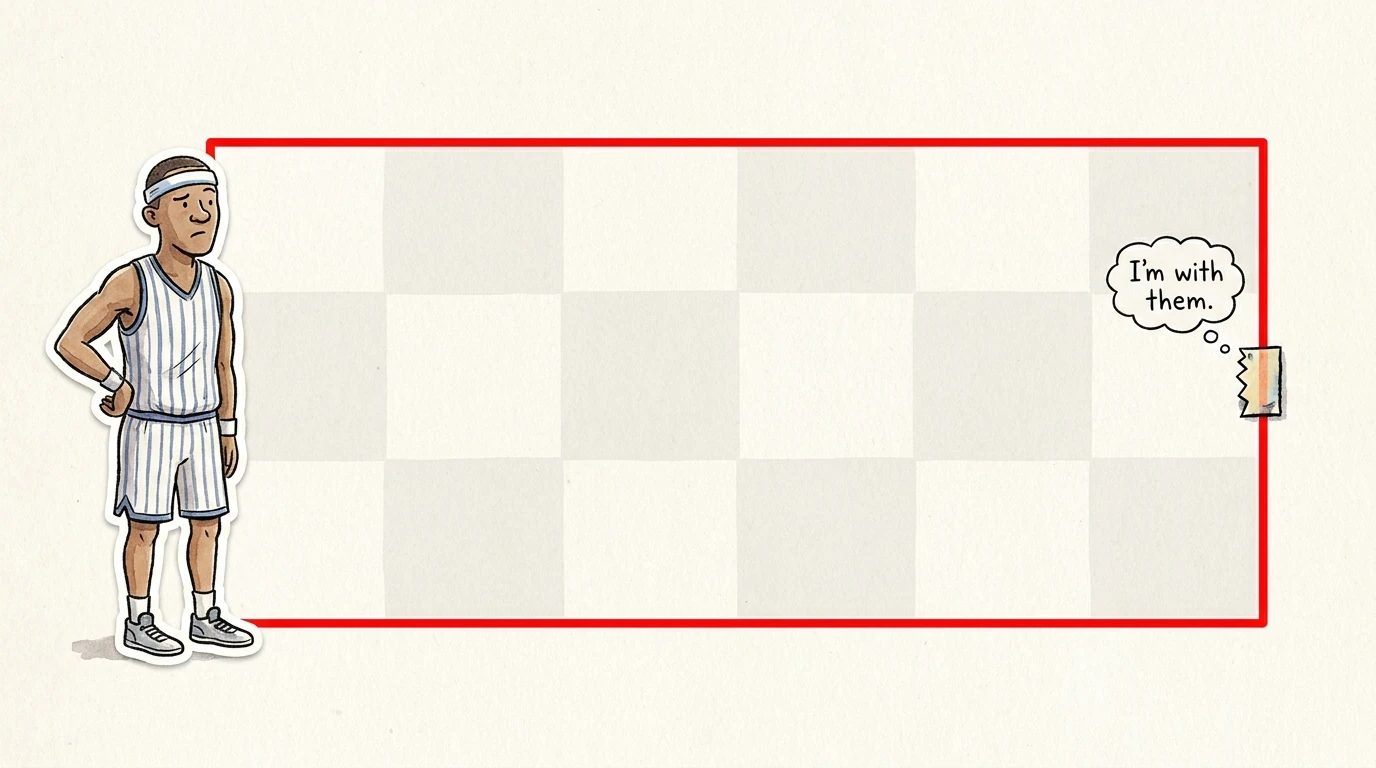
A meaningful automatic subject selection is a useful starting point, not a guarantee that every small detail is correct. Reserve manual attention for the exceptions revealed by this review.
13. Place the Assets and Finish the Photoshop Composite
Once the cutouts are approved, bring them into the destination Photoshop document. File’s Place Embedded command is a useful way to place a cutout as a Smart Object, keeping the embedded asset available while you transform it within the composition.
Smart Objects do not create extra image detail, so the resolution decisions made during preparation still matter. Avoid treating a small subject on a large transparent canvas as though it were a high-resolution subject.
Complete the scene-specific work after placement:
- Set relative subject scale and perspective.
- Arrange overlaps and depth relationships.
- Match exposure, contrast, and color to the destination scene.
- Create appropriate contact and cast shadows.
- Adjust local mask details where the new background exposes a problem.
- Match edge sharpness and apparent focus to surrounding elements.
These are compositing decisions rather than bulk background-removal settings. A clean subject mask gives you a better starting point, but the new environment determines how the subject should finally look.
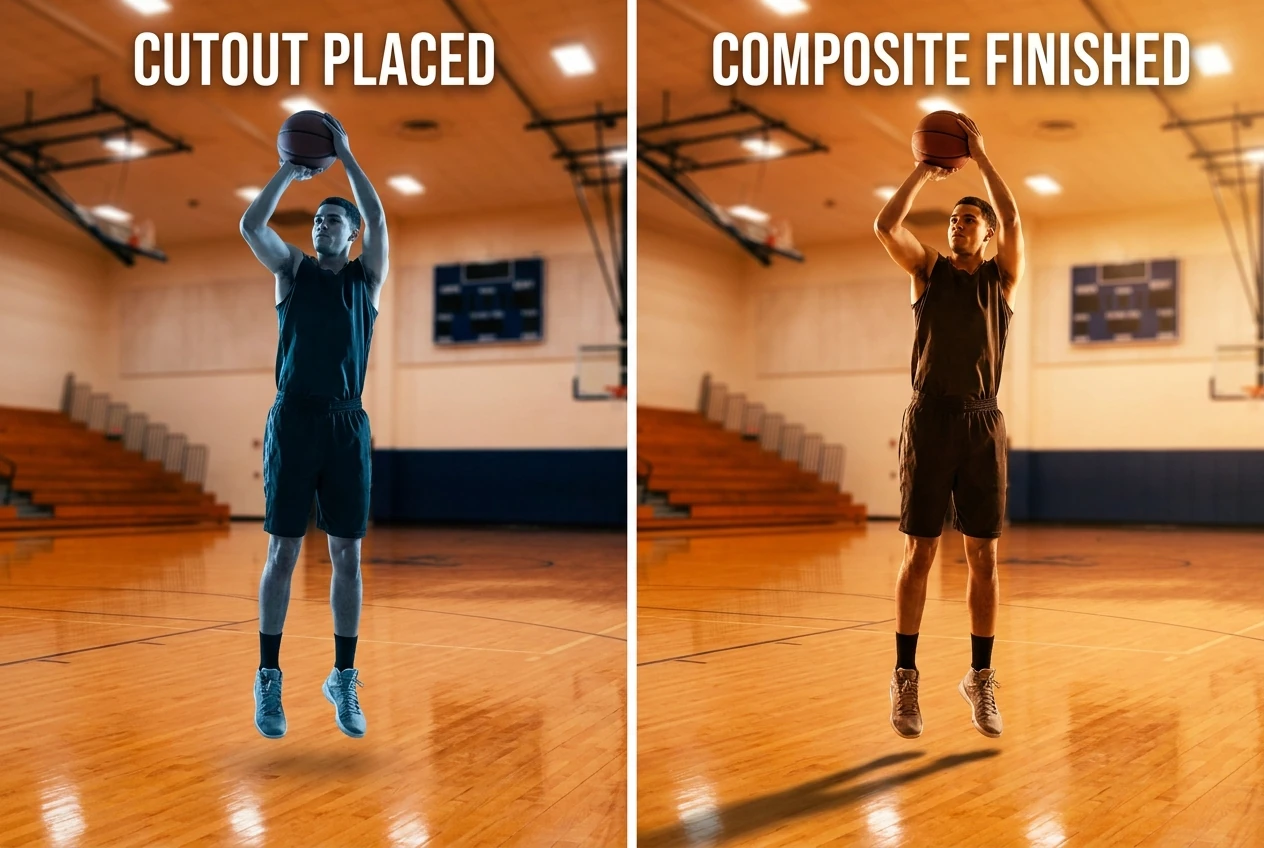
Retain processed PSD masters when you expect revisions. A ready-to-place PNG is convenient, while an editable processed mask gives you more flexibility when a different background reveals an edge that needs attention.
14. Save a Repeatable Setup, Processing, and Review Routine
For recurring work, save the complete preparation configuration rather than rebuilding it from memory. Bulk Background Remover’s saved operations can store source and output folder references, removal method, transparency skipping, refinement, crop or normalization settings, alignment, export type, Quality, and filename components.
Give each operation a name that describes its intended result, such as Full-Resolution Portrait Cutouts — PSD or Bottom-Aligned Square Assets — PNG.
A dependable recurring routine is:
- Load the saved operation and confirm that its folders are still the correct locations.
- Check whether the new photographs resemble the sources for which the settings were tested.
- Run a representative sample when lighting, subject detail, or intended output size has changed.
- Process the folder using the approved configuration.
- Review the cutouts and separate any subjects needing local correction.
- Place the approved assets into the composite and finish the scene-specific adjustments.
This keeps preparation consistent without pretending that every photograph needs identical artistic treatment. The reusable operation handles the repeatable sequence; your review decides whether the results are ready for the scene.
Bulk Background Remover: Automated Cutouts provides a practical way to turn folders of photographs into transparent Photoshop assets with less repetitive handling. Start with a representative test batch, preserve enough subject detail, and choose canvas and export settings around the compositions you actually intend to build.