How To Speed Up Image Background Removal In Photoshop
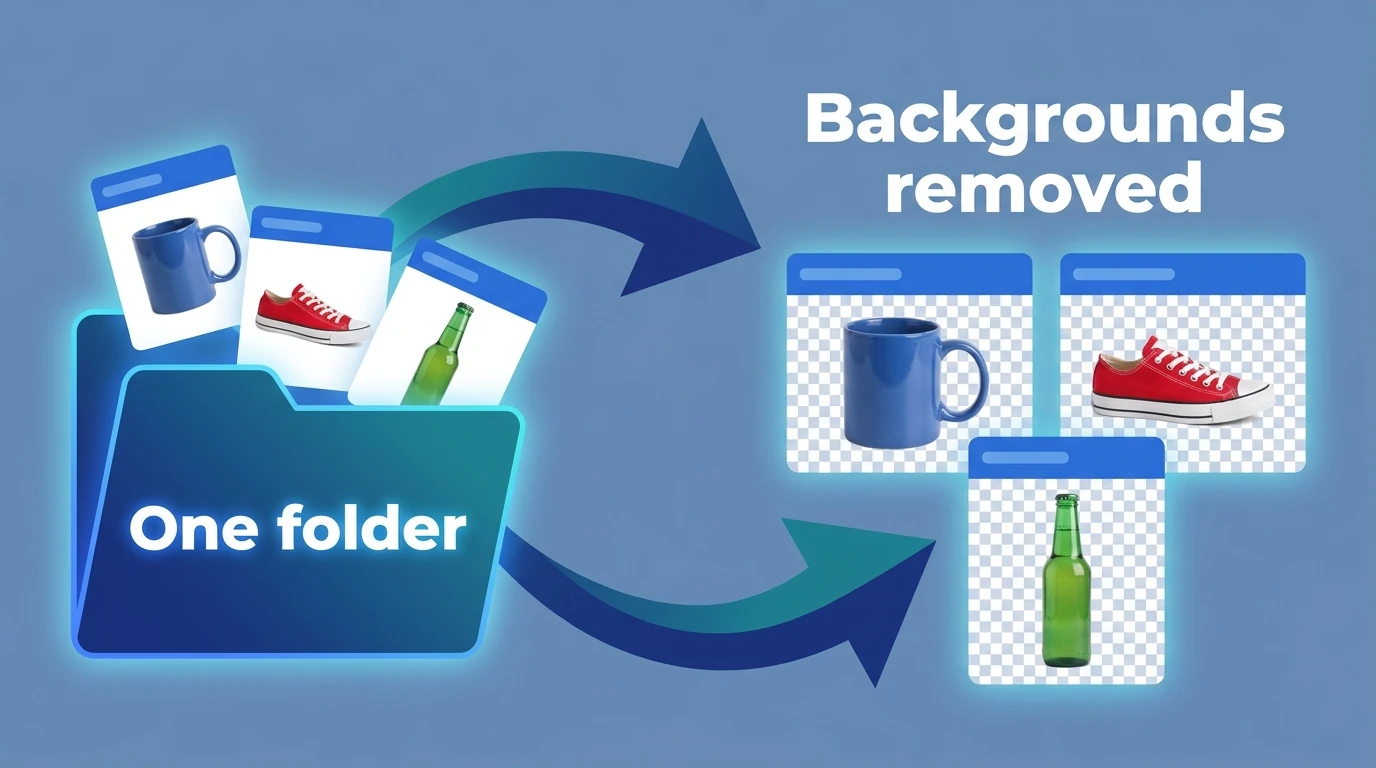

To speed up image background removal in Photoshop, automate more than the background-removal command. Opening files, adjusting edges, trimming empty canvas, exporting, naming files, and closing documents can create just as much repetitive work as making the initial cutout.
Bulk Background Remover: Automated Cutouts is a Photoshop plugin that lets you configure those steps once and apply them across a folder. It uses Photoshop’s native background-removal functionality, then handles optional mask refinement, cropping or canvas normalization, and export.
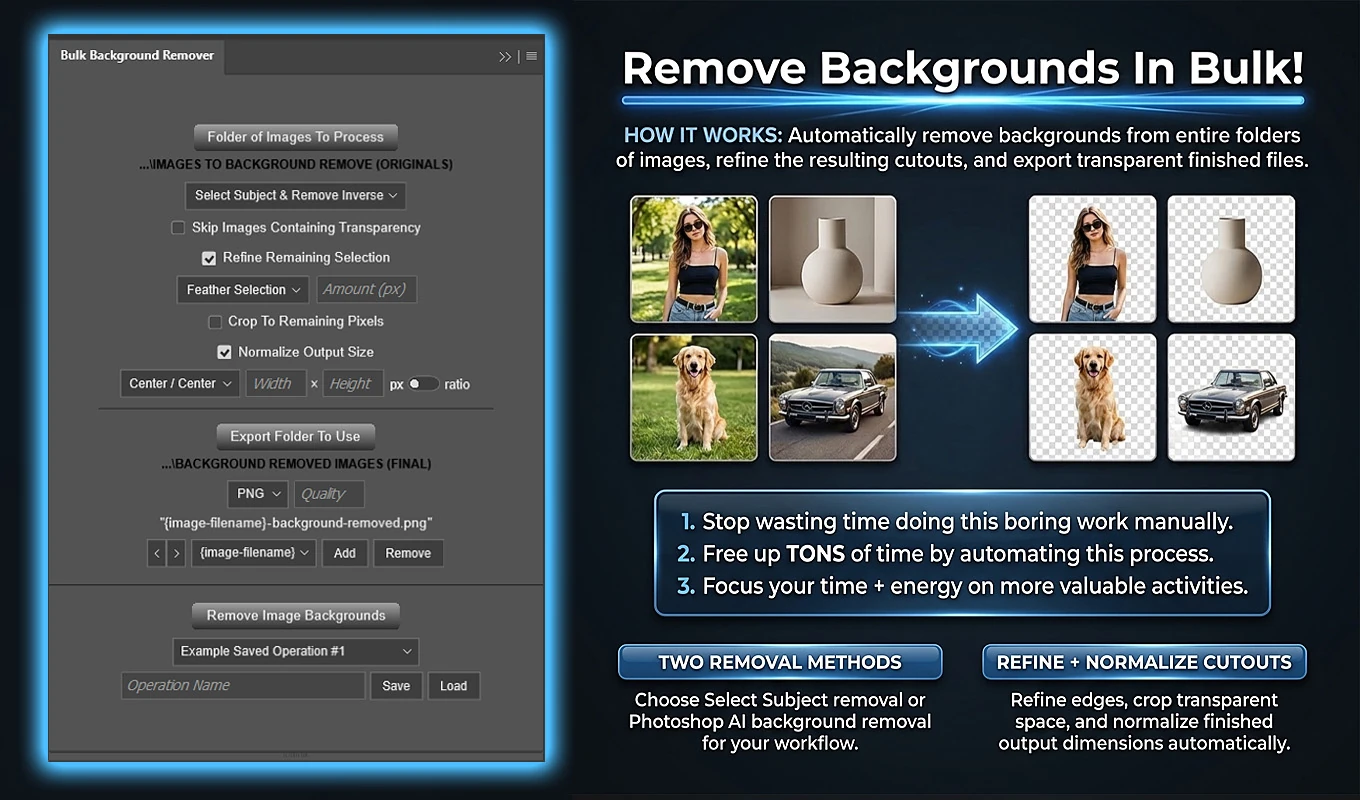
The practical approach is to choose a removal method suited to unattended processing, test it on representative images, and run the full folder with only the finishing steps you actually need. Here is how to build that workflow.
1. Remove the Repeated File-Handling Loop
For one image, running Photoshop’s Select Subject command and creating a mask may be straightforward. Across dozens or hundreds of files, however, the same surrounding tasks keep returning:
- Open the next source image.
- Create the cutout and adjust its edges.
- Trim transparency or prepare the required canvas dimensions.
- Choose an export name, format, and destination.
- Close the source and repeat.
That repeated handling is what Bulk Background Remover is designed to remove. You choose a source folder, set the removal and finishing options, and let the plugin carry out the configured workflow across supported files in that folder.
This is a production-workflow improvement, not a claim that the plugin makes Photoshop’s subject-detection engine run faster. The benefit comes from reducing the number of times you have to open, configure, save, and close individual images yourself.

Keep manual attention for the work that needs judgment: evaluating cutout quality and correcting difficult exceptions.
2. Set Up Separate Source and Export Folders
Install Bulk Background Remover: Automated Cutouts through Adobe Exchange or Adobe’s Creative Cloud plugin marketplace. After Creative Cloud installs it, open or restart Photoshop if necessary, then access the plugin through Photoshop’s Plugins menu.
Before configuring the batch, organize the files so the operation has a clear input and destination:
- Place the images you want processed directly inside one source folder.
- Create a separate export folder for the finished cutouts.
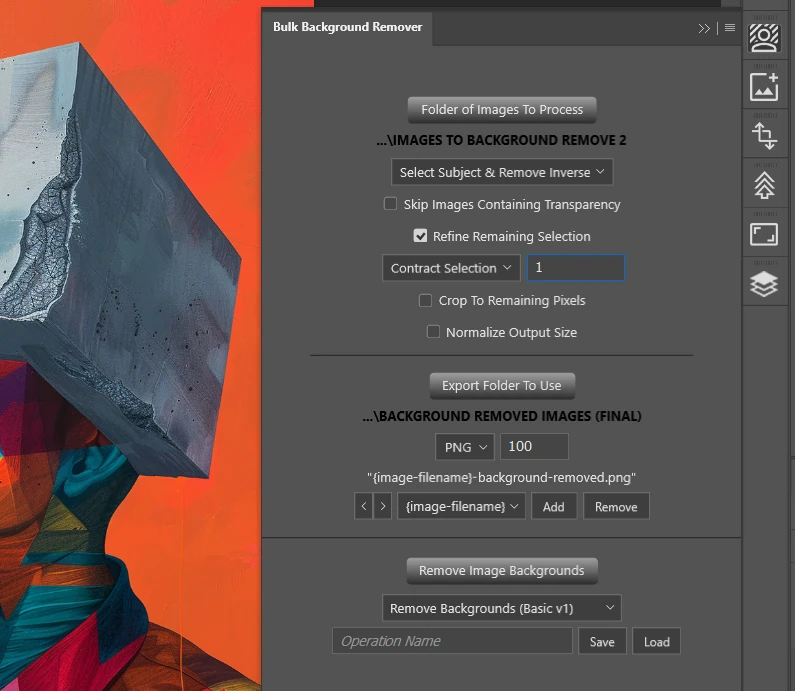
- Click Folder of Images To Process and select the source folder.
- Click Export Folder To Use and select the destination.
The plugin processes supported files directly inside the selected source directory; it does not recursively process nested subfolders. Supported inputs include common photographic formats such as JPEG, PNG, TIFF, and WebP, along with Photoshop documents and several other supported formats.
Keep exported derivatives outside the source folder. That prevents a later operation from picking up previous outputs as fresh inputs. Also remember that the plugin reads the folder’s current contents when processing begins, so files added or removed before you start affect the batch.
3. Choose the Method That Minimizes Interruptions
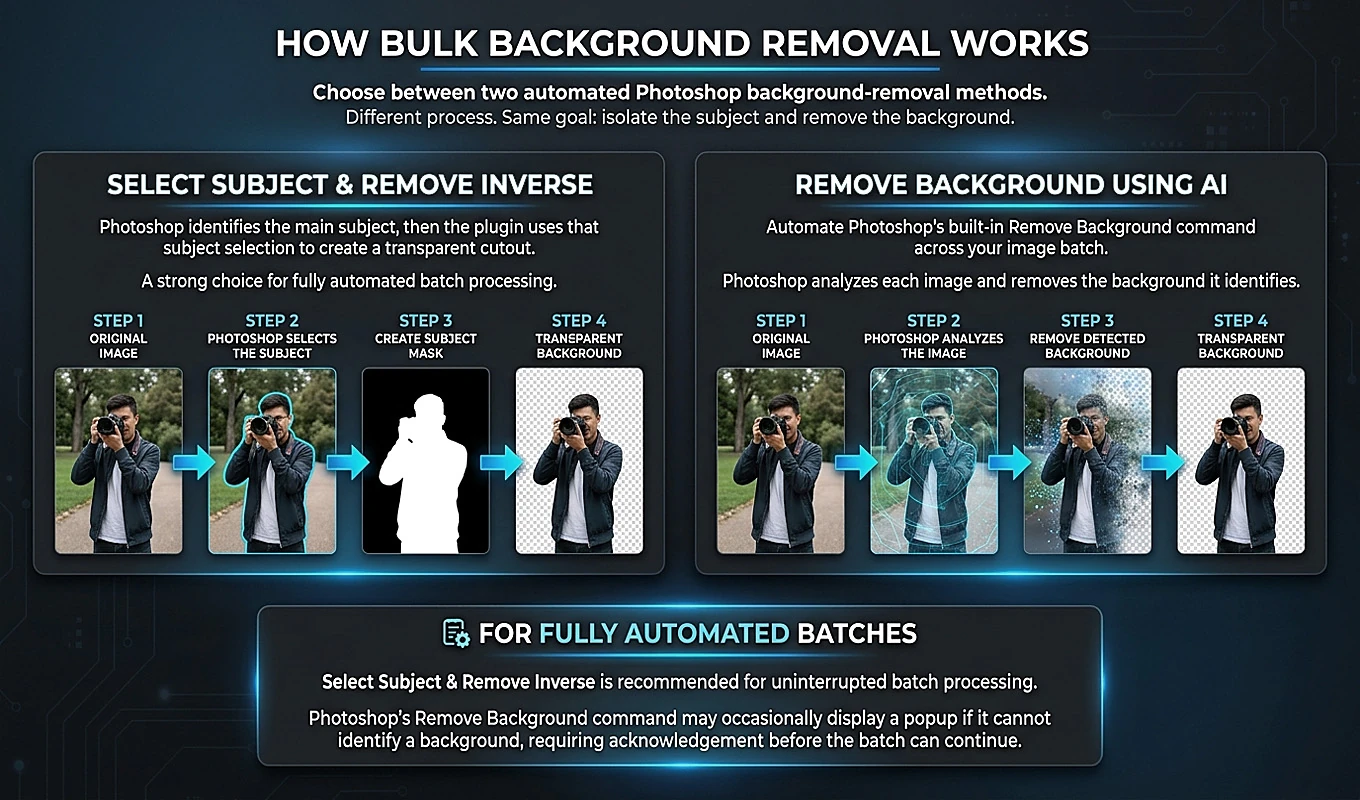
The Background Removal Method dropdown offers two choices. Both use Photoshop-native functionality, but they differ in an important way for unattended work.
Select Subject & Remove Inverse
This is the default option and the recommended choice when uninterrupted batch processing is the priority. The plugin runs Photoshop’s Select Subject command, checks that a meaningful selection exists, and creates a Reveal Selection layer mask.
Despite the method’s name, the current implementation does not simply delete the inverse selection. It hides the background with a mask, which can then support the plugin’s optional edge-refinement step.
Remove Background Using AI
This option invokes Photoshop’s native Remove Background command. Before processing, the plugin warns that Photoshop may display an operation-pausing popup if it cannot identify a background to remove. The plugin cannot reliably suppress that Photoshop-controlled dialog.
You can choose Proceed Anyway or Cancel Operation. If you need to leave a large folder running with as little intervention as possible, Select Subject & Remove Inverse is the more suitable starting point.
Neither method guarantees a correct cutout for every image, and the plugin does not automatically switch methods when the selected one fails. Choose the method based on a representative test rather than expecting automatic fallback.
4. Tune the Settings on a Small Test Batch
A short test is usually more useful than committing an entire folder to unproven settings. Copy a small selection of representative images into a separate test folder and export the results to a test destination.
Include different subject sizes, difficult edges, and background conditions found in the actual job. A clean, high-contrast product photograph alone will not tell you how the settings handle the rest of the folder.
Start with refinement disabled so you can see what Photoshop’s initial cutout produces. Then inspect the exported images, especially around fine details and high-contrast boundaries. Viewing a cutout against both light and dark backgrounds can help reveal edge contamination.
If the same edge issue appears consistently, enable Refine Remaining Selection and choose the appropriate treatment:
- Contract Selection moves the mask boundary inward. It can help remove residual background edging or halos.
- Expand Selection moves the boundary outward. It can help recover edge regions excluded by an overly aggressive cutout.
- Feather Selection softens the boundary where the subject meets transparency.
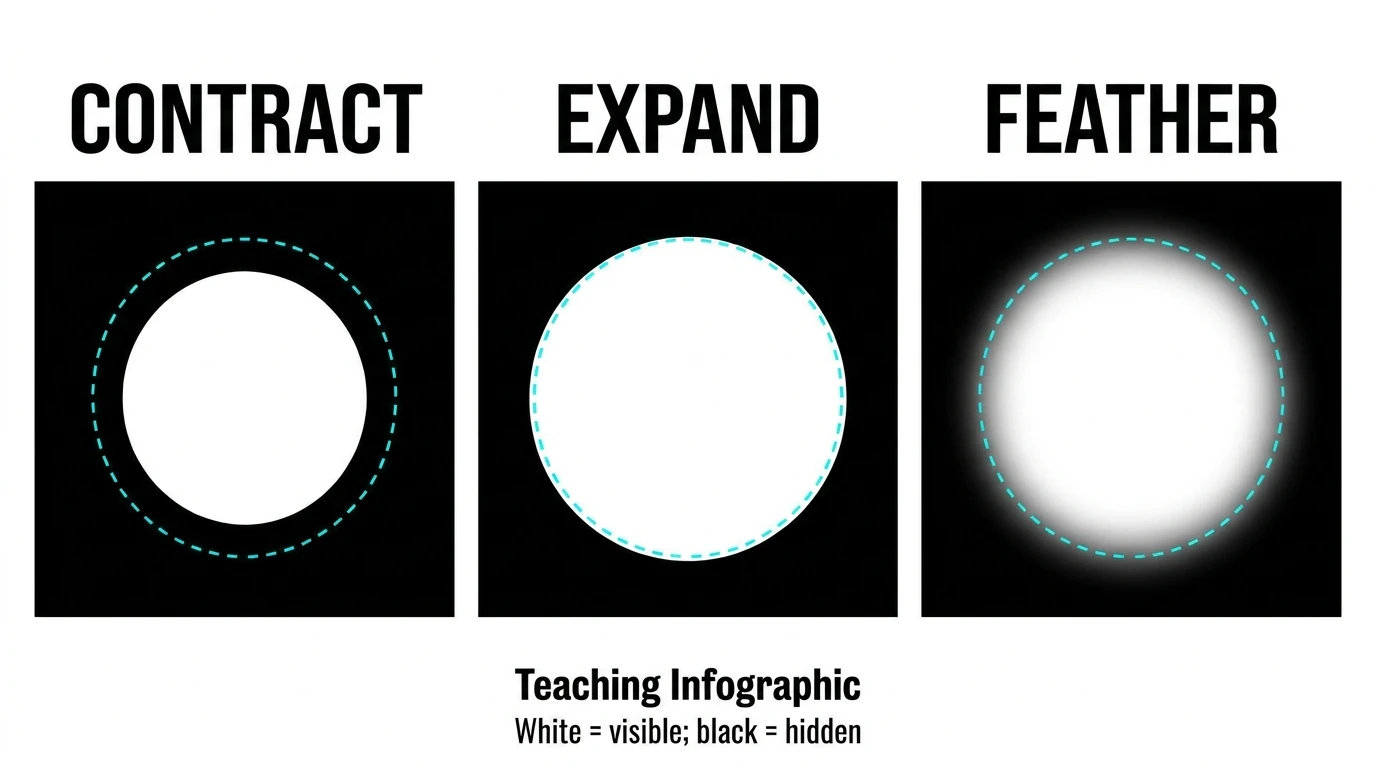
Use a restrained amount first. For example, a 1- or 2-pixel contraction can be a useful test when there is a narrow fringe, but it is not a universal setting. The same pixel amount has a different relative effect on a small image than on a much larger one.
Refinement runs after successful background removal and modifies the resulting mask. It does not repair an incorrectly identified subject. If one setting damages fine details while helping simpler objects, separate those image groups instead of forcing one treatment across everything.
5. Decide Whether Already-Transparent Images Should Be Skipped
Enable Skip Images Containing Transparency when the source folder includes finished transparent assets that should remain untouched.
The plugin checks the prepared working image for transparency before attempting background removal. If it detects transparency, that image is skipped completely: there is no removal, refinement, cropping, normalization, or export. The source document is closed without saving, and processing continues with the next file.
This setting is appropriate when a mixed folder contains raw photographs alongside already-completed cutouts. It avoids unnecessary processing without requiring you to separate every transparent asset manually.
Leave it disabled if already-transparent images still need a new exported derivative from this operation. A transparent PNG that needs a standardized canvas will not receive that canvas if the skip option bypasses it.
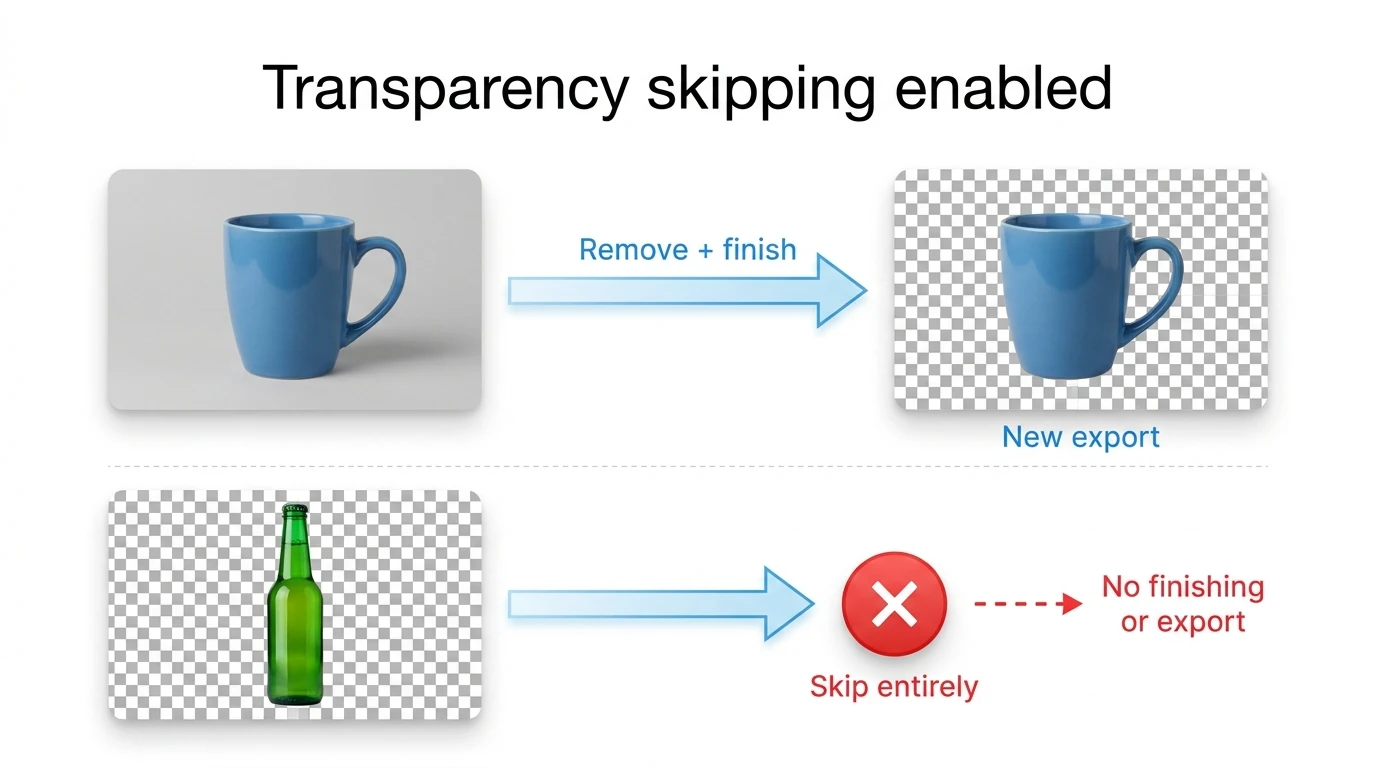
Also distinguish transparency from a finished cutout. An image can contain transparent areas and still have unwanted background content. The checkbox detects transparency; it does not judge whether the image is ready for delivery.
6. Choose Tight Cropping or a Standardized Canvas
Background removal is often followed by another repetitive task: preparing the canvas for its destination. Configure that step before the batch so you do not have to reopen every export.
Bulk Background Remover offers Crop To Remaining Pixels and Normalize Output Size. These settings are mutually exclusive because normalization already begins by trimming the transparent outer canvas.
Use Crop To Remaining Pixels for tightly bounded assets
This option removes fully transparent space from the top, bottom, left, and right of the cutout. It does not resize the subject, add padding, or force a particular aspect ratio.
Choose it when the goal is a compact transparent asset with minimal empty canvas. Different subjects will generally produce different output dimensions.
Use pixel normalization for exact output dimensions
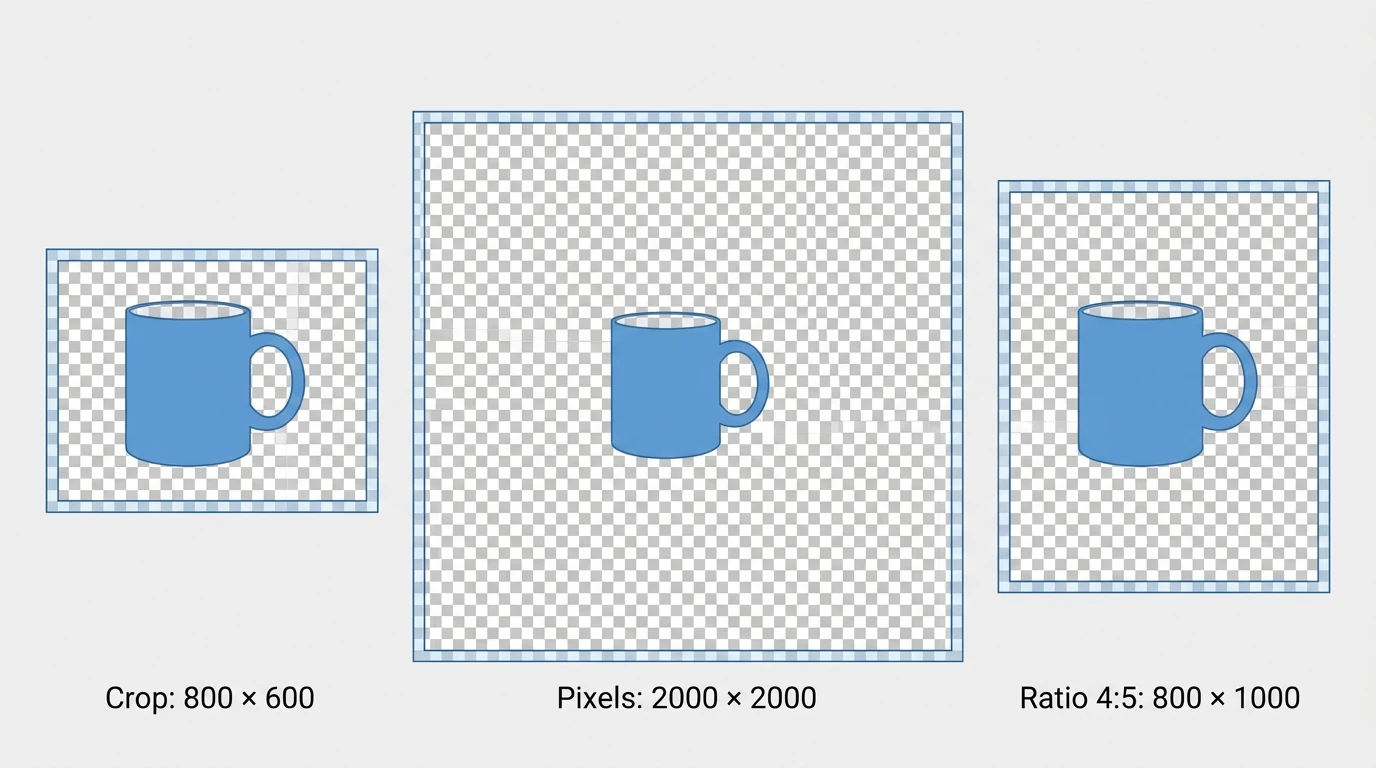
Choose Normalize Output Size, select px, and enter the required Width and Height. For example, 2000 × 2000 creates an exact square canvas suitable for a consistently sized product-image set.
The plugin first trims transparency. If the cutout is too large for the requested canvas, it scales down proportionally until it fits. Smaller cutouts are not enlarged.
An 800 × 600 cutout placed on a 2000 × 2000 canvas therefore remains 800 × 600, surrounded by transparent space. Exact canvas dimensions do not mean every subject becomes the same size.
Use ratio normalization when canvas shape matters
In ratio mode, Width and Height describe proportions rather than literal pixel dimensions. Entering 4 and 5 requests a 4:5 canvas.
The plugin trims the cutout and expands whichever canvas dimension is necessary. It does not crop visible subject pixels, distort the subject, or resize it merely to achieve the ratio. Outputs can share the same shape without sharing identical pixel dimensions.
For either normalization mode, select one of nine alignment positions. Center / Center suits many general cutouts; Center / Bottom is useful when products should share a consistent lower edge. Choose the alignment now rather than repositioning every subject afterward.
7. Configure Export and Naming Before the Full Run
Choose the output format according to how the cutouts will be used. The plugin supports PNG, TIFF, PSD, PSB, and WebP export. JPEG is not an output option.
PNG is a straightforward choice for transparent assets. Its Quality control changes compression behavior rather than introducing JPEG-style loss of detail. WebP uses lossy compression with the selected 0–100 Quality value, so inspect a test export when balancing file size and appearance.
Next, build a filename that will remain useful across the entire folder. The default includes the original image name and a background-removed label. You can also include final dimensions, the removal method, export format, or Quality.
For example, combining the original name, background-removed, and final dimensions could produce:
blue-mug-background-removed-2000x2000.png
Dimension components use the actual final document size after cropping or normalization, making them useful for checking which derivative you are looking at.
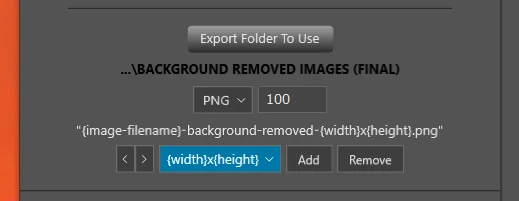
The plugin adds numbered suffixes when an output name already exists rather than overwriting that existing derivative. For test-to-production work, a fresh final export folder also helps keep experimental outputs separate from approved settings.
8. Start the Batch and Monitor It Without Editing the Sources
Once the test results are satisfactory, select the full source folder, verify the export destination, and click Remove Image Backgrounds.
During processing, the plugin displays a progress modal with a status area, progress bar, completed-image counter, and Cancel Operation button. You can also cancel with Escape while that modal is displayed.
Do not interpret progress as a count of newly exported cutouts in every situation. An image skipped because it already contains transparency still counts as completed progress, even though no derivative is exported.
The original source files are preserved by the normal workflow. Processing occurs in opened Photoshop documents, derivatives are saved separately, and the source documents are closed without saving.
There is an important distinction for layered files: the plugin merges visible layers during preparation. PSD and PSB exports preserve the processed working result, not the source document’s original multilayer composition. Keep the originals as your editable masters.
After the run, review the exported assets for missing subject details, unwanted background remnants, and incorrect framing. Automation reduces repeated handling; it does not replace visual quality control.
9. Apply the Workflow to a 300-Image Product Folder
Consider a hypothetical folder containing 300 product images. Forty are already-transparent assets that need no further work, while the remaining 260 still need backgrounds removed. The required delivery is transparent PNGs on 2000 × 2000 canvases, aligned at the bottom.
A practical configuration would be:
- Background Removal Method: Select Subject & Remove Inverse.
- Skip Images Containing Transparency: enabled.
- Refine Remaining Selection: enabled only if the test demonstrates a useful shared adjustment.
- Normalize Output Size: 2000 × 2000, using px.
- Alignment: Center / Bottom.
- Export filetype: PNG.
- Filename components: original image name, background-removed, and final dimensions.
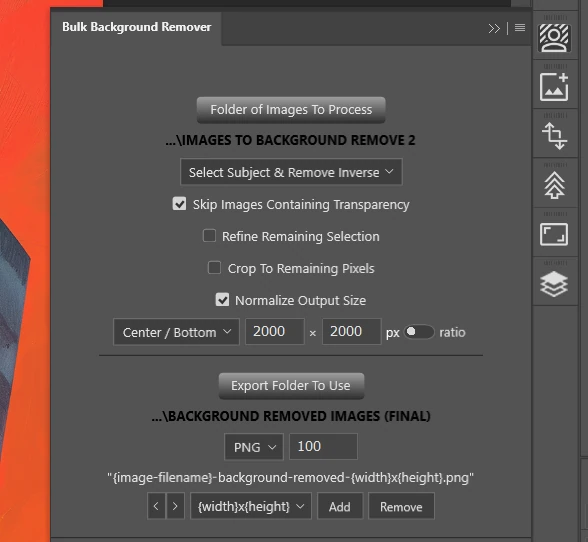
First, test representative products in a separate folder. If a small contraction removes a consistent fringe without damaging the products, use that setting for the relevant image group. Otherwise, keep refinement off or separate images that need different treatment.
During the full operation, the 40 transparent images are bypassed without export. The other 260 enter the removal workflow. Successfully processed cutouts are trimmed, reduced proportionally if necessary, placed on the square canvas, bottom-aligned, and exported.
The avoided work extends beyond 260 background-removal clicks. You also avoid manually creating each square canvas, positioning each product, entering each output name, and closing each source document. No fixed time saving can be promised, but the repeated tasks removed from the operator are clear.
10. Save the Configuration for the Next Job
Once a configuration produces the results you need, enter an Operation Name and click Save. Use a descriptive name such as “Product PNG 2000 Square Bottom Aligned” so the intended output is obvious later.
Saved operations retain the removal method, transparency-skip setting, refinement, crop or normalization settings, alignment, export format, Quality, filename components, and source and output folder references.
When the next job arrives, select the saved operation and click Load. Verify the folders before running it: a reusable configuration can restore the previous job’s locations, so select a new source or destination when necessary.
You can keep separate saved operations for genuinely different deliverables, such as tightly cropped transparent PNGs and standardized square product images. That avoids rebuilding the same configuration each time without pretending every image set needs identical treatment.
To put this approach into practice, install Bulk Background Remover: Automated Cutouts through Adobe Exchange and start with a small representative folder. Choose an interruption-resistant removal method, approve the finishing settings, and save the workflow. The useful speed improvement is turning repeated file-by-file work into a configured batch that leaves your attention available for the images that actually need it.