How To Upscale Multiple Images At Once In Photoshop

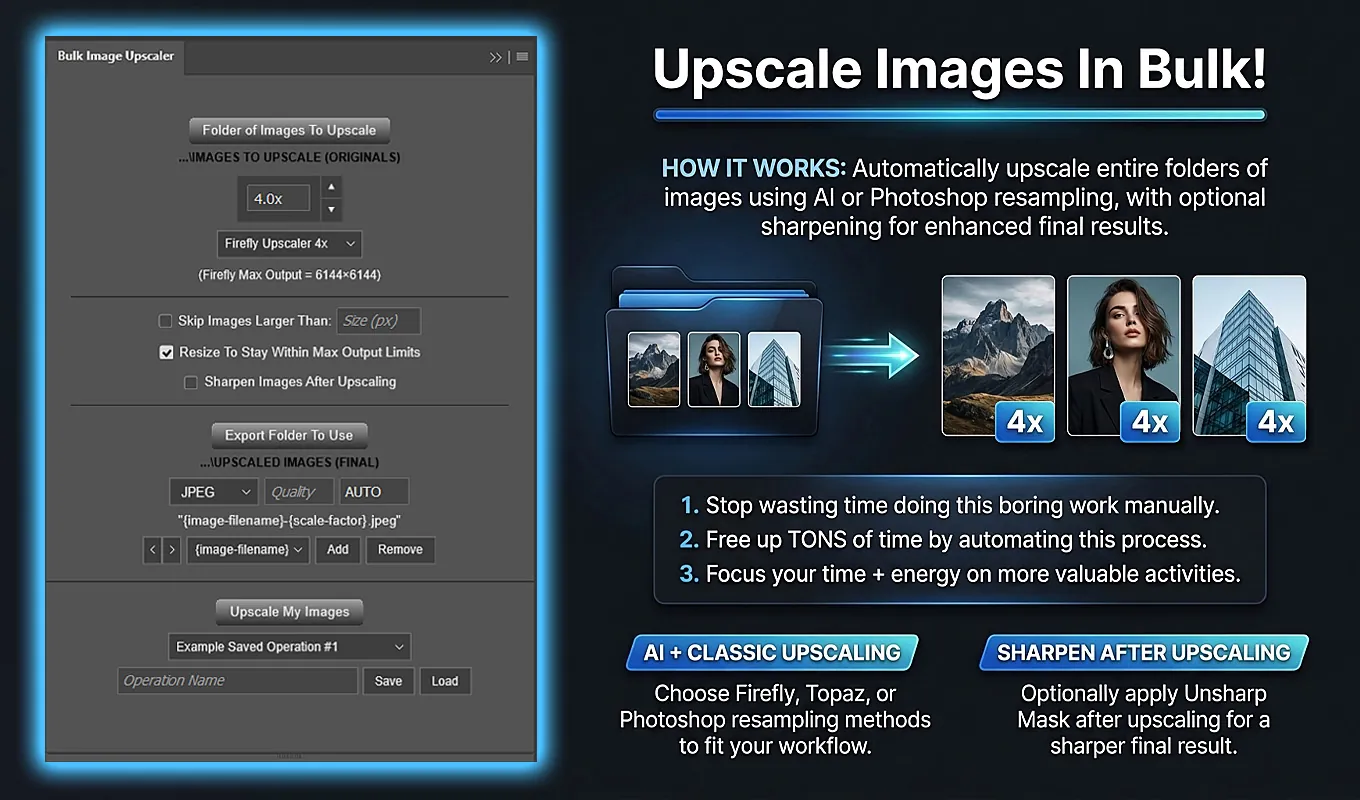
To upscale multiple images at once in Photoshop, use Bulk Image Upscaler: Batch-Enhance Resolution to run a folder-wide batch. Select your source folder, choose an upscaling method and enlargement factor, configure the export settings, and click Upscale My Images. The plugin handles the repeated opening, enlarging, exporting, and closing for you.
Bulk Image Upscaler is a third-party Photoshop plugin that supports both AI generative upscaling and traditional Photoshop resampling. You submit the images as one batch, and the plugin processes them one after another. It exports new files rather than saving the enlarged results over your originals.
1. The Quick Workflow for Upscaling a Folder of Images
If you already have Bulk Image Upscaler installed, this is the basic procedure:
- Open Bulk Image Upscaler from Photoshop’s Plugins menu.
- Click Folder of Images To Upscale and select the folder containing your source images.
- Choose an Upscaling Method. Select a 2× or 4× AI method, or choose a standard Photoshop method and enter a scale factor from 1.1× to 25.0×.
- Configure any applicable method settings. Optionally enable source-size skipping or post-upscale sharpening.
- Click Export Folder To Use, choose the destination folder, and set the export format, Quality, and DPI where applicable.
- Choose the filename components you want included in the exported filenames.
- Click Upscale My Images. For an AI method, acknowledge the Generative Credits confirmation before processing begins.
This replaces the manual cycle of opening an image, configuring Photoshop’s enlargement settings, exporting it, closing it, and repeating those steps for every remaining file. The main work becomes choosing the right settings once.
2. Install and Open Bulk Image Upscaler in Photoshop
Find Bulk Image Upscaler: Batch-Enhance Resolution in Adobe Exchange or Adobe’s Creative Cloud plugin marketplace. Acquire and install it through Adobe’s plugin installation process, allowing the Creative Cloud desktop application to complete the installation.
Open or restart Photoshop if necessary, then access the installed plugin from the Plugins menu. Adobe controls the installation dialogs, so their exact appearance can vary between Creative Cloud versions.
If you plan to use Firefly, Topaz Gigapixel, or Topaz Bloom, your installed Photoshop version must support the Generative Upscale functionality those methods use. The plugin checks for that support before allowing an AI operation to run. Its standard resampling methods use Photoshop’s traditional Image Size functionality instead.
3. Understand What an Upscale Factor Actually Changes
A scale factor multiplies both pixel dimensions of an image. A 2× enlargement doubles the width and doubles the height; it does not merely double the total pixel count.
- A 1200 × 800 image enlarged at 2× becomes 2400 × 1600 pixels.
- The same image enlarged at 4× becomes 4800 × 3200 pixels.
- At a custom 1.5× factor, it becomes 1800 × 1200 pixels.
Because width and height increase together, the image’s aspect ratio is preserved. A 2× result contains four times as many pixels as the original, while a 4× result contains sixteen times as many.
DPI is a different setting. Pixel dimensions describe how many pixels the image contains; DPI describes the relationship between those pixels and physical output size. A larger DPI number is not, by itself, evidence that an image contains more useful detail.
For this batch workflow, choose the enlargement factor according to the pixel dimensions you need. Standard methods let you specify DPI separately. AI methods keep the DPI field fixed to AUTO.
4. Prepare the Source Folder the Plugin Will Read
Place the images you want to enlarge directly inside one source folder, then select it with Folder of Images To Upscale. The plugin does not recursively search nested subfolders. If some of your images are inside additional folders, they will not be included in that folder’s batch.
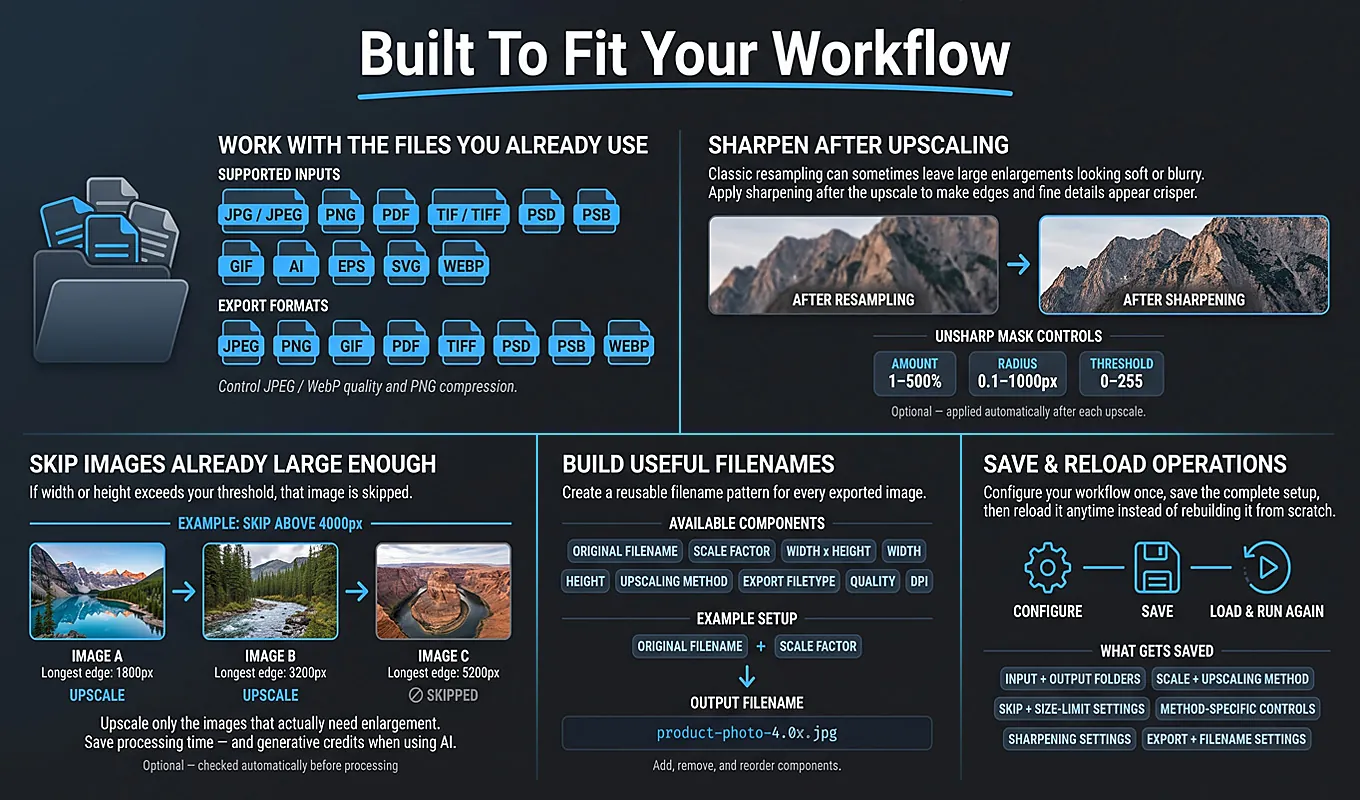
Supported inputs include JPEG, PNG, TIFF, PSD, PSB, GIF, WebP, PDF, AI, EPS, and SVG files. Unsupported extensions are ignored. If the selected folder contains no supported files, the operation does not proceed.
The plugin reads the current folder contents immediately before processing, not when you first select the folder. This is useful when you are still assembling a batch: files added after folder selection can be included when the operation starts. Conversely, files removed before the run are no longer part of that batch.
For a straightforward setup, use a separate export folder. Keeping incoming images and finished outputs apart makes it easier to confirm what was processed and review the resulting files.
5. Choose Between AI Upscaling and Standard Photoshop Resampling
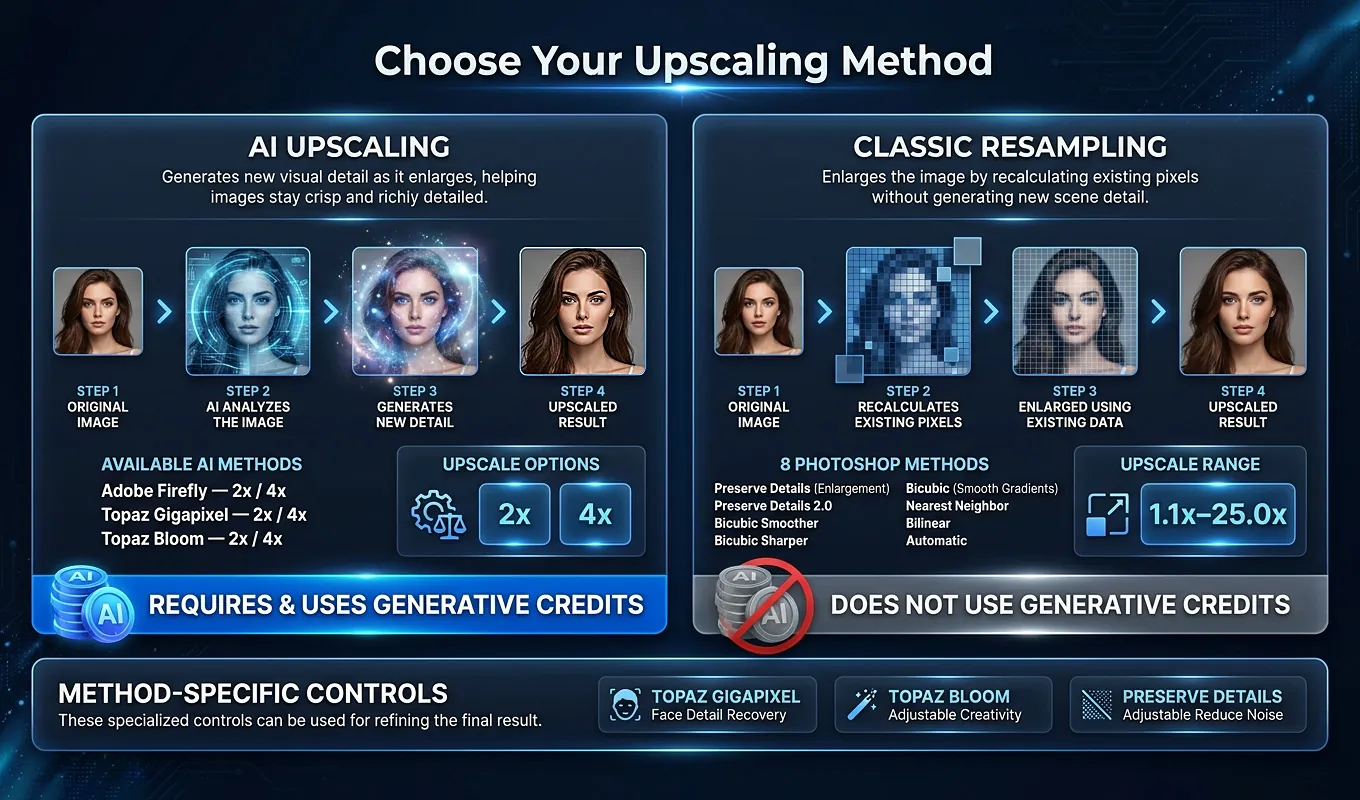
The most important configuration decision is the upscaling method. Bulk Image Upscaler offers six AI choices and eight standard Photoshop resampling choices, but you do not need to evaluate all fourteen individually for every batch.
Choose an AI method for a generative 2× or 4× workflow
The AI options are Firefly Upscaler, Topaz Gigapixel, and Topaz Bloom, each available in 2× and 4× variants. Selecting a variant automatically synchronizes the scale-factor control with its required multiplier.
- Firefly Upscaler provides 2× and 4× enlargement without an additional method-specific control in this plugin.
- Topaz Gigapixel adds an optional Face Detail Recovery checkbox, relevant when your batch contains portraits or other images of people.
- Topaz Bloom exposes Creativity from 0 through 10, allowing you to configure that model-specific parameter.
These methods use Photoshop’s Generative Upscale functionality and require a Generative Credits acknowledgement. The default selected method is Firefly Upscaler 2x, so change it before running if you intend to use another method.
Choose a standard method for a custom enlargement factor
If you need an exact multiplier such as 1.7×, 2.5×, or 6.0×, select a standard Photoshop resampling method. These accept factors from 1.1× through 25.0× with one decimal place, and the arrows adjust the factor in 0.1× increments.
Preserve Details (Enlargement), Preserve Details 2.0, and Bicubic Smoother (Enlargement) are available enlargement-oriented choices. Both Preserve Details methods expose a Reduce Noise setting from 0 through 100. Nearest Neighbor (Hard Edges) is also available for work where retaining hard pixel boundaries matters.
The practical decision rule is simple: use a standard method when you need a custom multiplier or want enlargement without Generative Credits. Use an AI method when you specifically want a Firefly, Gigapixel, or Bloom generative workflow at 2× or 4×.
6. Let the Plugin Resolve AI Output-Size Limits
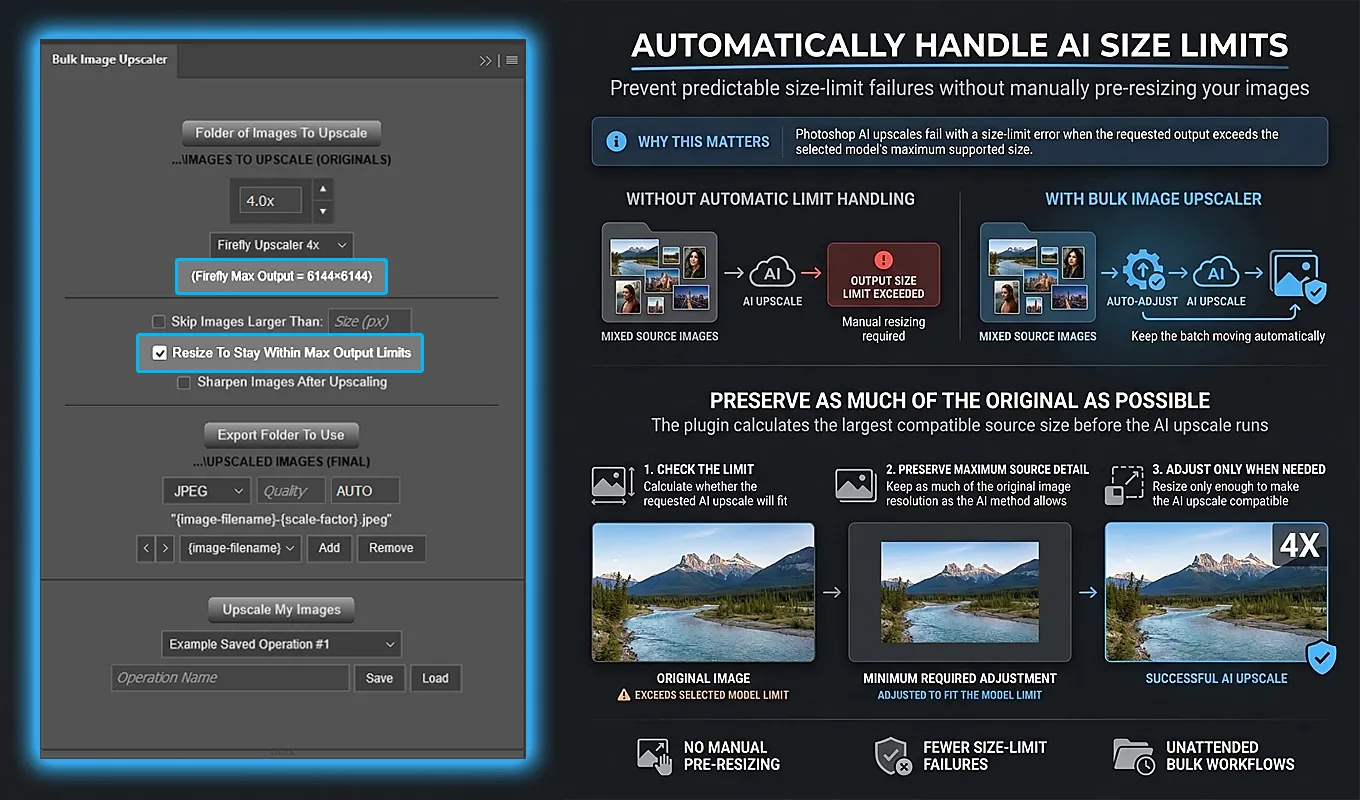
A mixed folder can contain images that fit a model’s limits and others that would become too large at the requested factor. Bulk Image Upscaler handles that situation with Resize To Stay Within Max Output Limits, which remains enabled for AI workflows.
The limits differ by model:
- Firefly: the output must remain within 6144 pixels in both width and height.
- Topaz Gigapixel: the output must remain within 56,000,000 total pixels.
- Topaz Bloom: the output must remain within 9,000,000 total pixels.
The Topaz constraints are total-pixel limits, not universal per-side limits. A non-square image is evaluated by its total output pixel count.
If the requested enlargement fits, the plugin leaves the source dimensions and selected scale unchanged. If a 4× request would exceed the limit, it can switch that image to the corresponding 2× method when doing so preserves more original source information.
If even 2× would exceed the limit, the plugin proportionally reduces the source just enough for the 2× operation to fit. That preliminary resize uses Photoshop’s Bicubic interpolation and preserves aspect ratio.
This means selecting 4× does not guarantee that every exported file will measure four times its original dimensions. The automatic handling prioritizes retaining source information while staying within the model’s constraints, rather than forcing every image through a nominal 4× operation.
7. Skip Images That Are Already Large Enough
When a folder contains both small and already-large images, you may not want every file enlarged. Skip Images Larger Than gives you a direct way to control which sources enter the upscaling stage.
Enable the checkbox and enter a Size (px) threshold. The setting checks the original source dimensions: if either width or height exceeds the threshold, that image is skipped.
For example, with a threshold of 5000 pixels:
- A 4000 × 3000 source is processed.
- A 3000 × 6000 source is skipped.
- A 7000 × 2000 source is skipped.
The threshold effectively acts as a maximum source longest-edge size. It accepts an integer from 1 through 100,000, and entering a valid size automatically enables the checkbox.
This is separate from AI output-limit handling. Skipping means you deliberately do not upscale that source. Output-limit handling means the plugin adapts an image you do want processed so the selected AI family can handle it. For AI batches, source-size skipping can also avoid unnecessary generative processing of files that are already large enough.
8. Include Post-Upscale Sharpening When You Need It
If your normal Photoshop routine includes sharpening after enlargement, enable Sharpen Images After Upscaling. The plugin applies Photoshop’s Unsharp Mask after the upscale and before export, so you do not need to reopen every result for a separate sharpening pass.
Enabling the checkbox reveals three controls:
- Amount (%): an integer from 1 through 500.
- Radius (px): 0.1 through 1000, with up to one decimal place.
- Threshold (#): an integer from 0 through 255.
Sharpening is available with both AI and standard methods, and it is off by default. It is optional, not a required part of upscaling.
If you have not established sharpening settings for this type of image, begin with a representative test batch rather than choosing aggressive values for the entire collection. Use the same output size and export settings you intend to use for the full run when judging the result.
9. Set the Export Format, Quality, and DPI
Click Export Folder To Use and choose where the finished images should be saved. Outputs are written directly into that folder; there is no output-subfolder organization selector.
Choose the delivery format according to how the enlarged files will be used:
- JPEG is a practical choice for photographic delivery when lossy compression is acceptable.
- PNG provides lossless output.
- WebP uses lossy compression with the configured Quality value.
- TIFF, PSD, and PSB are available when those formats are required for delivery or further Photoshop work.
GIF and PDF export are also supported. JPEG is the default selected format.
The Quality field accepts an integer from 0 through 100 for JPEG, PNG, and WebP. For PNG, this controls compression behavior; PNG remains lossless. For GIF, PDF, TIFF, PSD, and PSB, the plugin fixes Quality to 100 because those export pathways do not use its adjustable quality control in the same way.
With a standard resampling method, enter a DPI value from 1 through 1500. With an AI method, leave the fixed AUTO setting in place. If the files are intended for print, confirm that their final pixel dimensions support the intended physical size rather than relying on the DPI label alone.
10. Give the Exported Files Useful Names
The default filename format combines the source filename with the scale factor. For example, photo-001.png could produce photo-001-2.0x.jpg when exported as JPEG at 2×.
For a mixed-size batch, adding final dimensions makes the results easier to identify. Use the filename builder to add and arrange these components:
- {image-filename}
- {scale-factor}
- {width}x{height}
That combination can produce a filename such as photo-001-2.0x-2400x1600.jpg. Components are joined with hyphens, and the builder’s movement arrows let you change their order.
The values describe the actual result. If automatic AI limit handling changes a requested 4× operation to 2×, the scale-factor component reflects 2.0x. Width and height likewise reflect the final exported dimensions.
The plugin also handles existing output names by adding numbered suffixes, such as photo-001-2.0x (1).jpg, instead of unintentionally overwriting an earlier export. Generated names are sanitized, and overly long names are shortened when necessary.
11. Example: Upscale 40 Product Photos in One Batch
Suppose you have 40 product photographs and want enlarged JPEG versions. The folder contains 30 images at 1200 × 800 pixels, eight at 2000 × 1500 pixels, and two at 6000 × 4000 pixels. You want strong enlargement for the smaller images but do not need to enlarge the two largest sources.
Configure the operation as follows:
- Select the folder containing all 40 photographs.
- Choose Firefly Upscaler 4x. The scale-factor control automatically becomes 4.0x.
- Enable Skip Images Larger Than and enter 5000 pixels.
- Keep Resize To Stay Within Max Output Limits enabled.
- Leave post-upscale sharpening off for this initial run.
- Select a separate export folder, choose JPEG, and set Quality to 90. DPI remains AUTO.
- Build filenames from {image-filename}, {scale-factor}, and {width}x{height}.
- Click Upscale My Images and acknowledge the Generative Credits confirmation.
The 30 smaller photographs fit Firefly’s limit at 4×, producing 4800 × 3200 outputs. Their names can look like mug-front-4.0x-4800x3200.jpg.
The eight 2000 × 1500 photographs would become 8000 × 6000 at 4×, exceeding Firefly’s maximum width. A corresponding 2× operation fits without reducing those sources, producing 4000 × 3000 outputs. Their names can look like lamp-side-2.0x-4000x3000.jpg.
The two 6000 × 4000 sources are skipped because their longest edge exceeds the 5000-pixel source threshold. The example therefore produces 38 enlarged files, with filenames showing which scale factor each processed image actually used.
12. Run the Batch, Track Progress, and Reuse the Setup
Before processing begins, the plugin validates the configuration, including the selected folders, method, scale factor, export settings, filename components, and any enabled method-specific controls.
For AI operations, the Confirm Before Proceeding dialog requires an active checkbox acknowledgement that Generative Credits will be used. Credit use can depend on the selected model, operation settings, and number of images. The operation does not begin if you cancel that confirmation.
During the run, the Upscaling Your Images... progress modal displays status text, a progress bar, a completed-image count, and important updates. The plugin opens a source, applies the configured workflow, exports the result, closes the source document without saving, and continues to the next file.
You can cancel with Cancel Operation or the Escape key. Cancellation is checked between major processing stages; Photoshop can temporarily block normal plugin interaction while a generative command is executing.
For recurring work, enter an Operation Name and click Save once you have a configuration worth reusing. Saved operations retain the folders, method, scale, relevant controls, sharpening, export settings, and filename components. Select the saved operation and click Load for a future batch. If a saved folder can no longer be restored, the plugin asks you to choose it again.
13. Prevent the Mistakes That Spoil a Batch Upscale
A batch repeats your choices efficiently, so it is worth checking those choices before applying them to a large collection. The most useful safeguards are specific to how folder-wide upscaling works:
- Test representative images first. Use a small folder containing the kinds of files you will process, including different sizes or image types where relevant. Review faces, text, fine edges, and sharpening before committing to the larger batch.
- Do not expect identical output dimensions from different-sized sources. A shared multiplier preserves their relative dimensions; it does not make every image the same width and height. AI limit handling can also change the effective factor for individual files.
- Separate batches that need different treatment. One operation uses one primary method and scale configuration. If some files need Gigapixel Face Detail Recovery while others need a specific standard multiplier, configure separate operations.
- Check the source folder if nothing processes. Supported images must be directly inside the selected folder, and both source and export folders must still exist and be accessible. At least one filename component must also remain.
- Judge image quality, not just file size. More pixels do not guarantee that blur, compression damage, or missing detail has been convincingly resolved. Inspect the exported results before using them in a final deliverable.
For your first full batch, keep the setup simple: choose a method, confirm the enlargement factor, export to a separate folder, and include final dimensions in the filenames. Once the results meet your needs, save the operation. Bulk Image Upscaler then gives you a repeatable way to enlarge multiple images in Photoshop without manually performing the same open, upscale, export, and close sequence for every file.