What Is Unsharp Mask And How Does It Work?
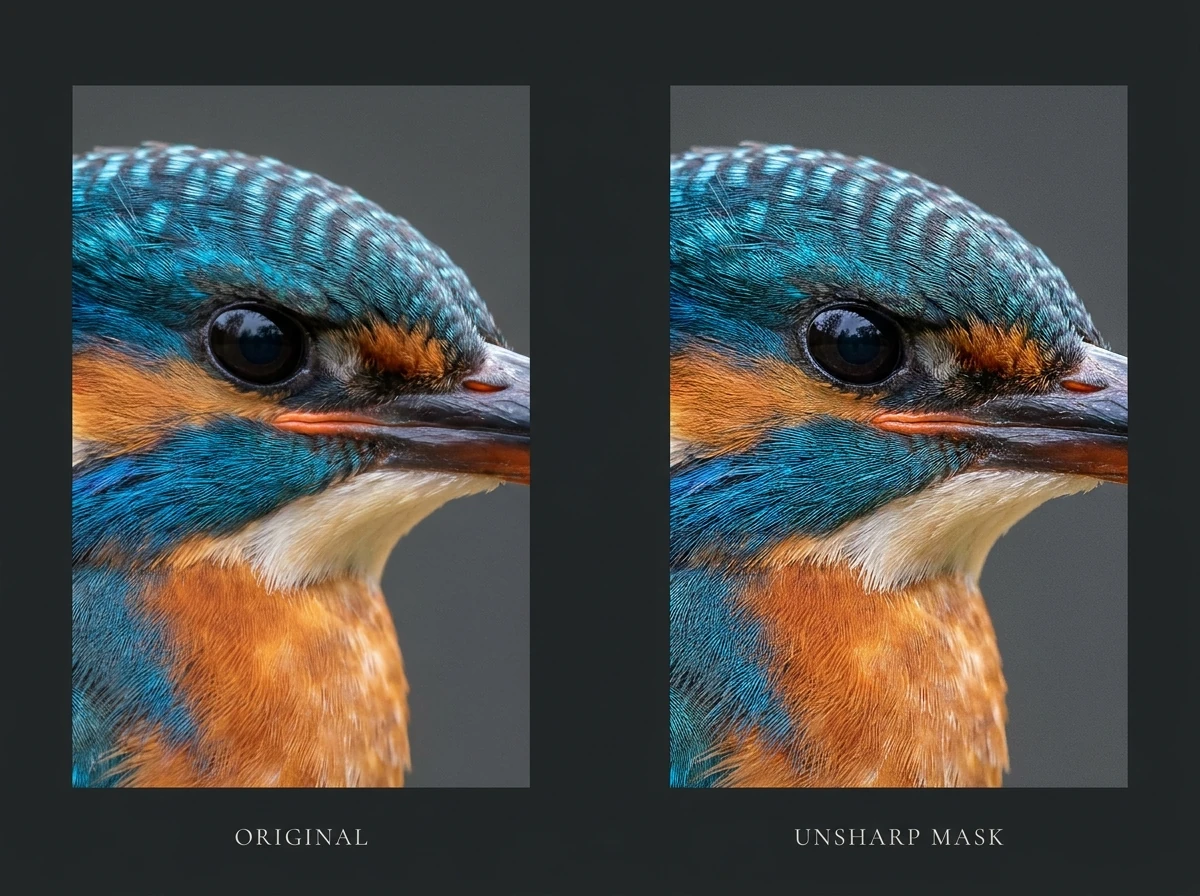

Unsharp Mask is a sharpening filter that makes existing edges look more defined by increasing their local contrast. It compares an image with a blurred version of itself, extracts the difference, and adds a controlled amount of that difference back to the original.
That single operation explains almost everything about the filter: why it can make eyelashes and fine lettering look crisper, why it can exaggerate noise, and why pushing it too far produces bright outlines instead of convincing detail. Its three controls—Amount, Radius, and Threshold—determine the strength, scale, and selectivity of that contrast enhancement.
1. Why a sharpening filter is called “Unsharp Mask”
The name describes an intermediate step, not the finished result. The filter uses an unsharp, or blurred, version of the image to calculate what should be emphasized.
The terminology comes from photographic darkroom work. A slightly out-of-focus negative mask was precisely aligned with the original transparency to change contrast, including contrast near edges. Imatest’s explanation of sharpening connects that photographic process to digital unsharp masking and includes edge-response illustrations that make the effect easier to visualize.
Imagine a dark roof against a bright sky. Sharpening can make the roof slightly darker immediately beside the boundary and the sky slightly brighter immediately beside it. The stronger transition makes the edge appear more definite.
This improves apparent sharpness, sometimes called acutance. It does not increase the image’s pixel dimensions or recreate detail that was never recorded. A slightly soft photograph may become more convincing; a badly missed focus point does not become a correctly focused photograph simply because its remaining edges have stronger contrast.
2. Follow the calculation at one edge
The basic, unthresholded operation has three stages:
- Create a blurred version of the original image.
- Subtract that blurred version from the original to obtain a detail signal.
- Multiply the detail signal by a strength factor, then add it back to the original.
Written as a simplified equation:
Sharpened image = original + strength × (original − blurred original)
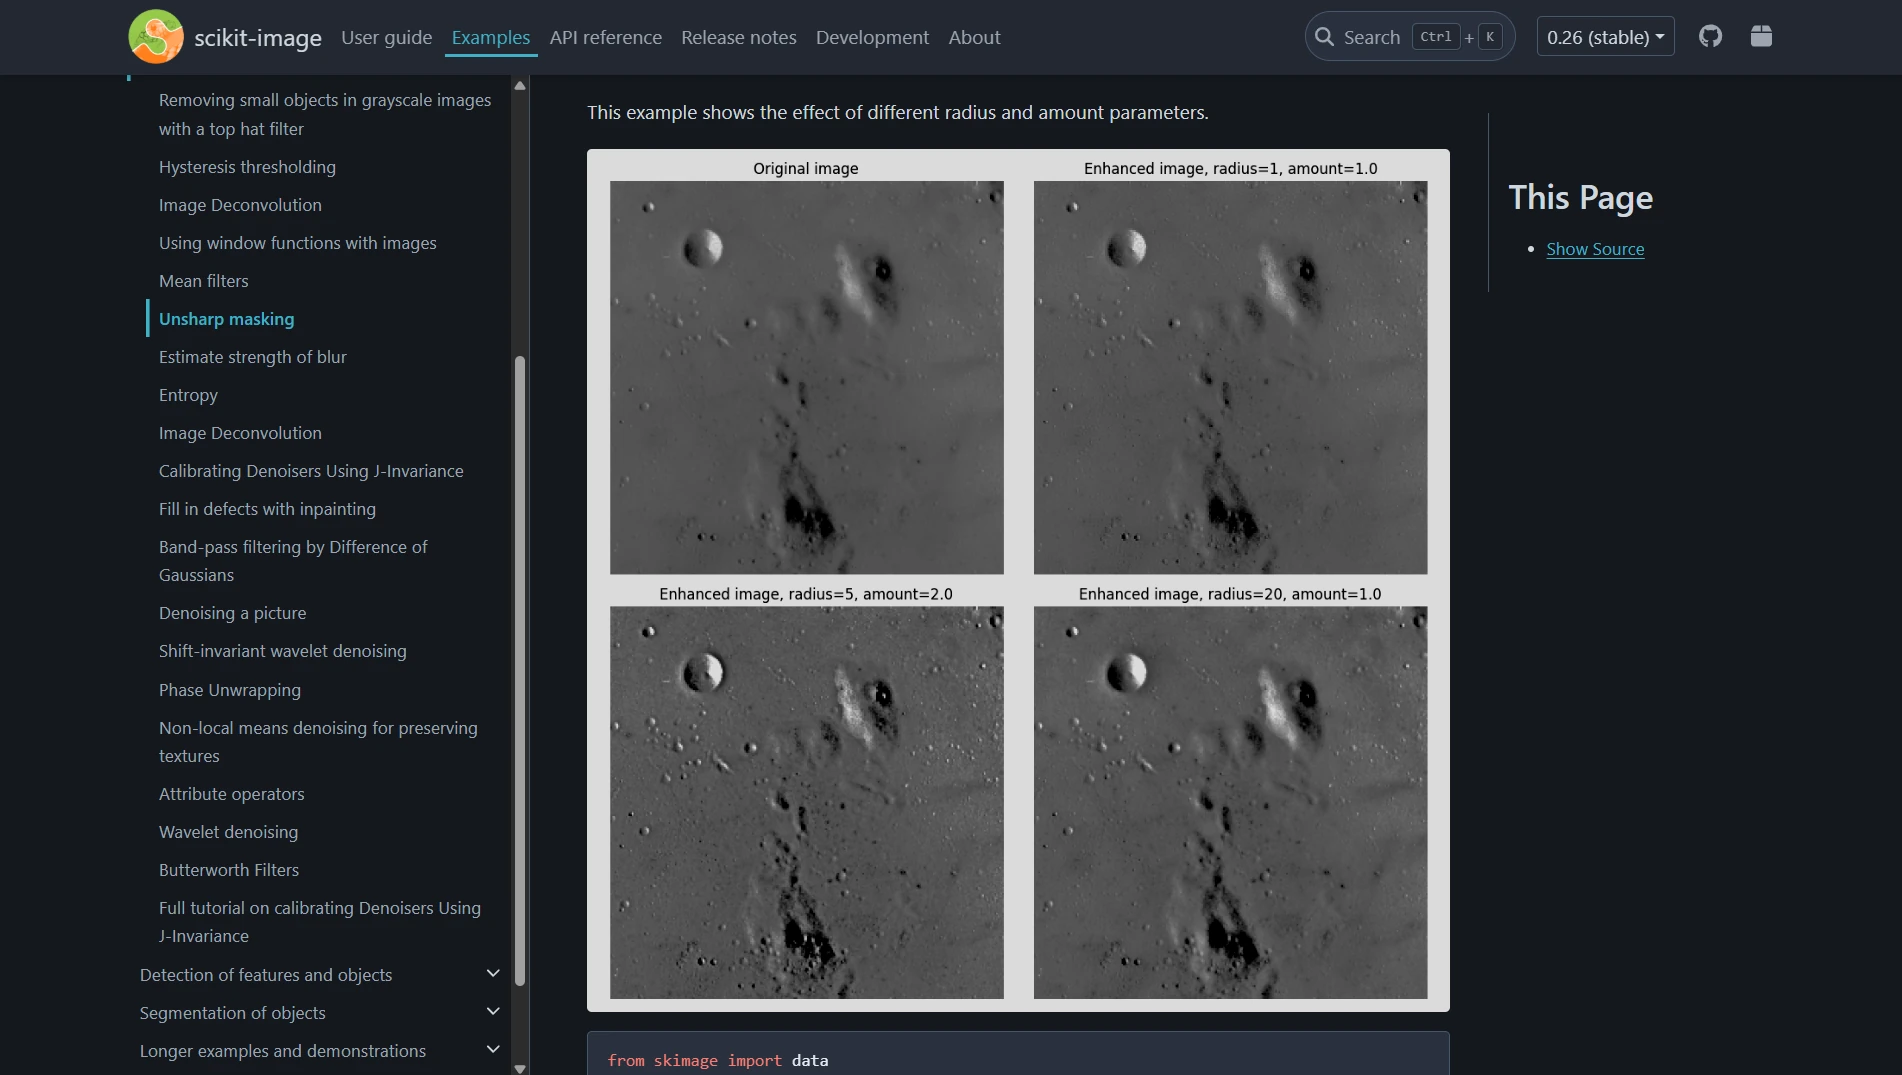
The scikit-image unsharp-masking example illustrates this calculation with several combinations of radius and strength. You do not need to run its code to compare the example images.
Here is a hypothetical grayscale example using values between 0 and 255. Consider two pixels on opposite sides of an edge:
- On the dark side, the original value is 60, while the blurred version is 80. The difference is −20. Adding that difference back at a strength of 1 produces 40.
- On the light side, the original value is 180, while the blurred version is 160. The difference is +20. Adding it back produces 200.
The original difference between those two pixels was 120 levels. After the adjustment, it is 160. The boundary has stronger contrast, even though no additional detail has been captured.
In a perfectly uniform area, the original and blurred values match, so their difference is zero. There is nothing to add back. Near an edge, the blurred copy spreads tonal values across the boundary, creating the positive and negative differences that drive sharpening.
The catch is that noise also creates differences between neighboring pixels. The calculation does not inherently know whether a tiny variation represents useful fabric texture or unwanted grain.
The “mask” here is that calculated detail signal. It is not a Photoshop layer mask that you must draw, and the blurred intermediate image does not replace the original.
3. The three controls: strength, scale, and selectivity
Photoshop’s Unsharp Mask filter exposes three controls. They solve different problems, so treating all three as interchangeable “more sharpness” sliders makes the filter unnecessarily difficult to use.
Amount: how strongly the difference is added back
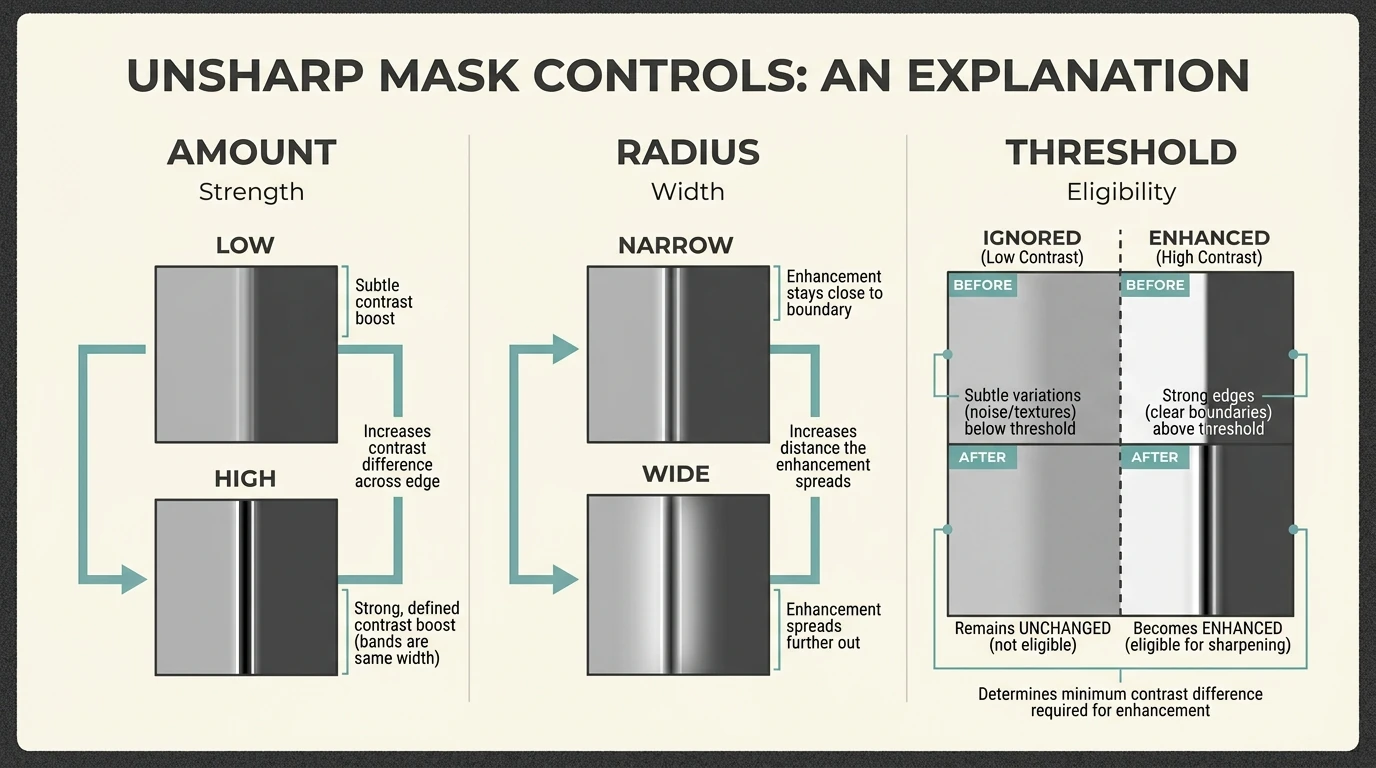
Amount controls the intensity of the edge-contrast adjustment. In the simplified equation, 100% corresponds to a strength factor of 1; 200% doubles the added detail signal.
It does not mean the photograph becomes “100% sharper.” There is no universal percentage of sharpness being measured. A high Amount can strengthen fine edges, but it can also make noise, existing outlines, and small tonal irregularities more conspicuous.
Radius: the spatial scale of the adjustment
Radius determines the scale of the blur used to calculate the detail signal and, consequently, how broadly the sharpening affects an edge.
A small Radius produces a narrow adjustment that can suit fine detail. A larger Radius spreads the adjustment farther from the boundary, producing broader light and dark bands.
This is why increasing Radius can make an image look more heavily outlined rather than more detailed. At sufficiently broad scales, the effect becomes more about local contrast than fine-detail sharpening.
Threshold: which tonal differences qualify
Threshold determines how different pixels must be from their surroundings before sharpening applies. Photoshop expresses it on a 0–255 scale.
At 0, low-contrast variations are not excluded by a threshold. Raising it protects more subtle variations while allowing stronger edges to receive sharpening.
This can help spare smooth skin or a quiet sky, but it can also exclude faint hair, delicate texture, and other useful detail. Threshold is not a subject detector, and it does not remove existing noise. It only changes which differences receive additional sharpening.
A useful shorthand is: Amount controls strength, Radius controls width, and Threshold controls eligibility.
4. Set up an editable Photoshop test
Learning Unsharp Mask is much easier when you can revisit the settings instead of repeatedly committing changes to the same pixels.
- Select the image layer you intend to sharpen. Clear any unintended selection if you want the filter to affect the whole layer.
- Right-click the layer in the Layers panel and choose Convert to Smart Object.
- Choose Filter > Sharpen > Unsharp Mask.
- Inspect an important detail at 100% zoom while adjusting the controls. Toggle Preview to compare the original and sharpened appearance.
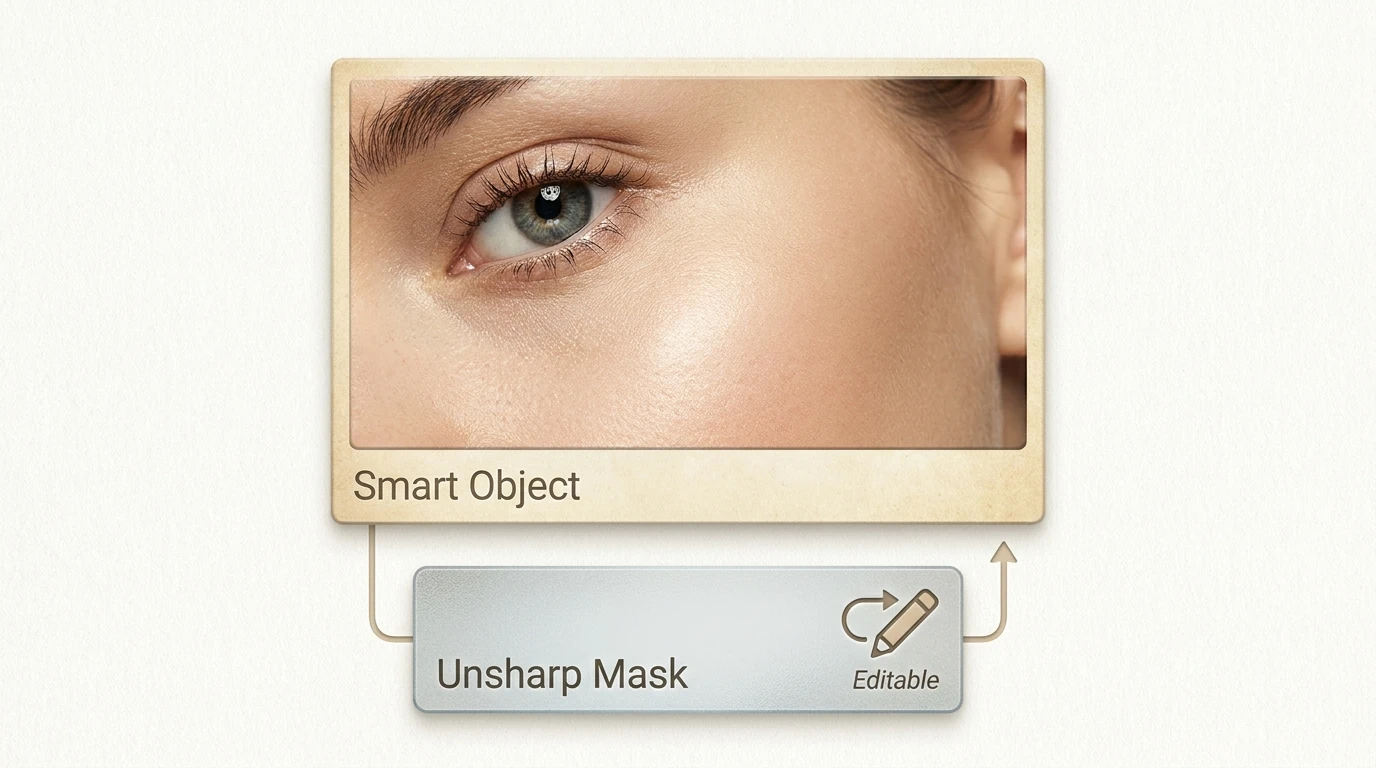
- Click OK. To revise the settings later, double-click the Unsharp Mask entry beneath the Smart Object.
Adobe’s guide to applying and managing Smart Filters explains how these editable filter entries work, including their visibility and blending controls.
A Smart Filter and Smart Sharpen are not the same thing. “Smart Filter” describes the editable way a filter is applied. “Smart Sharpen” is a separate sharpening filter. Unsharp Mask can itself be applied as a Smart Filter.
For this test, choose an image containing both something you want to emphasize and something you want to leave quiet: an eye beside skin, a building against sky, or a product edge beside a smooth background.
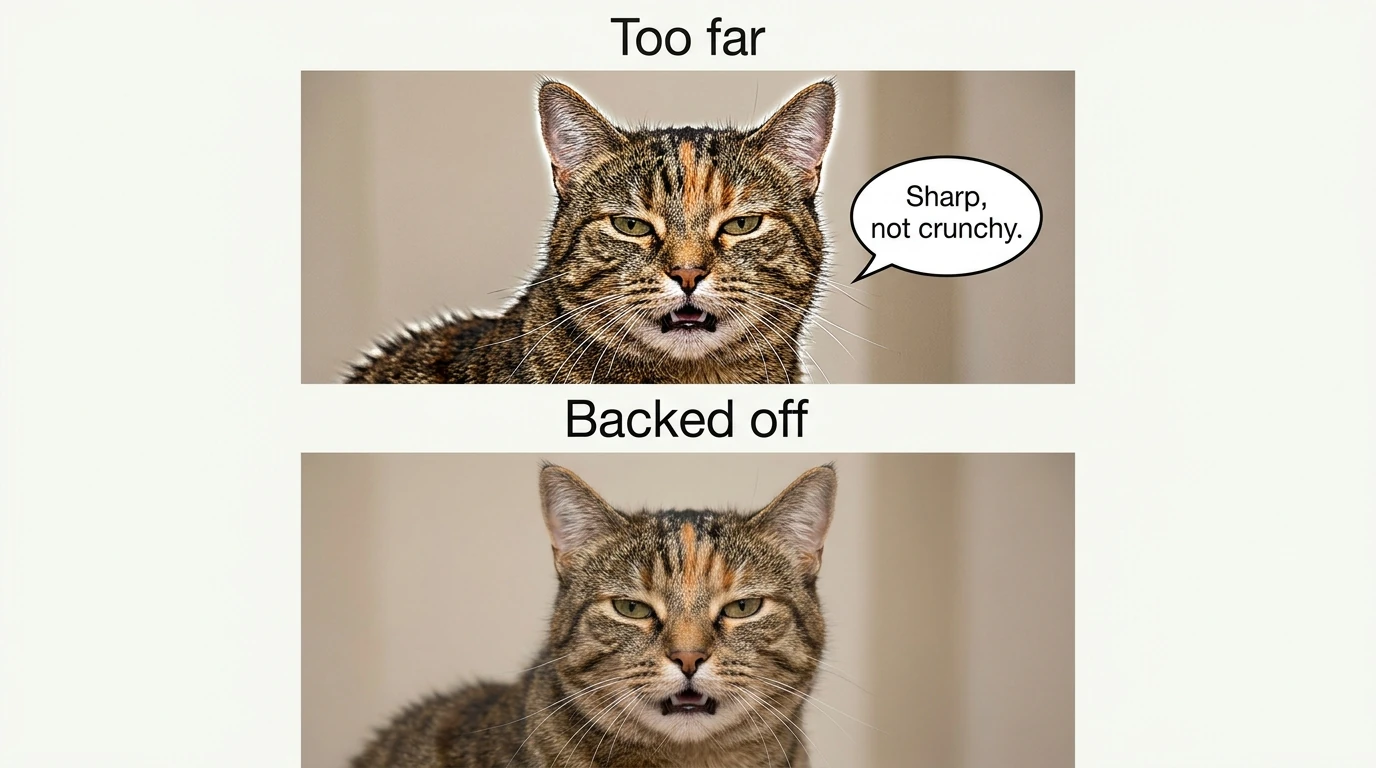
5. Find your settings by exaggerating, then backing off
A preset gives you numbers. A short controlled experiment teaches you what those numbers are doing.
For a learning exercise—not a universal finishing recipe—try Amount 100%, Radius 0.8 pixels, and Threshold 0. Then change one control at a time:
- Temporarily raise Amount to around 200% so the effect is obvious. This is a diagnostic setting, not necessarily the final one.
- Compare several small Radius values, such as 0.3, 0.6, and 1.2 pixels. Watch an edge rather than judging only the overall impression.
- Choose the Radius that strengthens the desired detail without creating an obvious border around it.
- Lower Amount until the enhancement looks believable.
- Raise Threshold a little at a time if smooth areas become gritty. Watch whether useful low-contrast detail disappears from the sharpening treatment.
Adobe demonstrates a similar exaggerate-and-reduce approach in its nondestructive sharpening tutorial, aiming for sharpening that is “visible, but natural looking at 100% view.”
Do not inspect only the strongest edge. Check fine detail, smooth areas, and a high-contrast boundary. A setting that flatters eyelashes may make nearby skin look harsh; one that adds attractive stone texture may damage the sky beside it.
Finally, switch Preview off for a moment, then on again. The question is not whether the processed version looks more dramatic. It is whether the subject looks more clearly defined without making the processing itself conspicuous.
6. When it looks worse, diagnose the artifact
Different sharpening problems call for different corrections. Lowering every control at once can hide the problem without teaching you what caused it.
- Bright or dark outlines appear around objects: reduce Radius first if the bands are too wide. Reduce Amount if their width is acceptable but their contrast is excessive.
- Skin, skies, or shadows become gritty: you are emphasizing unwanted variations along with detail. Try less Amount, a modest Threshold increase, or selective masking.
- Fine texture looks brittle or etched: reduce Amount and compare a smaller Radius. Also check whether the image already had substantial sharpening before this pass.
- Highlights lose subtle transitions or dark edges become unnaturally black: the adjustment may be pushing tones into clipping. Back off the sharpening rather than treating harder contrast as recovered detail.
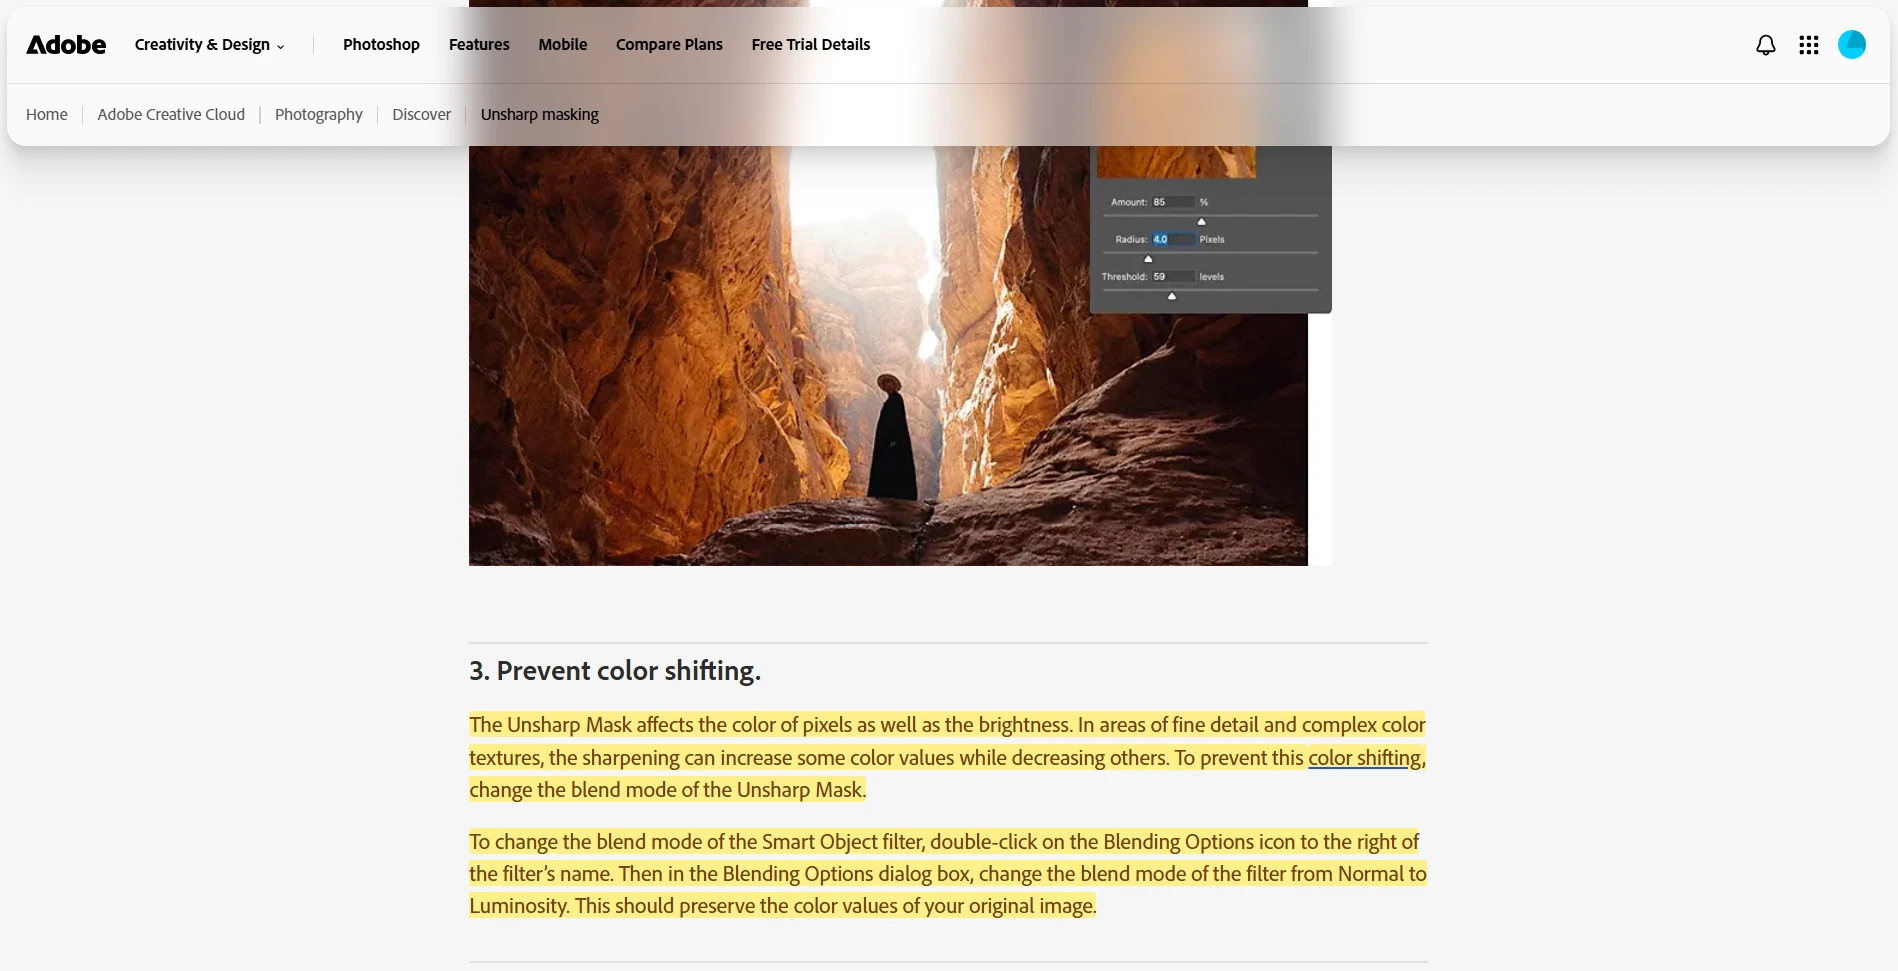
- Colored fringes become more noticeable: try applying the sharpening in Luminosity blending mode so its contribution is focused on brightness rather than color.
For the color issue, Adobe’s Unsharp Mask guide shows how to double-click the blending-options icon beside the Smart Filter and change its mode from Normal to Luminosity. This can help with color shifts; it does not cure excessive halos or brightness clipping.
If noise is the underlying problem, address it before the final sharpening pass. Adobe’s instructions for reducing noise and JPEG artifacts are useful here. A higher Threshold may avoid amplifying some defects, but it is not a replacement for cleaning them up.
7. Sharpen for the version people will actually see
Radius is measured in pixels, which makes the delivered image’s dimensions important.
A 2-pixel Radius is 0.2% of a 1000-pixel image’s longest edge, but only 0.05% of a 4000-pixel image’s longest edge. That does not establish an ideal setting; it shows why identical pixel values can have different relative scales.
For final output sharpening, establish the delivery dimensions before making your finishing decision. A practical sequence is to complete the main edits, address noise, prepare the required pixel dimensions, apply the final sharpening, and inspect the exported result.
This does not mean all sharpening must wait until the end. Capture sharpening and creative sharpening can occur earlier. The important distinction is that a final output pass should be judged for the actual output. Adobe’s lesson on capture and output sharpening explains that separation.
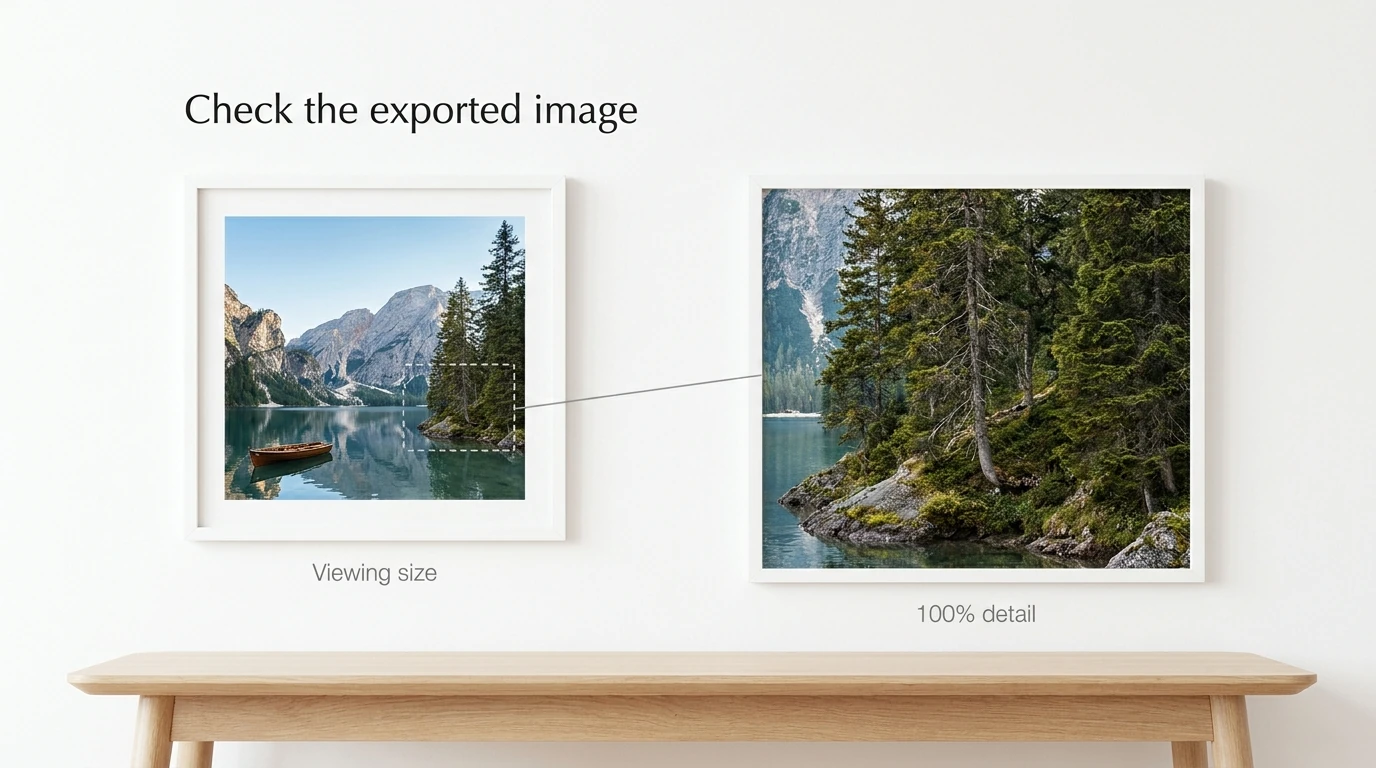
For screen delivery, inspect both at 100% and at the size people will normally view the image. For print, make a proof at the intended size when the result matters. A setting that looks attractive in a large on-screen preview is not automatically right for every print size or paper.
Also inspect the saved file, not just the working document. Your sharpening decision belongs to the finished image, including whatever happens during export and delivery.
8. Know when Smart Sharpen is the better next test
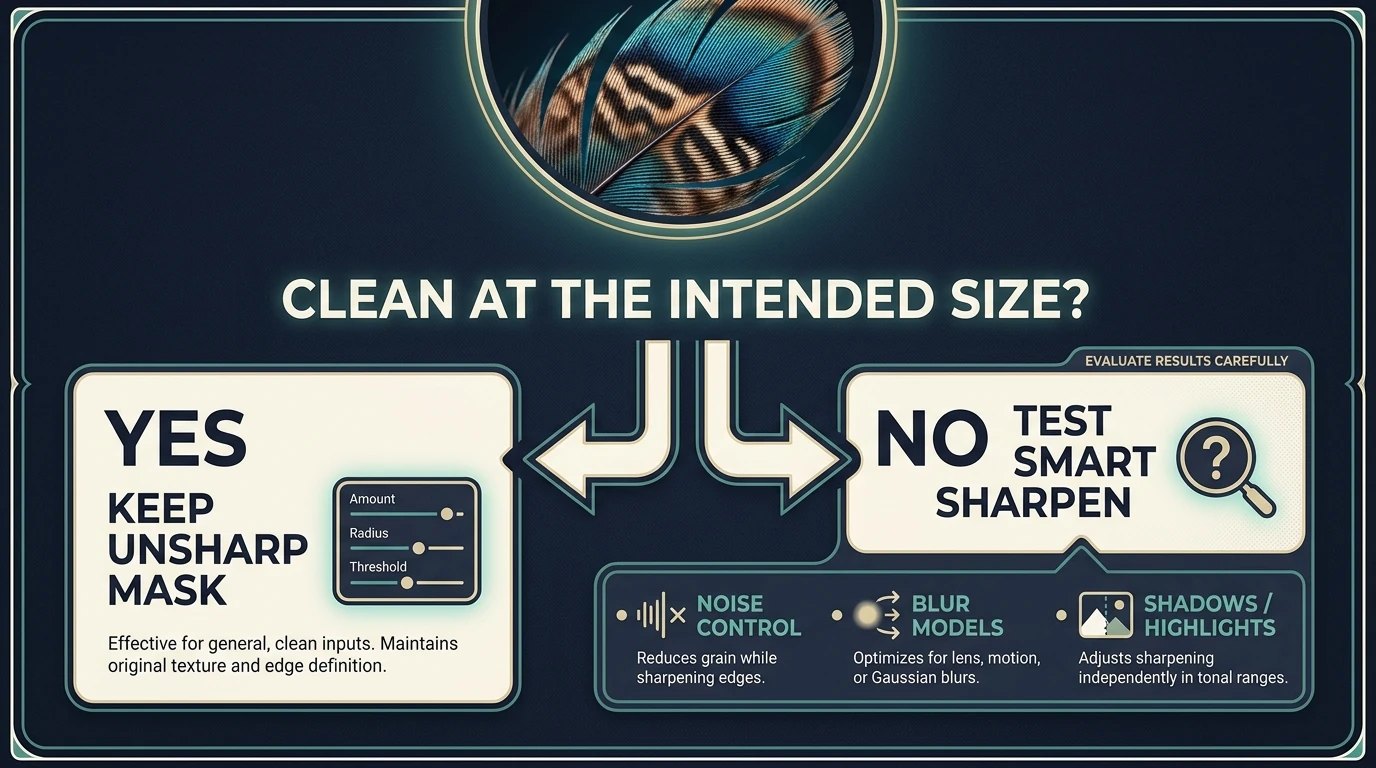
Unsharp Mask is useful when you want a direct, understandable edge-contrast adjustment with three controls. You do not need a more complicated tool simply because one exists.
However, if its controls cannot produce the balance you need, Photoshop’s Smart Sharpen is worth testing. It adds Reduce Noise and a choice of Gaussian Blur, Lens Blur, or Motion Blur removal models. Lens Blur can provide finer sharpening with fewer halos, while Motion Blur offers a directional approach to suitable blur.
Smart Sharpen also provides shadow and highlight controls, giving you more ways to manage the treatment in different tonal regions.
The practical distinction is control, not a guarantee that one filter always wins. If Unsharp Mask produces clean detail without objectionable artifacts, it has done its job. If the remaining problem requires noise handling, tonal adjustment, or a different blur model, Smart Sharpen gives you additional variables to test.
Neither filter should be judged by how far its sliders can be pushed. Judge the result against the original at the intended viewing size.
9. Turn a tested Unsharp Mask recipe into a folder-wide workflow
Once you have found a suitable treatment, the problem changes. Choosing settings may take careful inspection; repeating those settings across dozens or hundreds of comparable images should not require the same manual setup every time.
Bulk Image Sharpener: Automated Sharpening is a Photoshop plugin that automates that repetition. Select a source folder, choose Unsharp Mask, enter Amount, Radius, and Threshold, configure the export destination and format, and run the batch. It applies Photoshop’s sharpening operation and creates separate output files while leaving the original source files unsaved and unchanged.
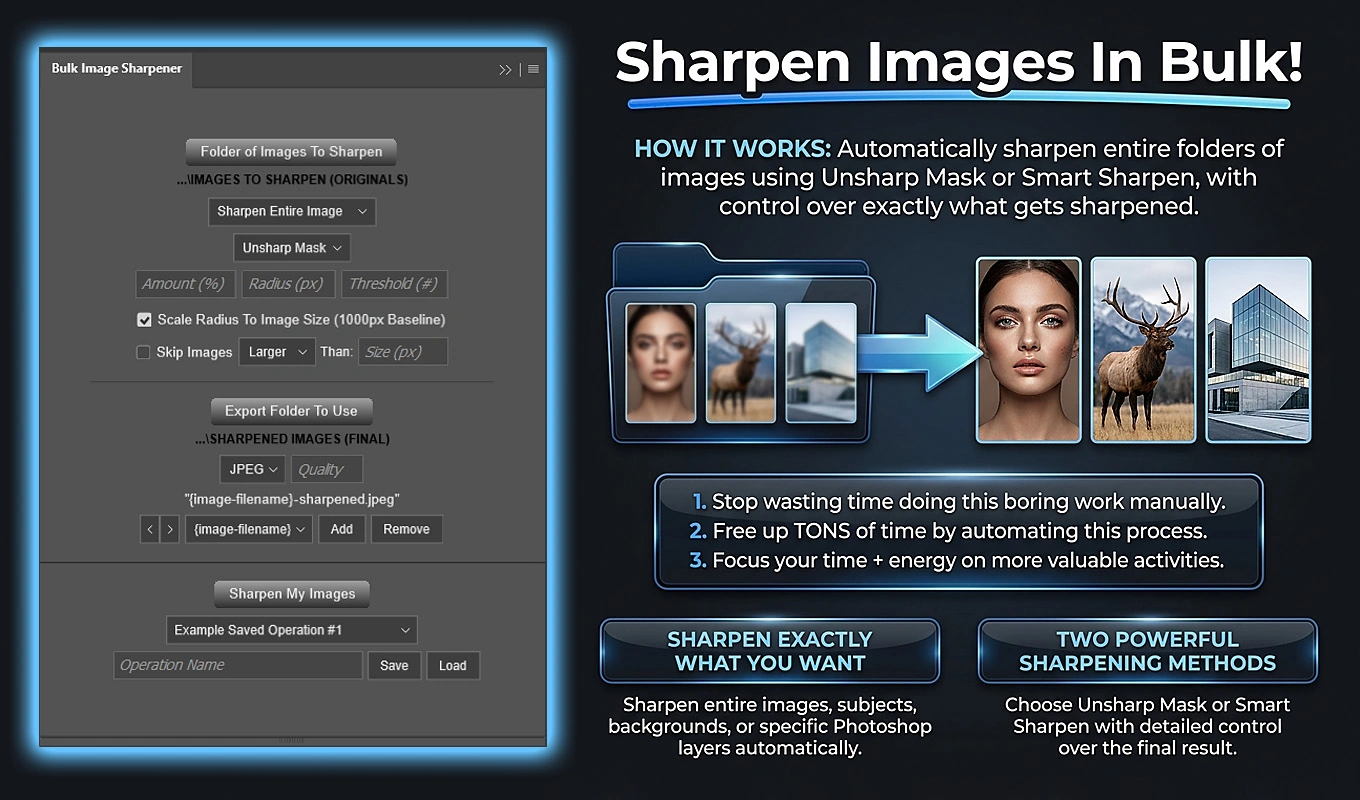
Two capabilities connect particularly well to the decisions discussed above.

Targeting is separate from Threshold
The plugin can sharpen the entire image, the Photoshop-detected subject, the detected background, a specifically named layer, or a layer identified by its position in the stack. Subject and background targeting use Photoshop Select Subject.
This is a different kind of selectivity from Threshold. Threshold responds to tonal differences; subject targeting responds to a selected image region. For a portrait workflow, choosing where the sharpening belongs may be more useful than raising Threshold until both background texture and delicate facial detail stop receiving the effect.
Radius can scale with image dimensions
The optional Scale Radius To Image Size setting uses a 1000-pixel longest-edge baseline:
Applied Radius = configured Radius × (document longest edge ÷ 1000)
For example, a configured Radius of 0.6 pixels becomes 0.6 pixels on a 1000-pixel image, 1.2 pixels on a 2000-pixel image, and 2.4 pixels on a 4000-pixel image. With Unsharp Mask, Amount and Threshold remain unchanged.
This is useful for differently sized versions of comparable imagery because it scales the geometry of the adjustment rather than applying one fixed pixel radius everywhere. It does not decide whether unrelated images need the same sharpening treatment.
Before processing a full folder, test representative files: a clean image, a noisy one, an image with fine texture, and one with strong light-dark boundaries. Group substantially different material into separate workflows where necessary. Once a configuration works, save it as a reusable operation rather than rebuilding it for every batch.
Whether you sharpen one photograph or a whole folder, the underlying decision stays the same: strengthen useful edge contrast at an appropriate scale, without allowing the added contrast to become more noticeable than the detail itself.